 Web Forms
Overview
Marigold Engage+ offers several different ways to bring data into the platform and load it into your marketing database. Data can be imported in a manual process through a file import (see Imports for more details), or by way of an FTP automated process (see FTP Import Templates for more details). You can manually edit or enter records one at a time using the Record Lookup screen. Data can also be submitted to the platform through an API Post, or through Web Forms and Web Events. The best import method should be indicated by your business requirements and marketing strategy. If you have any questions about which import method best meets your needs, please speak with your Client Services Representative.
Note: Using the Web Forms feature of Messaging requires a strong working knowledge of HTML and JavaScript, as well as some experience using XSL.
The Web Form screens walks you through the process of building a consumer-facing web form that can be used for a variety of purposes, such as:
-
Collecting consumer information
-
Managing consumer opt-out preferences
-
Sharing a message
Web Forms can also be used to trigger an Event-based Campaign. For example, if a consumer uses your Web Form to subscribe to your email newsletter, you could trigger the deployment of a Campaign that sends a "Welcome" message.
The platform supports two different data sources for building Web Forms -- the Messaging database, and the Engagement Data Platform (EDP). The Engagement Data Platform is the data layer that powers and unifies Cheetah Digital's Customer Engagement Suite (CES). The EDP empowers marketers to load and transform data from any source, at high volumes, and then to leverage that data to create lasting customer relationships across all engagement channels. These two options are described below in more detail.
Messaging supports the use of Google's reCAPTCHA API 2.0 as a validation mechanism. ReCAPTCHA is intended to distinguish between human users and automated spam or "bots." Cheetah Digital strongly recommends the use of reCAPTCHA for all Web Forms in order to protect against automated abuse. ReCAPTCHA requires an API "key pair" for the domain/subdomain that hosts the Web Form. Cheetah Digital can generate these key pairs using its Google account, or you may supply your own keys. In either case, the hosting domain and key pairs used for your Web Forms must be added to the Messaging platform by a Client Services Representative. If you have any questions about this process, please speak with your Representative. More information about reCAPTCHA can be found on Google's developer site.
Pre-Filling Forms
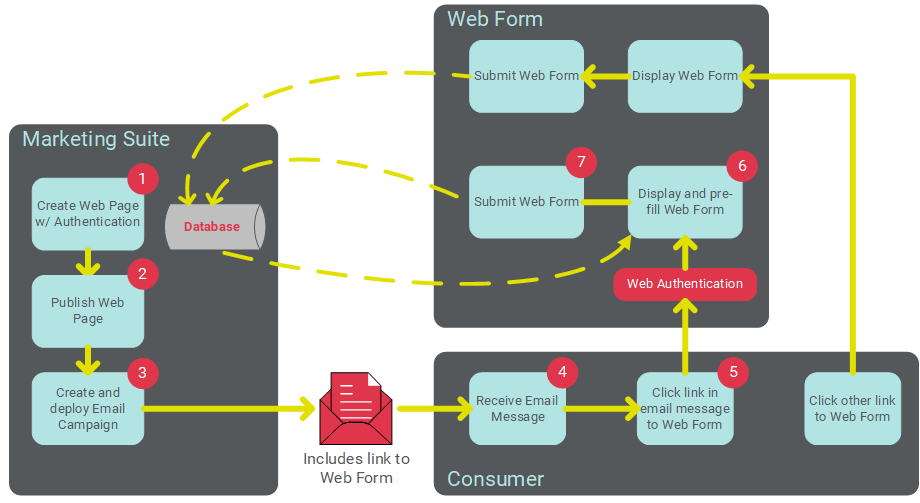
Web Forms can optionally be built with a Web Authentication in order to validate the consumer's identity when he or she lands on the Web Form. A Web Authentication contains the field (or fields) that you want to use to uniquely identify the consumer. Once the consumer's identify is verified, the Web Form can look that person up in the Messaging database, and pre-fill selected fields in the Form. For example, if you built a Form to gather consumer contact information, and you already had the viewer's postal address, you could pre-fill those postal address fields in the Form, thereby saving the viewer from having to re-enter that information.
To pre-fill the Form, the Web Authentication fields and values must be passed along in the URL by means of a query string. A common use case for this feature is to send this URL as part of an Email or SMS Text Campaign message.
The following diagram depicts this process of using a Web Form in conjunction with an Email Campaign. The email message contains a link to the Web Form. When the customer clicks this link, the URL passes the necessary identifying information, validates the consumer's identity, and pre-fills the Form. Consumers who access the Web Form through some other means, such as a link from your corporate website, will not use the Web Authentication, so the Form will not be pre-filled.
Personalized URLs
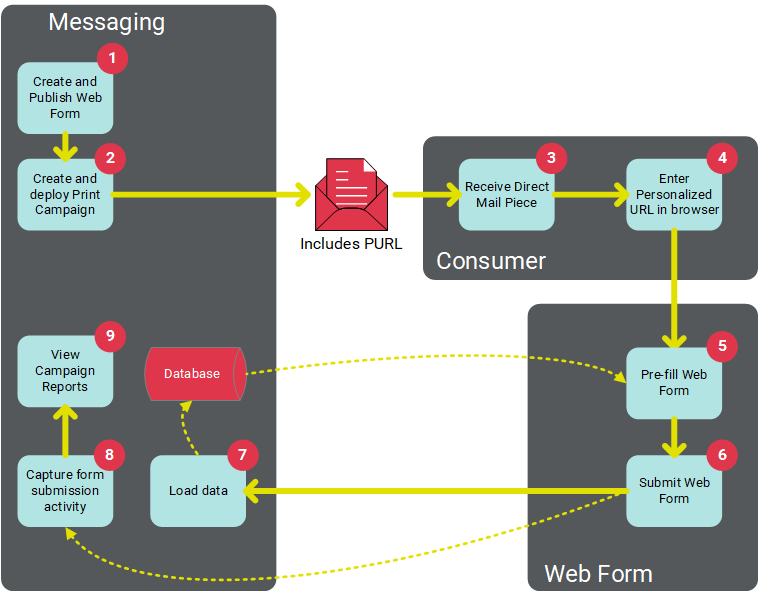
Web Forms can be used in conjunction with a Personalized URL (PURL). A PURL uses personalization values to create a unique URL for each recipient of your marketing Campaign (for example: "www.cheetahdigital.com/JohnSmith"). A PURL can be generated in the platform using any field, or fields, in a selected source table. PURLs add a personalized touch to your marketing strategy with the goal of being easier to remember, and garnering more attention from consumers. As an example, PURLs are often used to increase results from Print Campaigns. On the direct mail piece, you can print a Personalized URL that contains the consumer's name, and encourage the recipient to browse to this URL. Personalized URLs also allow for the ability to pre-fill the Web Form (similar in concept to a Web Authentication).
The following diagram depicts the process of using a Web Form with a PURL in conjunction with a Print Campaign.
Before using PURLs in your marketing Campaigns, the following steps must be completed:
-
Domain: You must have a web domain in place that you want to use for the Personalized URL.
-
Table: The source Table must be defined within your Messaging database. See Tables for more details on this process.
-
PURL Field: The source Table must have a "PURL Field" defined. A PURL Field is a special field that's populated based on the values in one or more other fields. For example, you could define a PURL Field that's composed of "First Name" and "Last Name" fields. See PURL Domains for more details on this process.
-
PURL Domain: You must have a "PURL Domain," which binds the PURL Field to your web domain. See PURL Domains for more details on this process.
-
Web Form: You must create a Web Form, and bind the PURL Domain to that Web Form. This Web Form contains the content of the web page that the user will see when he or she navigates to the Personalized URL. See "Create a New Web Form" below for more details on this process.
-
Campaign: The Web Form containing the PURL must be bound to the Campaign, which also causes the platform to populate the PURL Field you defined above. In addition, you typically want to add the PURL somewhere within the Campaign content, in order to communicate the PURL value to each recipient of your Campaign message (see "Add a Web Form Link to a Campaign" below for more details).
Web Form Methods
Messaging offers three different methods of building Web Forms, each with their own unique features and intended use cases.
-
Web Forms: The Web Forms screen allows you to build a Web Form with the primary intent of collecting information from a consumer. The Form is hosted on the Messaging platform. The data collected from the consumer is sent via an HTTP(S) request, parsed, and loaded to the database. This method supports the use of Web Authentications to verify the consumer's identify for the purposes of pre-filling fields in the Form (described above in more detail). Web Forms also support Personalized URLs (see above for more details), confirmation pages, and exception notifications. In addition, the submission of a Web Form can be used to trigger the deployment of a Campaign.
-
Web Page with a Web Form: The Web Page screen allows you to add a simple data entry Web Form to the Page. Web Pages with Forms are treated much like a "channel," and they support the use of dynamic content and personalized content. Data collected from a Web Page with Form is sent via an HTTP(S) request, parsed, and loaded to the database. Web Pages with Forms support the use of Web Authentications to verify the consumer's identify for the purposes of calculating dynamic content and pre-filling fields in the Form. Web Pages with Forms support link tracking for reporting purposes, as well as the use of a confirmation page. Web Pages with Forms do not support Personalized URLs or exception notifications. In addition, the submission of a Web Page-based Form can't be used to trigger the deployment of a Campaign. See Web Pages for more details.
-
HTTP POST API: With this method, the web form is built and hosted on an external site, such as the client's website, or some other third party site. The API endpoint serves as the mechanism to transmit consumer-entered data from the form to Messaging. Data collected from the form is sent via an HTTP(S) request, parsed, and loaded to the database. See HTTP POST for more details.
Access
The Web Forms screen is accessible by the following method:
-
From the Main menu, select Production > Web Forms.
Web Forms -- Messaging
The steps for creating a new Web Form that uses Messaging as its data source are described below.
|
Web Forms can either be created through the Messaging user interface, or uploaded into the platform (see New Item: Create a New Web Form for details on that process). To create a new Web Form through the user interface, that uses Messaging as the data source:
Note: You can never modify this source table after the Web Form is created.
|
|
The Data Options section is used to define various configuration options about your Web Form.
Note: If using SSL encryption, you'll need to purchase an SSL certification and provide it to Cheetah Digital so it can be loaded on our server. Also, you'll need to make sure that all URL paths for images and form calls are set to use HTTPS. Please speak to your Customer Service Representative for more details.
Note: The Sanitize Data Fields option is enabled by default in all new Web Forms created after release 21.10 (October 2021) of Cheetah Messaging. All Web Forms created prior to this release will have this feature disabled by default. You can optionally enable the feature in older forms, or you can choose to encode specific fields by attacking the suffix " safe" (with a space) to the field name. For example: "email safe." Cheetah Digital's best practice is to enable this feature, but please note that enabling the feature in older Web Forms may cause changes to the format of field content, so be sure to test the Form after enabling this feature.
The "Simple" mapping option allows you to select one or more fields on the Web Form's source table.
The "Advanced" option lets you pick an existing Data Map to use when bringing data in through the Web Form. Data Maps provide more sophisticated import options.
If the Web Form doesn't contain the Unique Identifier field for the Source Table, then you must use the Soft Match feature in order to successfully load the data. The Soft Match lets you match to the database using any fields with a Data Type of "Email," "Phone," "Twitter," or "Push Registration ID." For example, let's say the Unique ID on your "Recipient" table is "Member ID," but you don't collect Member ID data in your Web Form. You could instead select some other field, such as "Email Address," that contains unique data, and match on that instead. If the soft-matched value in the Web Form matches an existing value in the database, then the platform will make the update to that record in the database. If the soft-matched value does not already exist in the database, the platform creates a "temporary" record. This temporary record can later be merged with a full record that contains the Unique Identifier. If you're using the Soft Match feature, you still must add the Source Table's Unique Identifier field (or fields) to the Web Form, even if you're not actually intending on providing the Unique ID fields on the inbound data. The Unique ID must be part of the Web Form in order to save the Web Form; you don't need to actually include this field (or fields) when you bring data into the system. Define a Soft MatchDefine a Soft Match
Note: If you run a Calculated Field as part of a Web Form, the system derives and populates that field only for the record in the Web Form. Conversely, if you set up a Calculated Field schedule, the system derives and populates the field for every record in the table (see Tables for more details).
Note: Messaging is not a fully-featured Web Form creation tool. The sample code generated by the platform is generic code that can be used as a reference for creating the actual Web Form, or as a base when creating the Web Form in some other third-party editing software. |
|
The Form Content section allows you to enter the actual content of your Web Form, as either HTML or XSL code. XSL provides more advanced functionality than basic HTML, such as pre-populating check boxes and radio buttons, for example (see "Sample XSL Web Form" below for more details).
|
|
Engage+ allows you to define email alerts if the contents of your form surpass certain thresholds for a selected import metric or exception. The Notifications section is displayed only if you placed a check mark in the "Import Exceptions" check box (note: this is an optional feature that must be enabled within your account in order to be available for selection).
Note: If you want to delete an existing Template, select it from the "Template" drop-down menu, then click delete.
Note: You must check at least one of the above check boxes.
|
|
The Confirmation section is used to configure the page to which the consumer is directed once they successfully submit the Web Form. You can also define the confirmation page using the "cp" parameter within the Web Form code. For example: <input type="hidden" name="cp" value="http://www.cheetahdigital.com" /> Note: Optionally, you can choose to NOT define a confirmation page, which allows for the ability to use JavaScript or XSL to set the confirmation page dynamically depending on user input, or on already existing data pre-filled from the database or passed in the URL query string. See "Sample XSL Web Form" below for more details on dynamically selecting the confirmation page. To define the confirmation page:
Externally-hosted web pageExternally-hosted web page To display a web page that's hosted externally to the Messaging platform:
Another Web FormAnother Web Form To display another Web Form (typically used for Multi-Forms):
Enter web page contentEnter web page content To display a web page that's hosted by Messaging:
If your Web Form is finished, the next step is to publish it. See "Publish a Web Form" below for more details on this process. |
|
The Form Schedule section provides several options for disabling, or expiring, this Web Form, either based on the number of submissions received, or based on a schedule.
Note: Be careful when testing Web Form submissions, as the test submissions count toward both of the above thresholds. If you're testing a link to your Web Form from an email message, the platform will count Web Form submissions from your email "proof" recipients, as if they were actual, live email recipients.
Note: If using the schedule feature, when you publish your Web Form, it won't yet be available to users until the schedule's start date. If a user attempts to access the Form prior to the start date, a generic error message is displayed.
If your Web Form is finished, the next step is to publish it. See "Publish a Web Form" below for more details on this process. |
|
If you defined an end date for the Web Form in the Form Schedule section above, the Expiration section allows you to define the content that gets displayed to the recipient if they attempt to access an expired Web Form. To define the expiration content:
Externally-hosted web pageExternally-hosted web page To display a web page that's hosted externally to the Messaging platform:
Another Web FormAnother Web Form To display another Web Form (typically used for Multi-Forms):
Enter web page contentEnter web page content To display a web page that's hosted by Messaging:
If your Web Form is finished, the next step is to publish it. See "Publish a Web Form" below for more details on this process. |
|
Messaging provides the ability to generate Personalized URLs (PURLs) for a Web Form. PURLs can be used to make the call-to-action for any landing page or form much more personalized to the viewer, and allows for the ability to pre-fill the viewer's data just by going to the PURL in his or her browser (similar in concept to a Web Authentication). To assign a PURL Domain to your Web Form:
In order to use the PURL, this Web Form must be bound to a Campaign. If your Web Form is finished, the next step is to publish it. See "Publish a Web Form" below for more details on this process. |
Web Forms -- Engagement Data Platform
The steps for creating a new Web Form that uses EDP as its data source are described below
|
For Web Forms that use the Engagement Data Platform (EDP) as the data source, the platform uses the Member ID as the lookup value instead of the Email Address. This feature is mainly intended for clients who have Business Units defined in EDP, since a recipient could use the same email address across multiple Business Units, or have a shared email address with multiple Member IDs. The platform will extract the Member ID from the EDP tracking parameters, and use it as the lookup value. To create a new Web Form through the user interface that uses the Engagement Data Platform as the data source:
|
|
The Data Options section is used to define various configuration options about your Web Form.
Note: If using SSL encryption, you'll need to purchase an SSL certification and provide it to Cheetah Digital so it can be loaded on our server. Also, you'll need to make sure that all URL paths for images and form calls are set to use HTTPS. Please speak to your Customer Service Representative for more details.
Note: The Sanitize Data Fields option is enabled by default in all new Web Forms created after release 21.10 (October 2021) of Cheetah Messaging. All Web Forms created prior to this release will have this feature disabled by default. You can optionally enable the feature in older forms, or you can choose to encode specific fields by attacking the suffix " safe" (with a space) to the field name. For example: "email safe." Cheetah Digital's best practice is to enable this feature, but please note that enabling the feature in older Web Forms may cause changes to the format of field content, so be sure to test the Form after enabling this feature.
Note: If the platform encounters an error during the record update, the recipient does not have visibility into the failure. The error is added to the Messaging logs. Please speak to your Services Representative for more information.
Note: Messaging is not a fully-featured Web Form creation tool. The sample code generated by the platform is generic code that can be used as a reference for creating the actual Web Form, or as a base when creating the Web Form in some other third-party editing software.
|
|
The Form Content section allows you to enter the actual content of your Web Form, as either HTML or XSL code. XSL provides more advanced functionality than basic HTML, such as pre-populating check boxes and radio buttons, for example (see "Sample XSL Web Form" below for more details).
|
|
The Confirmation section is used to configure the page to which the consumer is directed once they have successfully submitted the Web Form. You can also define the confirmation page using the "cp" parameter within the Web Form code. For example: <input type="hidden" name="cp" value="http://www.cheetahdigital.com" /> Note: Optionally, you can choose to NOT define a confirmation page, which allows for the ability to use JavaScript or XSL to set the confirmation page dynamically depending on user input, or on already existing data pre-filled from the database or passed in the URL query string. See "Sample XSL Web Form" below for more details on dynamically selecting the confirmation page. To define the confirmation page:
Externally-hosted web pageExternally-hosted web page
Another Web FormAnother Web Form
Enter web page contentEnter web page content
If your Web Form is finished, the next step is to publish it. See "Publish a Web Form" below for more details on this process. |
|
The Form Schedule section provides several options for disabling, or expiring, this Web Form, either based on the number of submissions received, or based on a schedule.
Note: Be careful when testing Web Form submissions, as the test submissions count toward both of the above thresholds. If you're testing a link to your Web Form from an email message, the platform will count Web Form submissions from your email "proof" recipients, as if they were actual, live email recipients.
Note: If using the schedule feature, when you publish your Web Form, it won't yet be available to users until the schedule's start date. If a user attempts to access the Form prior to the start date, a generic error message is displayed.
If your Web Form is finished, the next step is to publish it. See "Publish a Web Form" below for more details on this process. |
|
If you defined an end date for the Web Form in the Form Schedule section above, the Expiration section allows you to define the content that gets displayed to the recipient if they attempt to access an expired Web Form. To define the expiration content:
Externally-hosted web pageExternally-hosted web page
To display a web page that's hosted externally to the Messaging platform:
Another Web FormAnother Web Form
To display another Web Form (typically used for Multi-Forms):
Enter web page contentEnter web page content
To display a web page that's hosted by Messaging:
If your Web Form is finished, the next step is to publish it. See "Publish a Web Form" below for more details on this process. |
Other Features
This section describes additional features related to managing your Web Forms.
|
To copy an existing item to use as the basis for a new item:
|
|
After you've created the Web Form to your satisfaction, you must publish it to make it accessible to your customers. To publish your Web Form:
|
|
After you've created and published a Web Form, you can provide the URL to the Web Form through another marketing channel, such as an Email message, SMS Text message, or Push Notification. To add a Web Form to a Campaign message:
Note: Web Forms have to be created using the same source table as the Campaign in order for them to be available as a selection.
Note: If you're using a Web Form in conjunction with a Personalized URL (PURL), the Web Form containing the PURL must be bound to the Campaign, which also causes the platform to populate the PURL Field.
|
|
To view or edit an existing Web Form:
Note: If you're using the "Maximum submission" counters for this Web Form, republishing the Form will reset all counters back to "0." |
|
To delete an item:
Foldered items are moved to the Recycle Bin. Non-foldered items are permanently deleted.
|
|
This section describes a sample Web Form built using XSL. Web Forms can also be built in HTML, but XSL provides some additional functionality. Form Content
<?xml version="1.0" encoding="utf-8"?> <xsl:stylesheet version="1.0" xmlns:xsl="http://www.w3.org/1999/XSL/Transform"> <xsl:output method="html" encoding="UTF-8" indent="yes" omit-xml-declaration="yes" /> <xsl:template match="/">
</xsl:template> </xsl:stylesheet>
<xsl:template name="GetParam"> <xsl:param name="prop_name" /> <xsl:choose> <xsl:when test="/FormData/Props/Prop[@name=$prop_name]/@val != ''"> <xsl:value-of select="/FormData/Props/Prop[@name=$prop_name]/@val" /> </xsl:when> <xsl:when test="/FormData/RequestParams/RequestParam[@name=$prop_name]/@val != ''"> <xsl:value-of select="/FormData/RequestParams/RequestParam[@name=$prop_name]/@val" /> </xsl:when> <xsl:otherwise></xsl:otherwise> </xsl:choose> </xsl:template> This can be used along with XSL variables to easily access property data: <!-- Declare and Set the Variable Name --> <xsl:variable name="name_first"> <xsl:call-template name="GetParam"> <xsl:with-param name="prop_name">name_first</xsl:with-param> </xsl:call-template> </xsl:variable>
<!-- First Name Form Input Field --> <xsl:element name="input"> <xsl:attribute name="type">hidden</xsl:attribute> <xsl:attribute name="name">s_name_first</xsl:attribute> <xsl:attribute name="value"> <xsl:value-of select="$name_first" /> </xsl:attribute> </xsl:element>
Messaging Hosted Forms: <form name="Subscribe" method="post" action="go.aspx">
Customer or third-party hosted forms: <form name="Subscribe" method="post" action="http://ats.eccmp.com/ats/post.aspx">
<xsl:element name="input"> <xsl:attribute name="type">hidden</xsl:attribute> <xsl:attribute name="name">sb</xsl:attribute> <xsl:attribute name="value"> <xsl:value-of select="/FormData/Submission/@submission_id" /> </xsl:attribute> </xsl:element> <xsl:element name="input"> <xsl:attribute name="type">hidden</xsl:attribute> <xsl:attribute name="name">cr</xsl:attribute> <xsl:attribute name="value"> <xsl:value-of select="/FormData/Submission/@cust_id" /> </xsl:attribute> </xsl:element> <xsl:element name="input"> <xsl:attribute name="type">hidden</xsl:attribute> <xsl:attribute name="name">fm</xsl:attribute> <xsl:attribute name="value"> <xsl:value-of select="/FormData/Submission/@form_id" /> </xsl:attribute> </xsl:element> <xsl:element name="input"> <xsl:attribute name="type">hidden</xsl:attribute> <xsl:attribute name="name">ri</xsl:attribute> <xsl:attribute name="value"> <xsl:value-of select="/FormData/SubmissionRecip/@recip_id" /> </xsl:attribute> </xsl:element> <xsl:element name="input"> <xsl:attribute name="type">hidden</xsl:attribute> <xsl:attribute name="name">rk</xsl:attribute> <xsl:attribute name="value"> <xsl:value-of select="/FormData/SubmissionRecip/@recip_key" /> </xsl:attribute> </xsl:element> <xsl:element name="input"> <xsl:attribute name="type">hidden</xsl:attribute> <xsl:attribute name="name">cn</xsl:attribute> <xsl:attribute name="value"> <xsl:value-of select="/FormData/RequestParams/RequestParam[@name='cn']/@val" /> </xsl:attribute> </xsl:element> <xsl:element name="input"> <xsl:attribute name="type">hidden</xsl:attribute> <xsl:attribute name="name">mg</xsl:attribute> <xsl:attribute name="value"> <xsl:value-of select="/FormData/RequestParams/RequestParam[@name='mg']/@val" /> </xsl:attribute> </xsl:element>
Optional Hidden Input Fields: <!-- Hidden Confirmation URL Field - useful for dynamic thank you pages --> <xsl:element name="input"> <xsl:attribute name="type">hidden</xsl:attribute> <xsl:attribute name="name">cp</xsl:attribute> <xsl:attribute name="value"></xsl:attribute> </xsl:element>
Creating Your Own XSL CodeThis section provides some basic rules of XSL coding.
<img src="picture.gif" /> or <input type="text" value="s_name_first" />
Correct method: <b><i>This sentence is emphasized. </i></b>
Incorrect method: <b><i>This sentence is emphasized.</b></i>
Correct method: <table border="0" cellspacing="0" cellpadding="0">
Incorrect method: <table border=0 cellspacing=0 cellpadding=0>
<xsl:variable name="name_first"><xsl:call-template name="GetParam"><xsl:with-param name="prop_name">name_first</xsl:with-param></xsl:call-template></xsl:variable> <input type="text"> <xsl:attribute name="id">s_name_first</xsl:attribute> <xsl:attribute name="name">s_name_first</xsl:attribute> <xsl:attribute name="value"><xsl:value-of select="$name_first" /></xsl:attribute> </input>
Note: If pre-fill is not necessary, use the same HTML input tags, but with a backslash before the closing brackets to end the code. <input type="text" value="s_name_first" size="20" maxlength="75" />
<p>Yes! Please keep me informed with the monthly newsletter.</p> <input type="radio"> <xsl:attribute name="name">i_newsletter_flag</xsl:attribute> <xsl:attribute name="id">i_newsletter_flag</xsl:attribute> <xsl:attribute name="value">1</xsl:attribute> <xsl:if test="$newsletter_flag='1'"> <xsl:attribute name="checked">checked</xsl:attribute> </xsl:if> </input> <p>No, Maybe later.</p> <input type="radio"> <xsl:attribute name="name">i_newsletter_flag</xsl:attribute> <xsl:attribute name="id">i_newsletter_flag</xsl:attribute> <xsl:attribute name="value">0</xsl:attribute> <xsl:if test="$newsletter_flag='0'"> <xsl:attribute name="checked">checked</xsl:attribute> </xsl:if> </input>
<xsl:variable name="newsletter_flag"> <xsl:call-template name="GetParam"> <xsl:with-param name="prop_name">newsletter_flag</xsl:with-param> </xsl:call-template> </xsl:variable>
<xsl:element name="input"> <xsl:attribute name="type">checkbox</xsl:attribute> <xsl:attribute name="name">i_newsletter_flag</xsl:attribute> <xsl:attribute name="id">i_newsletter_flag</xsl:attribute> <xsl:attribute name="value"><xsl:value-of select="$newsletter_flag"/></xsl:attribute> <xsl:attribute name="onClick">if(this.checked) {this.form.s_newsletter_flag.value = '1';} else {this.form.s_newsletter_flag.value = '0';}</xsl:attribute> <xsl:if test="$newsletter_flag='1'"> <xsl:attribute name="checked">checked</xsl:attribute> </xsl:if> </xsl:element>
<xsl:element name="input"> <xsl:attribute name="type">hidden</xsl:attribute> <xsl:attribute name="name">s_newsletter_flag</xsl:attribute> <xsl:choose> <xsl:when test="not($newsletter_flag)"> <xsl:attribute name="value">0</xsl:attribute> </xsl:when> <xsl:otherwise> <xsl:attribute name="value"> <xsl:value-of select="$newsletter_flag"/> </xsl:attribute> </xsl:otherwise> </xsl:choose> </xsl:element> Note: In order to the have the check box work correctly and as a true preference value, JavaScript must be used in order to set the value of the hidden property field. In the sample above, we are using the JavaScript below to set the hidden input “s_newsletter_flag” value when the displayed input “i_newsletter_flag” is checked by the user. <xsl:attribute name="onClick">if(this.checked) {this.form.s_newsletter_flag.value = '1';} else {this.form.s_newsletter_flag.value = '0';}</xsl:attribute>
<!-- Declare the variable bsst --> <xsl:variable name="bsst"> <xsl:call-template name="GetParam"> <xsl:with-param name="prop_name">business_state</xsl:with-param> </xsl:call-template> </xsl:variable>
<select name="m_business_state" id="m_business_state" size="1"> <xsl:element name="option"><xsl:attribute name="value"></xsl:attribute><xsl:if test="not($bsst)"> <xsl:attribute name="selected">selected</xsl:attribute></xsl:if>Select a State</xsl:element> <xsl:element name="option"><xsl:attribute name="value">AL</xsl:attribute><xsl:if test="contains($bsst,'AL')"> <xsl:attribute name="selected">selected</xsl:attribute></xsl:if>Alabama</xsl:element> <xsl:element name="option"><xsl:attribute name="value">AK</xsl:attribute><xsl:if test="contains($bsst,'AK')"> <xsl:attribute name="selected">selected</xsl:attribute></xsl:if>Alaska</xsl:element> <xsl:element name="option"><xsl:attribute name="value">AZ</xsl:attribute><xsl:if test="contains($bsst,'AZ')"> <xsl:attribute name="selected">selected</xsl:attribute></xsl:if>Arizona</xsl:element> ... </select>
<xsl:variable name="comments"><xsl:call-template name="GetParam"><xsl:with-param name="prop_name">comments</xsl:with-param></xsl:call-template></xsl:variable> <input type="textarea"> <xsl:attribute name="id">s_comments</xsl:attribute> <xsl:attribute name="name">s_comments</xsl:attribute> <xsl:attribute name="rows">5</xsl:attribute> <xsl:attribute name="cols">40</xsl:attribute> <xsl:attribute name="value"><xsl:value-of select="$comments" /></xsl:attribute> </input>
<xsl:text disable-output-escaping="yes"><![CDATA[ <SCRIPT LANGUAGE="JavaScript"> // <!-- hide script contents from ancient browsers that don't support JavaScript CODE IS HERE // end hiding contents from old browsers --> </SCRIPT> ]]></xsl:text> Note: For best performance and ease of use, we recommend that you put all JavaScript and Style sheet code into a .js or .css file and reference it in the header like this: <link rel="stylesheet" href=" http://__________/Style.css" type="text/css"/> <script language="JavaScript" src=" http://__________.js /validate.js"></script>
Dynamically Displaying a Confirmation PageThe "Confirmation" section of the Web Form detail screen is used to configure the page to which the viewer is directed once he or she has successfully submitted the Web Form. Optionally, you can choose to NOT define a confirmation page, which allows for the ability to use JavaScript or XSL to set the confirmation page dynamically depending on user input, or on already existing data pre-filled from the database or passed in the URL query string. HTML Sample: <input type="hidden" name="cp" value="http://_______"/>
XSL Sample: <!-- Declare the Variable Named "sourceID" --> <xsl:variable name="sourceID"><xsl:call-template name="GetParam"><xsl:with-param name="prop_name">sourceID</xsl:with-param></xsl:call-template></xsl:variable> <!-- Set the Confirmation Page based on the sourceID value passed in the URL String --> <input type="hidden"> <xsl:attribute name="name">cp</xsl:attribute> <xsl:choose> <xsl:when test="$sourceID = '1'"> <xsl:attribute name="value">http://www.google.com</xsl:attribute> </xsl:when> <xsl:when test="$sourceID = '2'"> <xsl:attribute name="value">http://www.yahoo.com</xsl:attribute> </xsl:when> <xsl:when test="$sourceID = '3'"> <xsl:attribute name="value">http://www.hotmail.com</xsl:attribute> </xsl:when> <xsl:when test="$sourceID = '4'"> <xsl:attribute name="value">http://www.aol.com</xsl:attribute> </xsl:when> <xsl:otherwise> <xsl:attribute name="value">http://www.conversen.com</xsl:attribute> </xsl:otherwise> </xsl:choose> </input> |
Troubleshooting
|
If your Web Form isn't unsubscribing consumers as expected, check the following:
If the problem persists, please contact Global Support for further assistance. |
Topic updated: November 2021