 Searching for an Item
Within Engage+, items fall into one of two general categories -- "foldered" and "non-foldered."
Foldered items, as the name implies, are stored within a user-configurable folder or sub-folder. When you create the item, you select a location where the item is to be stored. You can later move this item to a new location if needed (see Managing your Folder Structure for details on how to move an item). Foldered items tend to be the more complex types of items, such as Campaigns, Filters, and Content Blocks, for example. Foldered items can also be restored from the Recycle Bin if they're deleted.
Non-foldered items are always saved at the client account level, rather than within a specific folder or sub-folder. You don't select a location when you create one of these items, and they can't be restored if they're deleted. Non-foldered items tend to be simpler items, such as Seed Lists or Opt-Out Messages, for example.
Global Search
The Global Search option is available from the top-right corner of every screen, within the Admin Banner Bar.
The Global Search feature allows you to search across the entire platform for all items, of any item type (both foldered and non-foldered items), containing a specific text string in the item's display name.
To perform a global search:
-
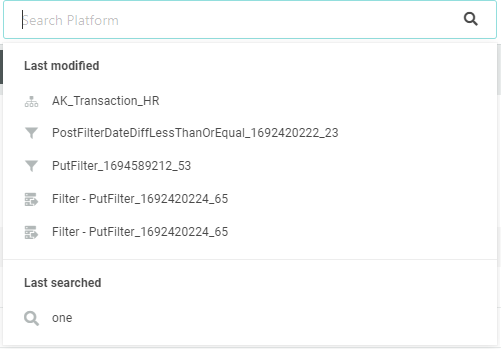
In the Global Search field, begin entering the desired text string. The platform displays the top results in a menu, weighted by recency. As you type additional characters, the platform refines these results. If you hover your mouse cursor over an item in the menu, the platform displays the last-modified date within a pop-up tool tip.
-
Also within the menu of search results, the platform displays the top item types that match your search, as well as counts for each. If you click on one of these item types, the platform opens the Search Results screen (see below for details), refined by the chosen item type.
-
To navigate directly to the item, select it from within the menu of search results.
-
Click Enter. The search results screen is displayed as a new tab in the Top Navigation Pane. This screen lists all of the items, of every item type, that contain your text string anywhere within the item name. This screen shows the item name, location, and last-modified date.
-
Optionally, you can refine your search results by Type, Modified Date or Tag.
-
Optionally, to open an item, click on the item name. The system opens the item in a new tab.
Last Searched and Modified
To see a list of your previously-used search terms or last modified items, simply click into the Search field without providing a search term. The platform displays a list of your recent search terms and last modified items, within a menu.
Search by ID
The platform supports several short cuts, designed to help you find a specific items based on one of the ID types used within Engage+.
-
Object Reference ID: Use the prefix "r:" followed by the ID value. The platform displays a list of items with this Object Reference ID, including the Campaign Cells (different items of different types can have the same Object Reference ID value).
-
Object ID: Use the prefix "o:" followed by the ID value. The platform opens the specified item.
-
Running Campaign ID: Use the prefix "c:" followed by the ID value. The platform opens the specified Campaign.
Search Results
For further search options, type in the desired text string and press Enter. The Search Results screen is displayed. The system also adds a new tab to the Top Navigation Pane; this tab uses the search string as its label, so you can easily navigate back to these Search Results.
The Search Results screen lists all of the items, of every item type, that contain your text string anywhere within the item's display name. This screen shows the item name, location, and last-modified date. Non-foldered items will show a location of "/My Files/."
-
By default, the search results are sorted by name in ascending order. You can optionally sort by Last Modified date as well, and you can toggle the sort order to either ascending or descending.
-
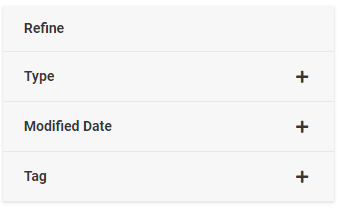
Optionally, to further refine the search results:
-
From the "Type" pane on the right, select one or more item types. The filter results are refreshed to show only the items of the selected type, or types.
-
From the "Modified Date" pane on the right, enter or select a date range. The filter results are refreshed to show only the items that have a last-modified date within the defined range.
-
From the "Tag" pane on the right, enter one or more Tags. The filter results are refreshed to show only the items assigned the select Tag value.
-
As you add search refinements, the system lists them near the top of the screen, above the search results. To remove a search refinement, click the "X" icon next to it. Or click clear all to remove all additional search refinements.
-
To view an item, click on its name. The system displays the details screen for that item. If the search results contain cell, clicking the result will open the cell’s tree with parent and children cells.
Foldered Items
When browsing for a foldered item within Engage+, you can either
-
Navigate to the Browse System screen, which allows you to browse for any foldered item.
-
Navigate to the browse folder screen for the desired item type (such as the Campaigns screen or the Filters screen, for example).
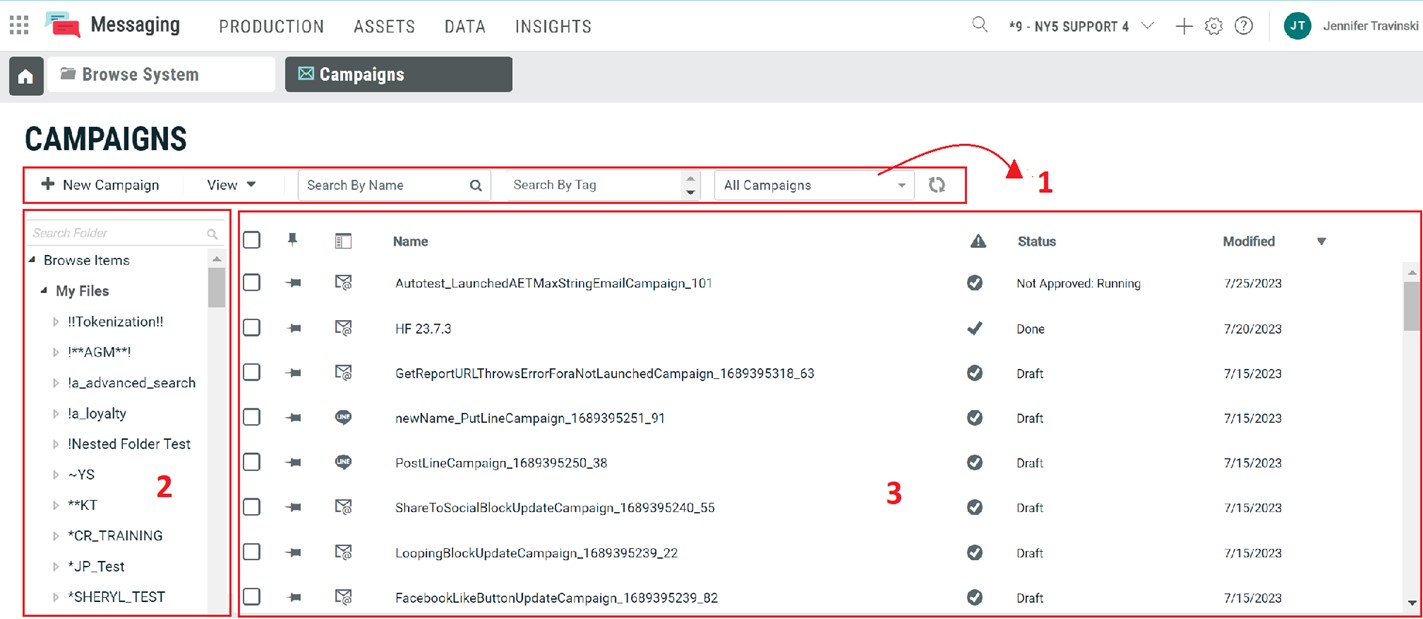
You'll initially be presented with the option to navigate to the desired folder, then choose from a list of existing items stored in the selected folder. In this situation, the Workspace is separated into the following components:
-
Tool Ribbon: This component provides access to common actions and commands, organized into different buttons, drop-downs, and fields. A refresh button is also available.
-
Navigation Tree: This component displays a folder structure, allowing you to drill-down into sub-folders. When you click on a folder name, the folder is expanded to show any sub-folders, and the Item Listing section is refreshed to show the contents of the selected folder. You can easily search for a desired folder in the folder structure by typing a keyword associated with the folder name, in the search field above the folder list.
-
Item Listing: This component displays the contents of the folder that you selected in the Navigation Tree. When you're in the context of a specific item, only items of that type are displayed in the Item Listing. The Item Listing provides several browsing and searching options for finding an existing item. These different options are described below.
Browsing Options
The system provides the following methods for browsing for an item:
-
In a specific folder: If necessary, in the tool ribbon, click the View drop-down option, then ”View Folders” to toggle on the Navigation Tree (the Navigation Tree is toggled on by default). Within the Navigation Tree, click on a folder to expand it. Any sub-folders are displayed beneath it. All items of the current type that are stored in the selected folder are displayed in the Item Listing section of the screen.
-
In a specific folder by folder name: If you know the folder name containing the item, you can easily search for a desired folder in the folder structure by typing a keyword associated with the folder name, in the search field above the folder list. All items of the current type that are stored in the selected folder are displayed in the Item Listing section of the screen.
-
Across the entire system: If necessary, click on View > View Folders option in the Home tab tool ribbon to toggle off the Navigation Tree. The Item Listing is refreshed to show every item of this type within the system.
After using one of these browsing methods, you can view extended information about an item by placing a check mark in the check box next to the item name. A panel is displayed beneath the Item Listing that shows extra information about the selected item, such as tags, status,table, channel, and created and modified dates.
To view the full details of an item, click on the item name in the Item Listing. The platform displays the detail screen for this item and opens a new tab for this item in the Top Navigation Pane. Or, to open tabs for multiple items at once, place check marks next to each item, then click “Open” in the Tool Ribbon. A confirmation dialog box is displayed; click open items.
Optionally, you can "pin" items, which causes them to automatically be displayed at the top of the folder contents, regardless of the sort order. This feature is useful if you have a large folder with many items, and you frequently need to find and select the same item. To pin an item, click the gray thumbtack icon to the left of the item name. The item is moved to the top of the folder. To un-pin it, click the pinned vertical thumbtack icon.
Search Options
Once you've applied one of the browsing methods described above, you can further refine the search results using one or more of the following options:
-
From the filter drop-down menu displayed above the search results, select one of the following options:
-
-
All Items (this option is selected by default)
-
My Items
-
Items I was the Last to Modify
-
Items I Created
-
EDP Items
-
Messaging Items
-
-
Tags:Tags are optional labels that can be attached to most items. To search based on a tag, click on the Tag search box in the Search by Tags field of the Tool Ribbon. The system displays a pop-up menu of every tag utilized within the current system. Select a tag from this menu. The Item Listing is refreshed to display all items tagged with this value. You can optionally select additional tags. Multiple tags are joined with an "OR" operator, meaning the system will display items that contain ANY of the selected tags. To remove a tag from your search, click the "X" icon next to the tag value.
-
Name: To search based on the item name, begin typing in the "Search by Name" text box above the Item Listing. With each additional letter that you type, the system further refines the search, and displays the results in the Item Listing. The system utilizes a "contains this text" search method, meaning that the system will search for your text string anywhere within the item name, not just at the beginning of the name. To delete your text string, click the "X" icon to the right of the "Search by Name" text box.
All of the search options described above are cumulative, and can be used together in any combination. For example, you could search for: "items I created that contain the word 'buyers' in the name."
Sort Options
By default, the Item Listing is sorted by last modified date in descending order (most recent at the top). To sort the Item Listing by some other column, click on the column header. The Item Listing is refreshed to sort by that column in descending order. To toggle to ascending order, click the same column header again.
Note: Pinned items will always appear at the top of the folder, regardless of the sort order. Pinned items are designated by a vertical thumbtack icon to the left of the item name.
Non-foldered Items
Since non-foldered items are always stored at the client account level, the search options are much simpler than for foldered items.
-
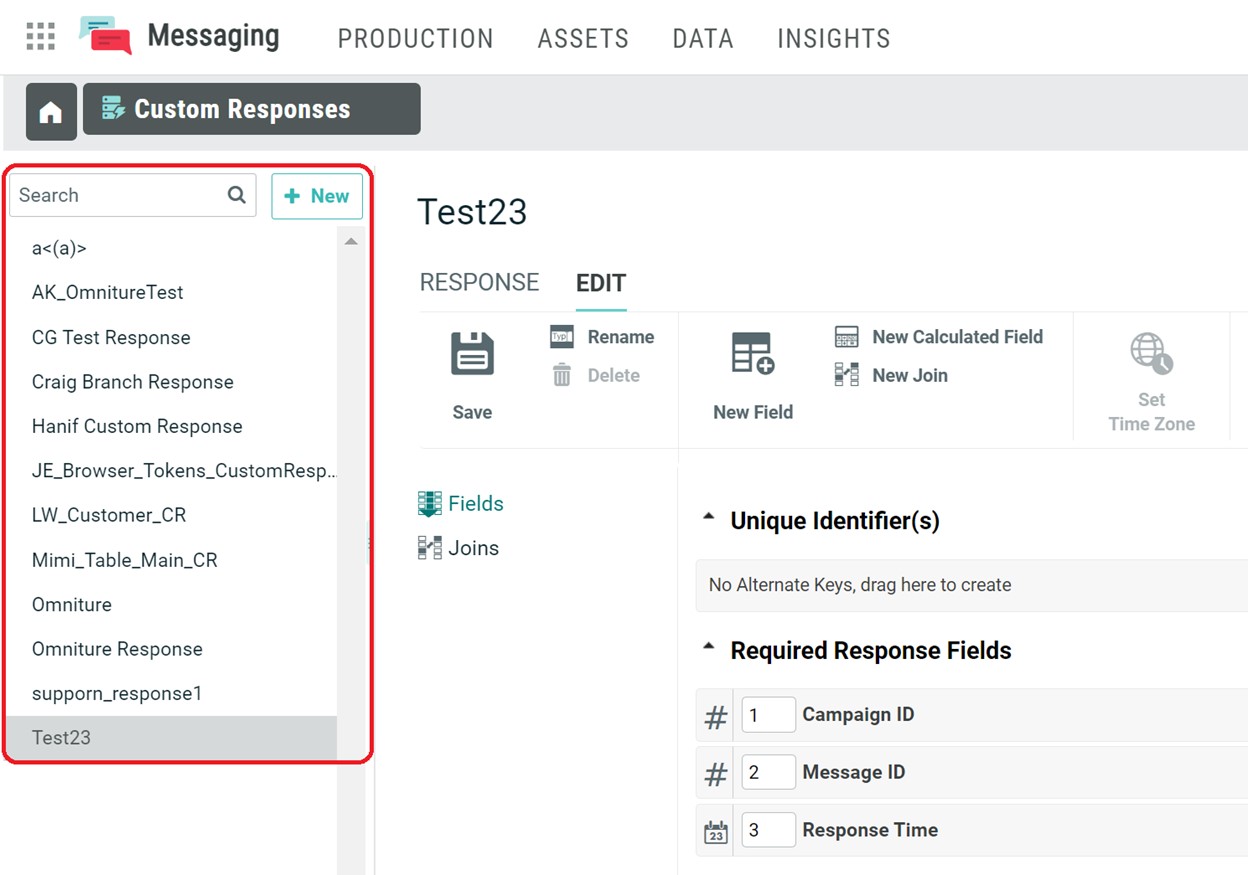
Item Listing: When you initially navigate to the item screen for a non-foldered item, the system displays the Item Listing along the left-hand side of the Workspace that shows every item of this type within this client account.
Search Options
To search based on the item name, begin typing in the "Search by Name" text box above the list of items. With each additional letter that you type, the system further refines the search, and displays the results. The system utilizes a "contains this text" search method, meaning that the system will search for your text string anywhere within the item name, not just at the beginning of the name. To delete your text string, click the "X" icon to the right of the "Search by Name" text box