Imports

Overview

Engage+ offers several different ways to bring data into the platform and load it into your marketing database. Data can be imported in a manual process through a file import, or by way of an FTP automated process (see FTP Import Templates for more details). You can manually edit or enter records one at a time using the Record Lookup screen. Data can also be submitted to the platform through an API Post, or through Web Forms and Web Events. The best import method should be indicated by your business requirements and marketing strategy. If you have any questions about which import method best meets your needs, please speak with your Client Services Representative.

The Imports screen is used to perform a manual file import. From this screen you can browse to and select the import file, select or define a Data Map, set up email notifications, reviewing parsing results, and configure various options for how the platform should handle and process the data.

The Marigold Help Center provides access to a wide range of enablement videos on many Marigold solutions that you can take as needed. Click here to browse to the video on how to use Imports.  

Prerequisites

Before proceeding to import data into the platform, the following required assets need to be created within Engage+:

Data File Formats

Engage+ accepts database imports as Microsoft Excel files or as text files, with the data fields being delimited using any of the following characters: tab, comma (,), semicolon (;), pipe (|), or caret (^).

The platform also supports the use of fixed-width import files, but you'll need to define the Data Map separately; you can't create an "on the fly" Data Map if importing a fixed-width file. See the Data Maps topic for more details.

The import file may contain any information that is available, and will typically contain the Unique Identifier for the destination Table; it is possible to load an import file that doesn't have the Unique Identifier, through the use of a "Soft Match" instead.

Before importing data into the platform, make certain the data is clean and formatted properly. The following tips can be useful when creating text files from Microsoft Excel:

Data Parsing

The platform parses the import data to ensure that the values are clean, valid, and usable. Depending on the Data Type for a field, various methods of parsing and cleansing are utilized. The platform may adjust the import value for a field according to rules set for that type of field. For example, if a numeric value is being imported into a field identified as a "Phone Number," the platform will verify that this value is the correct length, and will remove any unnecessary and invalid characters. For more details on the Data Parsing rules utilized by Messaging, please see the Data Parsing Help topic.

Access

The Imports screen is accessible by the following method:

Features

 Create a New Manual Import

Click hereClick here

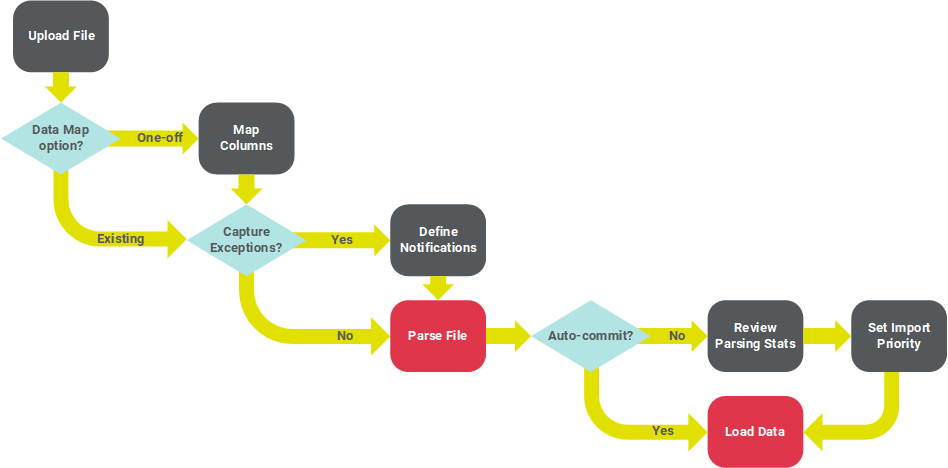
A Manual Import allows you to process a "one-off" file import. When creating a Manual Import, the steps in the import process will vary depending on which options you select. The following flowchart depicts these different options.

To create a new Manual Import:

  1. In the Tool Ribbon, click + New Import.

  2. A "New Item" pop-up window is displayed. To select the folder where you want to save this new Manual Import, click the folder name in the Navigation Tree on the left side of this pop-up. The "Where?" field is updated with the selected folder name.

  3. In the "Name" field, enter a name for your new Manual Import. This name must be unique within the selected folder.

  4. Click Create. The Workspace is refreshed to show a blank Manual Import details screen, where you can configure the details of the Manual Import.

  5. Optionally, you can assign one or more tags to your Manual Import. To assign a tag, click on the "Add tag" field in the Edit section of the Tool Ribbon. The system displays a pop-up menu of all the existing tags. You can select one of these tags, or type in a new one and press Enter. You can repeat this process to add more tags. To remove a tag, click the "X" icon next to the tag label.  

Upload File

The "Upload File" section is used to select the file that you want to import, and to define various configuration options.

  1. Click choose file, then browse to and select the desired file to upload. The platform supports files with .txt, .xls, .pgp, and .zip file extensions.

  2. From the "Encoding" drop-down menu, select the desired encoding method (the default method is "UTF-8").

  3. If you have any custom stored procedures defined for your account, an additional "Post-Update Process" drop-down menu is displayed. Optionally, select a stored procedure from this menu. Custom import procedures are typically used to perform additional data transformations on the import file. Please note that this option isn't available if you're importing data into a Load and Send table.

  4. If you have any CASS / NCOA Processes defined for your account, an additional "CASS / NCOA Processing" drop-down menu is displayed. Optionally, select an NCOA Process from this menu. See NCOA Processes for more details. Please note that this option isn't available if you're importing data into a Load and Send table

  5. Optionally, if you want commit this file to the database without viewing file parsing statistics, place a check mark next to "Auto-Commit." In most cases, the Auto-Commit option is recommended once you've successfully processed import files, and are confident that the process is working as intended.

  6. If you want to capture and store records that encounter exceptions, place a check mark next to "Import Exceptions" (note: this is an optional feature that must be enabled within your account in order to be available for selection).

  7. The "Hierarchy Options" drop-down menu is typically used if your account utilizes a multi-division setup, such as a Parent / Child database. Hierarchy Rules are a configuration feature set in the Parent system that determine which records from a given table a Child system can access. From this drop-down menu, select one of the following options. Please note that this option isn't available if you're importing data into a Load and Send table.

    • Update Current Customer Only: This option will load the data to the Parent system only.

    • Update Current Customer and Children: This option will load the data to the Parent and to any Children systems as well.

    • Custom Hierarchy Rule: This option allows you to select a custom Hierarchy Rule. If you select this option, the Hierarchy Rule field is displayed. Either begin typing in the Hierarchy Rule name, or click the browse button (magnifying glass icon) to browse for and select it.  

  1. The Data Mapping section allows you to either select an existing Data Map, or to build a new Data Map "on the fly." Select a Data Map option:

    1. Select an Existing Data MapSelect an Existing Data Map

      To select an existing Data Map for your Manual Import:

        1. Click the "Select an Existing Data Map" tab.

        2. In the "Data Map" field, either begin typing in the Data Map name, or click the browse button (magnifying glass icon) to browse for and select it. You can also create a new Data Map by clicking the new button (plus-sign icon).

        3. Optionally, if you want to view the details of the Data Map after selecting it, click the "jump-to" button (green up-arrow icon). The system displays the Data Maps screen. When finished, click the Manual Import tab in the Top Navigation Pane to return to the Imports screen.


      Create an "on the fly" Data MapCreate an "on the fly" Data Map

      To define a new Data Map "on the fly" for use in your Manual Import:

        1. Click the "Create a New Data Map" tab.

        2. From the "Import Into" drop-down menu, select the Source Table. This table represents the main table into which data will be loaded; data can also optionally be loaded into tables that are joined to this Source Table

        3. If your import file contains a header row, place a check mark next to "File Heading."

        4. From the "File Delimiter" drop-down menu, select the delimiter character -- Tab, Comma, Semi-Colon, Pipe, or Caret.

      Note: "Fixed-width" is not available as an option in this menu; if you're importing a fixed-width file, you'll need to define the Data Map separately, then select that Data Map on the Manual Import screen, as described above.

        1. Optionally, from the "Text Qualifier" drop-down menu, select a text qualifier -- either Single Quote or Double Quote.

        2. From the "Data Processing" drop-down menu, select one of the following options that controls how the system handles the import records:

          • Update or Create All Records: Select this option if you want the import process to create new records, and update existing records.

      Note: If you selected a Load & Send table above in step 2, then "Update and Create All Records" is the only available option in the "Data Processing" drop-down menu.

          • Only Update Existing Records: Select this option if you want the import process to only update existing records (new records are ignored).

          • Only Create New Records: Select this option if you want the import process to only create new records (updates to existing records are ignored).

        1. Optionally, if you want to save this Data Map so that it can be reused, place a check mark next to "Make this a reusable Data Map." The "Name" field is displayed; enter a name for this new Data Map.


  2. In the Tool Ribbon, click Save & Upload. The system uploads the import file. If you need to cancel the import process, click Delete in the Tool Ribbon, then click ok in the confirmation dialog box.

Map Columns

The "Map Columns" section is primarily used if you selected the Create a New Data Map option above. This section is used to map the columns in the import file to the correct fields in the destination Table, or to any joined Tables. If you selected an existing Data Map, then this section is "read only." You can view a preview of the import file contents, and view the selected Data Map, but you won't be able to make any changes to the column mapping.

Note:  If your import file contains a header row, the system will attempt to identify the columns in the import file by matching the values in the header row to the "Database Name" in the Table. If the system is able to find a match, that field be automatically be displayed within the drop-down menu in the "Map to" column on the screen.

To define the "on the fly" column mapping for your Manual Import:

  1. For each column in your import file, map the column to a field in the Source Table, by selecting the desired field from the drop-down menu in the "Map to" column. This drop-down is populated with every field on the Source Table. If you want to skip a column on the import file, select "Do Not Import."

  2. Optionally, if you want to load a column into a new field in the Source Table, select "Add New Data Field." If adding a new field, you must also provide the display name and database name for the new field, and select a Data Type. Please note that this option isn't available if you're importing data into a Load and Send table.

Note: In most cases, the Unique Identifier for the destination Table should be part of the Data Map (and it's required if you're importing data into a Load and Send table). If the Unique ID is composed of multiple fields, then all of those fields need to be mapped in order to successfully load the data. If the Unique Identifier is not in the import file, then you'll need to use the Soft Match feature, which is described below in more detail.

  1. Optionally, to utilize Advanced Options for a field, click the down-arrow button next to that field. The "Advanced Options" section is displayed. Place check marks next to the desired options you want to use for this field.

  2. If the Source Table includes Joins to other tables, each Join is listed separately. Click the check mark icon next to the Join name to enable that Join. Then repeat steps 1 and 2 to map to Fields on the joined table. Please note that this option isn't available if you're importing data into a Load and Send table.

If the import file doesn't contain the Unique Identifier field for the destination Table, then you must use the Soft Match feature in order to successfully load the data. The Soft Match lets you match to the database using any fields with a Data Type of "Email" or "Phone." For example, let's say the Unique ID on your "Recipient" table is "Member ID," but you don't have Member ID data available in your import file. You could instead select some other field, such as "Email Address," that contains unique data, and match on that instead. Please note that this option isn't available if you're importing data into a Load and Send table.

Define a Soft MatchDefine a Soft Match

    1. Click on the "Soft Match" section to expand it.

    2. Click the "Select Field" tab. The "Available Fields" list box is populated with all of the fields in the destination Table with a Data Type of "Email" or "Phone."

    3. Select a field in the "Available Fields" list box, then click the center "Move" bar. Optionally, you can use Shift + click or Control + click to select and move multiple fields. The selected field (or fields) is added to the "Selected Fields" list box. Repeat this step as needed to add more fields to the Soft Match. To remove a field from the Soft Match, click the "X" icon next to the field name within the "Mapped Fields" list box


If the soft-matched value in the import file matches an existing value in the database, then the platform will make the update to that record in the database. If the soft-matched value does not already exist in the database, the platform creates a "temporary" record. This temporary record can later be merged with a full record that contains the Unique Identifier.

  1. In the Tool Ribbon, click Edit > Save Data Mapping. If you're not capturing Import Exceptions, then the system begins the parsing step (see Data Parsing for more details on the platform's cleansing and validation rules). If you need to cancel the import process, click Edit > Cancel & Rollback in the Tool Ribbon, then click ok in the confirmation dialog box.

Select Notifications

If you checked the "Import Exceptions" check box above, an additional "Select Notifications" section is displayed on the screen. This section allows you to define email alerts if the contents of your import file surpass certain thresholds for a selected import metric or exception.

  1. In the "Choose Notification Type" drop-down menu, select the desired metric (or "All Metrics"). The "Notification Settings" pop-up window is displayed.

  2. In the "Notification Thresholds" section, enter the desired threshold settings that will trigger the alert notification. You can enter one or both of the following rules. If you enter both rules, the notification will be triggered if at least one condition is met.

    • Percentage of file: Enter the percentage of "invalid" records on the import file that will trigger the notification.

    • Number of rows: Enter the quantity of "invalid" records on the import file that will trigger the notification.

  1. Email notification settings can optionally be saved as a template, which allows you to reuse those settings. In the "Email Settings" sections, you can either select an existing email notification template, or create a new template.

    • Existing Template: Selected the desired template from the "Template" drop-down menu.

Note: If you want to delete an existing Template, select it from the "Template" drop-down menu, then click delete.

    • New Template: Enter the email subject line, "from" email address, and recipient email address (or multiple addresses). Enter a short message for the email notification. Optionally, if you want to save these email notifications settings, enter a name for the template in the "Save Template As" field.

  1. If you want the system to send notifications after the parsing step, place a check mark next to "Parsing."

  2. If you want the system to send notifications after the database update step, place a check mark next to "Update."

Note: You must check at least one of the above check boxes.

  1. Click Ok. the system adds the email notification to the "Selected Notifications" list. To view or edit the notification details, click the edit button (gear icon); the "Notification Settings" pop-up window is displayed. To delete a notification, click the delete button ("X" icon).

  2. Repeat steps 1 through 6 as needed to define the email notifications for additional metrics. Each selected metric is handled separately, and will generate its own email notification message.

  3. When finished, click Edit > Save Notifications in the Tool Ribbon. The system begins the parsing step (see Data Parsing for more details on the platform's cleansing and validation rules). If you need to cancel the import process, click Edit > Cancel & Rollback in the Tool Ribbon, then click ok in the confirmation dialog box.

Process File

When the platform has finished parsing your import file, the "Process File" section is populated with the results of the parsing step. This section shows how many records were on the file, and how many records encountered warnings or validation errors.

This section also allow you to establish the Priority for your import file. The Priority you select determines the order in which your imports will be handled. Generally speaking, your imports with a higher priority will take precedence over your imports with a lower priority. If your imports have the same priority, they will be processed in the order in which they were added (older imports first).

A few potential exceptions exist, which may impact the processing order of your imports:

  • You have two imports queues -- small imports (less than one million rows) and large imports. Therefore, an import in one queue may process before an import with a higher priority in the other queue.

  • If an import process needs to access a Table that's currently in use by another process, that import will be made to wait, potentially allowing another import with a lower priority to run first.

To finalize the import process:

  1. Optionally, from the "Priority" drop-down menu, select the appropriate priority for this import (the default is "Normal"). In the Tool Ribbon, click Save Priority.

  2. If, after reviewing the parsing statistics, you're ready to commit the import, click Approve & Commit in the Tool Ribbon. If you need to cancel the import process, click Edit > Cancel & Rollback in the Tool Ribbon, then click Ok in the confirmation dialog box.


 View a Completed Manual Import

Click hereClick here

Once a Manual Import is finished, and the records have all been imported into the database, you can no longer make any changes to that Manual Import. However, you can still view the configuration settings that were used for the import process

To view a completed Manual Import:

  1. Search for the desired Manual Import (see Search for an Item for more details on the available search methods).

  2. Click on the Manual Import name. The Manual Import screen is displayed and populated with the details of the selected Manual Import.

  3. Optionally, to view detailed information about the Manual Import, click the Import File tab in the Tool Ribbon. The Item Details screen is displayed, showing who created the item, who modified it last, and what the last actions taken on the item were. On this screen, click "Related Items" in the Function Menu to see other items in the system that reference or utilize this Manual Import. When finished, click the Edit tab in the Tool Ribbon to return to the main edit screen.

  4. Optionally, you can assign one or more tags to your Manual Import. To assign a tag, click on the "Add tag" field in the Edit section of the Tool Ribbon. The system displays a pop-up menu of all the existing tags. You can select one of these tags, or type in a new one and press Enter. You can repeat this process to add more tags. To remove a tag, click the "X" icon next to the tag label.  

  5. Optionally, to rename the Manual Import, click Edit > Rename. A "Rename Item" dialog box is displayed. Enter a new name for the Manual Import, then click save new name.

  6. To view the configuration details of the Manual Import, click on the desired section to expand it.

    • Upload File: This section displays information about the import file, hierarchy options, and data mapping options that were utilized.

    • Map Columns: Click show file preview to see a selection of sample records from the import file. Click show data map to view how the columns on the import file were mapped to fields in the destination Table (or joined Table).

    • Select Notifications: This section displays information about the email alert notifications and thresholds that were utilized.

    • Process File: This section displays the results of the data parsing / validation process. This section also shows the date / time of when the parsing step was run, and when the final database update step was run.


 Edit a Manual Import

Click hereClick here

A Manual Import consists of four main steps (Upload File, Map Columns, Select Notifications, and Process File). Once a given step is complete, you can no longer make any changes to the configuration options for that step. However, you can make changes to any subsequent steps that haven't yet been run. For example, let's say you finish the Upload File step for a Manual Import. You could leave the Import screen, then later come back and select that same Manual Import. You wouldn't be able to change any of the Upload File settings, but you could configure the next step in the process, Map Columns.

If you find that you need to make changes to a completed step, you'll have to cancel the Manual Import (see "Cancel a Manual Import" below for more details), then start over with a brand new Manual Import.

To edit a Manual Import:

  1. Search for the desired Manual Import (see Search for an Item for more details on the available search methods).

  2. Click on the Manual Import name. The Manual Import screen is displayed and populated with the details of the selected Manual Import.

  3. Optionally, to view detailed information about the Manual Import, click the Import File tab in the Tool Ribbon. The Item Details screen is displayed, showing who created the item, who modified it last, and what the last actions taken on the item were. The direct link URL to the Import object is available in the object url, which can be copied to the clipboard using the "Copy Link" icon. This can be used to easily share and also open the Import object in a browser. On this screen, click "Related Items" in the Function Menu to see other items in the system that reference or utilize this Manual Import. When finished, click the Edit tab in the Tool Ribbon to return to the main edit screen.

  4. Optionally, you can assign one or more tags to your Manual Import. To assign a tag, click on the "Add tag" field in the Edit section of the Tool Ribbon. The system displays a pop-up menu of all the existing tags. You can select one of these tags, or type in a new one and press Enter. You can repeat this process to add more tags. To remove a tag, click the "X" icon next to the tag label.  

  5. Optionally, to rename the Manual Import, click Edit > Rename. A "Rename Item" dialog box is displayed. Enter a new name for the Manual Import, then click Save new name.

  6. By default, the system will expand the section of the screen that represents the next step in the process that hasn't yet been run. For more details on how to configure each of these steps, please see "Create a New Manual Import" above.

    • Upload File: This section is used to select the file that you want to import, and to define various configuration options. When finished, click Edit > Save & Upload in the Tool Ribbon.

    • Map Columns: This section is used to map the columns in the import file to the correct fields in the destination Table (or joined Table). When finished, click Edit > Save Data Mapping in the Tool Ribbon.

    • Select Notifications: This section is used to define email alerts if the contents of your import file surpass certain thresholds for a selected import metric or exception. When finished, click Edit > Save Notifications in the Tool Ribbon.

    • Process File: This section is used to view Data Parsing results and statistics, and to set the import priority. When finished, click Edit > Save Priority in the Tool Ribbon.

  1. If you're ready to commit the import, click Edit > Approve & Commit in the Tool Ribbon


 Delete a Manual Import

Click hereClick here

To delete an item:

  1. Search for the desired item (see Search for an Item for more details).

  2. Click on the item name. The main item screen is displayed and populated with the details of the selected item.

  3. In the Tool Ribbon, click Edit > Delete. A confirmation dialog box is displayed.

  4. Click delete item to confirm the deletion.

Foldered items are moved to the Recycle Bin. Non-foldered items are permanently deleted.


 Cancel a Manual Import

Click hereClick here

A Manual Import consists of four main steps (Upload File, Map Columns, Select Notifications, and Process File). At each of these four points, you have the option of saving and continuing to the next step, or of cancelling the Manual Import. Once a Manual Import has proceeded all the way through the final "Process File" step, you can longer cancel it. Also, canceling a Manual Import is permanent, meaning that you can no longer make any changes do it, nor can you "un-cancel" it and continue on with the next step.

To cancel a Manual Import:

  1. Search for the desired Manual Import (see Search for an Item for more details on the available search methods).

  2. Click on the Manual Import name. The Manual Import screen is displayed and populated with the details of the selected Manual Import.

  3. In the Tool Ribbon, click Edit > Cancel & Rollback.


Troubleshooting

 Troubleshooting an Import

Click hereClick here

If your import isn't correctly processing records, check the following:

  • Check the file status on the Imported Files section of the FTP Import Template. Has the file been picked up for importing? 

  • Check that the name of the file is correct and in the correct location on the FTP server. 

  • Check the schedule of the FTP Import Template. Was the file placed in FTP server location after the schedule was set to look for it?

  • If the import is set for a recurring schedule, wait for the next one to see if it works then.

  • Make a copy of the FTP Import Template and see if it will correctly pick the file up. 

 If the problem persists, please contact Global Support for further assistance.