 Personalized URLs
Overview
A PURL – or Personalized URL – is a webpage that uses personalization values to create a unique URL for each recipient of your marketing Campaign (for example: "www.cheetahdigital.com/johnsmith"). A PURL can be generated in the platform using any field, or fields, in a selected source table. PURLs add a personalized touch to your marketing strategy with the goal of being easier to remember, and garnering more attention from consumers. As an example, PURLs are often used to increase results from Print Campaigns. On the direct mail piece, you can print a Personalized URL that contains the consumer's name, and encourage the recipient to browse to this URL.
Within Engage+, Personalized URLs are used in conjunction with Web Forms. This feature allows for the ability to pre-fill the Web Form by pulling information about the consumer from the database (similar in concept to a Web Authentication).
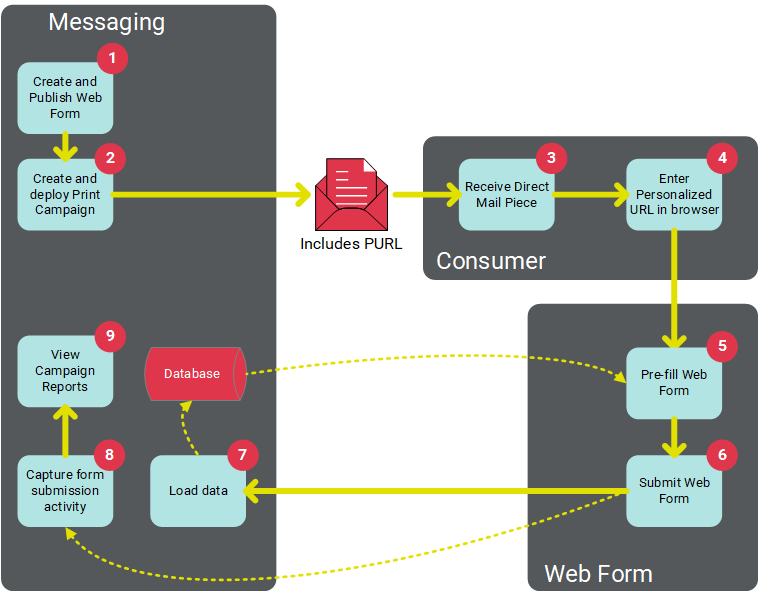
The following diagram depicts this process of using a Web Form with Personalized URLs. In this example, the PURL values are sent to consumers through a Print Campaign. When the customer browses to her or her own custom URL, the platform validates the customer's identity, in order to pre-fill the fields in the Web Form.
Pre-requisites
Before using PURLs in your marketing Campaigns, the following steps must be completed:
-
Domain: You must have a web domain in place that you want to use for the Personalized URL.
-
Table: The source Table must be defined within your Messaging database. See Tables for more details on this process.
-
PURL Field: The source Table must have a "PURL Field" defined. A PURL Field is a special field that's populated based on the values in one or more other fields. For example, you could define a PURL Field that's composed of "First Name" and "Last Name" fields. See "Create a New PURL Field" below for more details on this process.
-
PURL Domain: You must have a "PURL Domain," which binds the PURL Field to your web domain. See "Create a New PURL Domain" below for more details on this process.
-
Web Form: You must create a Web Form, and bind the PURL Domain to that Web Form. This Web Form contains the content of the webpage that the user will see when he or she navigates to the Personalized URL. See Web Forms for more details on this process.
-
Campaign: The Web Form containing the PURL must be bound to the Campaign, which also causes the platform to populate the PURL Field you defined above. In addition, you typically want to add the PURL somewhere within the Campaign content, in order to communicate the PURL value to each recipient of your Campaign message (see Add a Web Form (PURL) for more details).
Access
The PURL Domains screen is accessible by the following method:
-
From the Main menu, select Assets > Links > PURL Domains
Features
|
A PURL, or Personalized URL, utilizes data from a consumer record to create a customized URL specifically for that consumer. A PURL Field is a special field in your database defines the personalization values that will be utilized to populate each unique PURL. A PURL Field is defined by selecting one or more other Fields. For example, let's say you want your PURL to include the consumer's first name and last name ("www.companyname.com/JoeSmith"). You would define the PURL Field as containing the "First Name" and "Last Name" Fields. Note: To create a PURL Field, you must define a brand new Field in your marketing database. You can't modify an existing Field to use it as a PURL Field. The option to create a PURL Field is available only when you're creating a new Field. The following steps focus on how to create a PURL Field, without getting into the details of all the different options and features available when creating a new Data Field, such as the different Data Types or advanced options. For more information on these features, please see the Tables Help topic. To create a new PURL Field:
Note: A PURL Field value must be unique to work properly. In order to ensure that each value is unique, the platform will append a counter to duplicate values. For example, let's say you built a PURL Field consisting of "First Name" and "Last Name" values, and your Table had three "Joe Smiths" in it. The first record would get the value “JoeSmith”, the second “JoeSmith1”, and the third “JoeSmith2."
In order to use the Personalized URL in your marketing Campaigns, the PURL Field you just created must be selected within a PURL Domain. See "Create a New PURL Domains" below for more details.
|
|
A PURL Domain is used to bind a PURL Field to your web domain. Once you've created the PURL Domain, you can select it for use in Web Forms. Note: Existing PURL Domains can't be edited or deleted. To create a new PURL Domain:
In order to use the Personalized URL in your marketing Campaigns, the PURL Domain must be assigned to a Web Form (see Web Forms for more details).
|
|
Existing PURL Domains can't be edited or deleted. To view the details of a PURL Domain:
|