 Load and Send Overview
Description
Load and Send is an optional feature that allows you to import "campaign-ready" files for use in an email Campaign. The term "campaign-ready" means that everything needed to build and deploy the Campaign -- including recipient contact information and any personalization fields -- are present in this file.
This campaign-ready file is loaded into a special table dedicated specifically to the Load and Send feature, rather than into the regular relational database tables. Load and Send is designed to be easier to setup and execute than a full relational database, as it uses a much simpler data model, consisting of standalone "flat" tables.
Clients who want to use Load and Send have the option of using ONLY the Load and Send feature, or of using Load and Send in conjunction with a full relational database. If you use both methods, client-level attributes are shared across the two methods, including email domains, Sender Profiles, and IP addresses.
Tables and Versions
Load and Send tables utilize a "versioning" concept. Every time you import a new file, and load that data into the Load and Send table, the system maintains that data in a separate version, which is completely distinct from any previous (or subsequent) versions. Multiple versions of the same table can exist simultaneously.
The versions of a Load and Send table are temporary. After a specified retention period, a version is automatically deleted. The lifespan of a version can range from one to 120 days. This retention period is defined at an account-level (please speak to your Customer Service Representative about defining your retention period). The use of these temporary versions provides additional benefits to clients who have strict privacy compliance rules around keeping consumers' Personally Identifiable Information (PII).
The versions of a Load and Send table can never be modified -- you can't insert new records into a version, nor can you edit or delete individual records in a version. If you need to use additional, or refreshed, data in your Load and Send Campaign, you'll need to upload a brand new version.
The client depicted in the diagram below has set up a Load and Send table, and has loaded three previous import files into this table, creating three separate versions. They're now loading a fourth version. Each version exists separately, and simultaneously, within the Load and Send table. The first version they loaded has now reached the end of its retention period, and is deleted by the system. Please note that it's the version that gets deleted, not the entire Load and Send table.
Also, any assets that the client defines (such as Content Blocks and Filters) are assigned to the Load and Send table, and not to a specific version of that table. Therefore, these assets can be reused since they're not assigned to the temporary versions.

You can optionally define multiple Load and Send tables, if needed. For example, if you're running different types of Campaigns, and need to import different fields to support those Campaigns, you can create additional Load and Send tables.
Campaigns
At a high level, the basic process of executing a Load and Send Campaign is generally similar to that of running a Campaign off a full relational database. In both scenarios, you load data into the Messaging platform, define your audience of intended recipients, build your creative content, launch and deploy the Campaign, then capture recipient activity (such as clicks and opt-outs).
However, within that basic process, the Load and Send feature has a few key differences. The following diagram compares the typical process flow for a Campaign based off a full relational database, and a Campaign based on the Load and Send method.
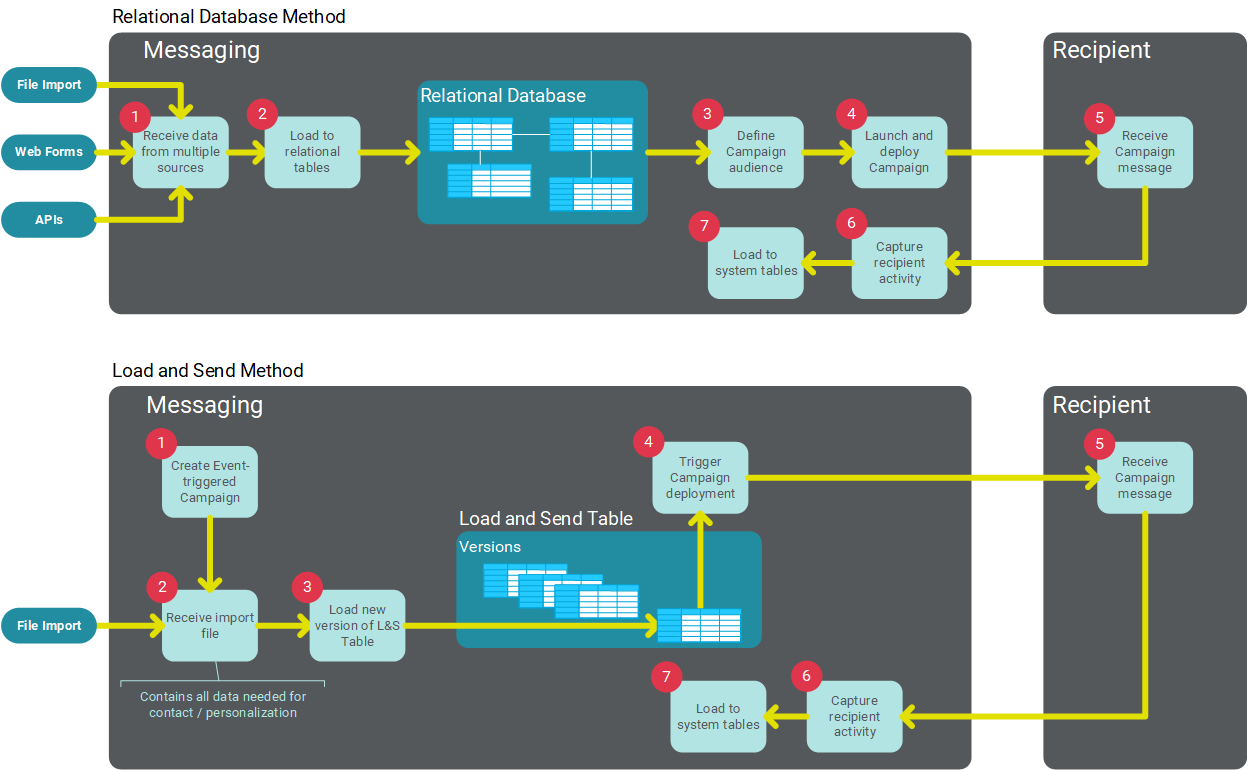
Load and Send is intended to be a quick, streamlined campaigning tool, and as such, Load and Send doesn't support the full scope of the Messaging platform's features. The following list highlights the key differences between a Load and Send Campaign and a relational database-driven Campaign.
The Load and Send feature supports only the email channel.
The Load and Send feature supports Regular One-off Campaigns and Event-triggered Campaigns. For Event-triggered Campaigns, the only triggering event that you can select for a Load and Send Campaign is a "File Import." You can then specify either an import file, or a folder location.
Load and Send Campaigns don't support the use of Cells & Splits.
Load and Send Campaigns don't support pre-launch audits.
Opt-Out Requests
Clients who want to use Load and Send have the option of using ONLY the Load and Send feature, or of using Load and Send in conjunction with a full relational database. Using the two methods together requires that consumer opt-out requests be "synchronized." Any opt-outs gathered from one method must be communicated to the other method, in order to respect consumer opt-out requests, and to maintain a good sender reputation.
The Load and Send feature maintains a separate, permanent, system-generated "preferences" table for storing opt-out requests from consumers. This preferences table is joined to the Recipient table (or whatever the source table is for your relational database Campaigns) on the email address field. Opt-out requests collected via a Load and Send Campaign are synchronized to the Recipient table via this join. When you launch a relational database Campaign, the platform checks the Status ID field on the Recipient table, and also the Status ID on the Load and Send preferences table (via the table join), in order to apply opt-out requests gathered from both Campaign methods.
Load and Send Campaigns work a little differently. The platform doesn't use the table join with the Recipient table to apply opt-out information collected via a relational database Campaign. Instead, the system uses a special type of Exclusion List called a "virtual" list that's built off the Recipient table. This Exclusion List contains consumers that have opt-ed out in response to a relational database Campaign. This Exclusion List is then applied to the audience in the Load and Send Campaign. In addition, the Load and Send Campaign checks the Load and Send preferences table. In this manner, opt-out requests from both Campaign methods are applied to the Load and Send Campaign.
The following diagram depicts the opt-out synchronization between the two Campaign methods.

Load and Send Set Up
The following configuration steps must be performed before you can begin deploying Load and Send Campaigns.
Table: Create the Load and Send table (see Tables for details). The Load and Send table is a permanent structure, that will house all of your temporary versions. The Load and Send table can't be joined to any other tables in your Messaging database.
Email Field: When you define the "Email" field on the Load and Send table, you have the option of marking this field as "Persistent." A field marked as Persistent will not be deleted when the rest of the temporary version is deleted; instead, the system will retain the value in the Email field.
Load and Send Only customers: The decision to make the Email field Persistent depends on your business requirements and security restrictions. If you don't want to maintain any Personally Identifiable Information (PII) in the platform, then you should NOT mark the Email field as Persistent. In this manner, the Email data will be purged along with the rest of the temporary version, after the data retention period.
Hybrid customers: For hybrid customers using both a relational database and a Load and Send table, you should mark the Email field as Persistent, as this field will be used to synchronize consumer opt-out requests received from the two different sending methods.
Data Map: Create the Data Map. The Data Map controls how the import data is loaded into the Load and Send table. Through the Data Map, you instruct the system which column in the import file is to be "mapped" to which field in the Load and Send table.
Folder: Create the Folder where you intent to store the import files (see Browse System for more information on how to create a Folder).
Import: Create the FTP Import Template or the Manual Import used to bring the campaign-ready file into the platform.
Opt-Out Message: Every email Campaign deployed through Messaging must contain an Opt-Out Message that allows recipients to unsubscribe from future email messages.
Virtual Exclusion List: If you're executing Load and Send Campaigns in conjunction with a full relational database, you need to create a special, "virtual" Exclusion List off of your Recipient table, in order to synchronize opt-out requests between the two Campaign methods.
Filter (optional): Filters are used to define the audience of intended recipients for a Campaign. In most cases, a Load and Send Campaign will simply use the default Filter for an Event-triggered Campaign. The default Filter is "all triggered records," meaning that all of the records in an import file will be part of the Campaign audience. Most clients will use this default setting, especially for the initial Campaign deployment off of a new Load and Send version. You need to define a Filter only if you want to further refine that set of recipients based on some business rule or logical criteria. You might do this on a subsequent deployment off a Load and Send version. For example, let's say you send the initial Campaign to the entire audience in the import file. Then a few days later, you want to send a follow-up deployment to only those recipients who clicked on a link in the first Campaign. You could create a Filter that targets only those consumers who clicked a link.
Other Assets (optional): Create any additional assets needed for the Campaign, such as Links, Content Blocks, Share-to-Social Blocks, or Looping Blocks (Load and Send Campaigns don't support the use of Dynamic Blocks anywhere within the Campaign content).
Campaign: Create the email Campaign (see Campaign Configuration: Email [Load and Send] for details). You can also create the Campaign through the Email Campaign API.