 Alert Groups
Overview
The primary purpose of an Alert Group is to notify a select group of individuals when some triggering event has occurred. That event could be any activity recorded by the platform, such as an email click or a Web Form submission. When the event takes place, the system deploys a message via Email, SMS Text, or Push Notification to the recipients included in the Alert Group.
Alert Groups are different from Seed Lists. A Seed List allows the platform to send a "copy" of an outbound message to a selected group. Conversely, when you assign an Alert Group to a Campaign, that Alert Group serves as the only Audience for that Campaign, overwriting any other Audience Filter selections you may have made. For this reason, Alert Groups should be assigned to a separate, dedicated Event-triggered Campaign whose only purpose is to send out alert messages when the desired triggering event takes place. The content of this Alert Group message can be anything you need.
You can also manage your Alert Groups through the Alert Groups API. This API endpoint allows you to retrieve information about an Alert Group, to manage the recipients within an Alert Group, or to define a new Alert Group.
Example
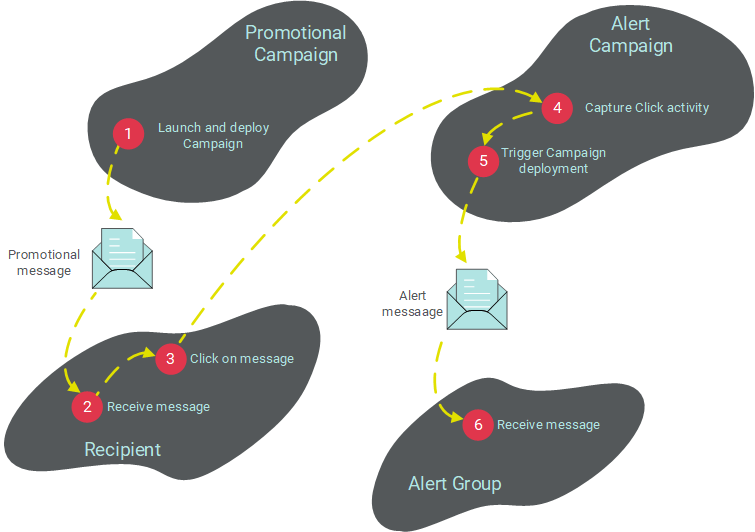
As an example, let's say you want to send a promotional email Campaign to your consumers, and you want to notify your internal salespeople when a consumer clicks on that promotional message. In this scenario, you need to set up two different Campaigns within the platform. The primary Campaign is a typical email marketing Campaign, with your desired promotional content, and an Audience Filter of your intended recipients.
Next, you need a secondary Event-triggered Campaign, with the desired triggering event ("Click" activity in this example). You could define the content of this secondary Campaign to include the contact information for the consumer who clicked on the promotional message. That way, your salespeople could follow up with the consumer. You create an Alert Group consisting of your salespeople, then assign this Alert Group to this secondary Campaign. This Alert Group becomes the Audience for this secondary Campaign. You would then launch both Campaigns.
Let's say a consumer receives the promotional email message, and clicks on it. The platform tracks that activity, which in turn triggers the deployment of the secondary alert Campaign. The platform deploys this Campaign containing the consumer contact information to ONLY the Alert Group.
The flowchart below depicts this process of setting up two separate Campaigns -- one that gets sent to consumers, and one with an Alert Group assigned to it.
Access
The Alert Group screen is accessible by the following method:
Features
|
Click hereClick here
To create a new Alert Group:
-
Above the list of existing Alert Groups, click + New button.
-
A "New Alert Group" pop-up window is displayed. In the "Name" field, enter a name for the new Alert Group.
-
From the "Data Source" drop-down menu, select the source table.
-
From the "Channel" drop-down menu, select the channel used to send the alert notifications (alert notifications can be sent via Email, SMS, or Push Notification).
-
Click Create. The Workspace is refreshed to show the Alert Group details screen.
-
By default, the system adds you as a member of the Group, and includes your contact information. To add another member, enter the member's contact information (email address or mobile phone number, depending on the Group's selected channel) in the "Add new list member" text field. Select a formatting option -- either "Plain Text" or "Multipart." Click the Add button (plus-sign icon). Repeat this step as needed to add more members to the Group. To remove a member, click the "X" icon next to the member.
-
Optionally, you can assign one or more tags to your Alert Group. To assign a tag, click on the "Add tag" field in the Edit section of the Tool Ribbon. The system displays a pop-up menu of all the existing tags. You can select one of these tags, or type in a new one and press Enter. You can repeat this process to add more tags. To remove a tag, click the "X" icon next to the tag label.
-
When finished, click Edit > Save in the Tool Ribbon.
|
|
Click hereClick here
To copy an existing item to use as the basis for a new item:
-
Search for the desired item (see Search for an Item for more details).
-
Click on the item name. The main item screen is displayed and populated with the details of the selected item.
-
In the Tool Ribbon, click Edit > Save As. A "Save as" dialog box is displayed.
-
Enter a name for the new item.
-
By default, the new item will be saved in the same folder location as the base item. Optionally, click the magnifying glass icon to browse to and select a different folder location.
-
Click save a copy. The system creates a copy of the selected item.
|
|
Click hereClick here
To view or edit an existing Alert Group:
-
When the screen is displayed, a list of all the current Alert Groups is displayed in the left-hand side of the Workspace. Optionally, you can filter this list by typing in all or part of an Alert Group name in the "Search by Name" field.
-
Click on the Alert Group that you want to view. The Workspace is refreshed to show the details of the selected Alert Group.
-
Optionally, to view detailed information about the Alert Group, click the Alert Group tab in the Tool Ribbon. The Item Details screen is displayed, showing who created the item, who modified it last, and what the last actions taken on the item were. On this screen, click "Related Items" in the Function Menu to see other items in the system that reference or utilize this Alert Group. When finished, click the Edit tab in the Tool Ribbon to return to the main edit screen.
-
Make any necessary changes to the Alert Group:
-
-
-
Remove an existing member by clicking the "X" icon next to the member.
-
Edit an existing member by changing the contact information, and / or the content type option.
-
Add a new member by entering the person's contact information (email address or phone number) into the "Add new list member" text field. Select a content type, then click the add button (plus-sign icon).
-
Optionally, to rename the Alert Group, click Edit > Rename. A "Rename Item" dialog box is displayed. Enter a new name for the Alert Group, then click save new name.
-
Optionally, you can assign one or more tags to your Alert Group. To assign a tag, click on the "Add tag" field in the Edit section of the Tool Ribbon. The system displays a pop-up menu of all the existing tags. You can select one of these tags, or type in a new one and press Enter. You can repeat this process to add more tags. To remove a tag, click the "X" icon next to the tag label.
-
To save your changes, click Edit > Save in the Tool Ribbon.
|
|
Click hereClick here
To delete an item:
-
Search for the desired item (see Search for an Item for more details).
-
Click on the item name. The main item screen is displayed and populated with the details of the selected item.
-
In the Tool Ribbon, click Edit > Delete. A confirmation dialog box is displayed.
-
Click delete item to confirm the deletion.
Foldered items are moved to the Recycle Bin. Non-foldered items are permanently deleted.
|
|
Click hereClick here
Alert Groups should be assigned to their own dedicated Campaign whose sole purpose is to generate alert notifications, and not to any "live" marketing Campaign. If you want to send out notifications to an Alert Group, you should create a new Event Triggered Campaign within Messaging, define the triggering event, define the content of the alert notification, and then assign the Alert Group. If you assign an Alert Group to a live marketing Campaign, the platform will stop sending messages to the Campaign's Audience, and will instead send messages only to the Alert Group. For this reason, you should keep "alert notification" Campaigns separate from "marketing" Campaigns.
The "alert notification" Campaign must be Event-triggered, and it must be in either the Email, SMS, or Push Notification channel. The channel associated with the Alert Group must match the Campaign channel (for example, you can't use an SMS Alert Group in an Email Campaign).
Note: You can assign only one Alert Group to a Campaign. If you need to send notifications to multiple Alert Groups, you'll need to define separate Campaigns for each Alert Group.
To assign an Alert Group to a Campaign:
-
Navigate to the desired Campaign (see Campaigns for more details).
-
In the Tool Ribbon, click Options > Audience > Add an Alert Group. A "Browse Alert Group" dialog box is displayed, showing all existing Alert Groups with the same channel as this Campaign.
-
Click on an Alert Group.
-
Within the "Audience" section of the Campaign screen, the system adds a new "Alert Group" field. To view or edit the Alert Group, click on the group's name. To remove this Alert Group from the Campaign, click the "X" icon to the right of the group name.
-
In the Tool Ribbon, click Edit > Save.
|