 Approval Workflows
Overview
Within Engage+, many clients have different groups of users responsible for performing different tasks. For example, a client might have a "creative" team responsible for the artwork and assets in an email message, a "marketing" team responsible for building the audience, and a "technical" team responsible for any coding. In order to facilitate hand-offs between these different groups, Engage+ allows you to establish points in the system that require approval before processing can continue, or before an item can be used. This feature, called an Approval Workflow, allows you to establish the rules around the approval -- who the requestors and approvers are, the types of items that require approval, and what the next steps should be after an item is approved or rejected.
The following diagram depicts a typical process for an Approval Workflow.
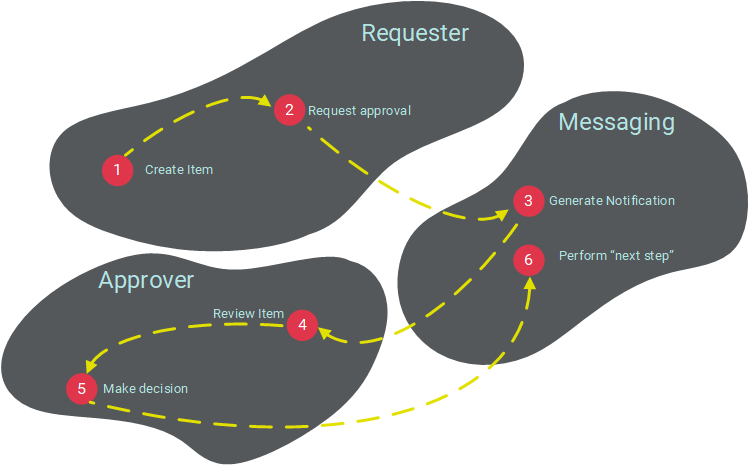
Items requiring approval will remain in a "draft" state, and can't be used until the designated approver reviews the item, and officially approves it. For example, a Campaign requiring approval can't be deployed until it's been approved.
Once an item has been approved, it's available to be used unless the requestor edits the item, which puts it back into a "draft" state. The item remains in that "draft" state until the approver again reviews and approves the modifications.
Access
The Approval Workflow screen is accessible by the following method:
Features
|
Click hereClick here
To create a new Approval Workflow:
-
Above the Navigation Tree, click + New.
-
A New Approval Workflow pop-up window is displayed. Enter a name for the new Approval Workflow, and click Create.
-
The Workspace is refreshed to show a blank Approval Workflow.
-
The Approval Assignment section allows you to identify the approval requestor, and for what item type. Select a user and an item type (Campaign, Content Block, Dynamic Block, or Filter), then click the add button (plus-sign icon).
-
The selected user / item type is added to the list of requestors. Optionally, repeat step 4 as needed to add more requestors and / or item types.
-
The Approval Steps section allows you to identify the user who will perform the approval, as well as what the consequences are to approving, or not approving, the item. Select the approver from the drop-down menu.
-
The selected user is added to the list of approvers. Optionally, repeat step 6 as needed to add more approvers.
Note: If you add multiple approvers, an email notification will be sent to each of them. However, only ONE of them has to actually approve the item, not all of them.
-
From the "On not approved" drop-down menu, select what action the system should take if the item is not approved. The options in this menu are "Do nothing" or "Notify approval requestor."
-
From the "On approved" drop-down menu, select what action the system should take if the item is approved. The options in this menu are "Notify item is approved" or "Go to next step."
-
Optionally, you can add another approval step by clicking Edit > Add Approval Step in the Tool Ribbon. In the new approval step, repeat the above process of selecting an approver (or approvers), and selecting the appropriate actions for when the item is approved and when it is not approved.
Note: An Approval Workflow can consist of multiple Approval Steps. However, once an Approval Step is added, you can't delete it.
-
Optionally, you can add one or more tags to this new Approval Workflow. Tags are labels that can be attached to any item, to help with searching and filtering. To assign a tag, click on the tag field in the Edit > Tags section of the Tool Ribbon. The system displays a pop-up menu of every tag utilized within the current system. Select a tag from this menu, or type in a new tag and press Enter.
-
When finished, click Edit > Save in the Tool Ribbon.
|
|
Click hereClick here
To copy an existing item to use as the basis for a new item:
-
Search for the desired item (see Search for an Item for more details).
-
Click on the item name. The main item screen is displayed and populated with the details of the selected item.
-
In the Tool Ribbon, click Edit > Save As. A "Save as" dialog box is displayed.
-
Enter a name for the new item.
-
By default, the new item will be saved in the same folder location as the base item. Optionally, click the magnifying glass icon to browse to and select a different folder location.
-
Click save a copy. The system creates a copy of the selected item.
|
|
Click hereClick here
To view or edit an existing Approval Workflow:
-
When the screen is displayed, a list of all the current Approval Workflows is displayed in the left-hand side of the Workspace. Optionally, you can filter this list by typing in all or part of an Approval Workflow name in the "Search by Name" field.
-
Click on an Approval Workflow name. The Workspace is refreshed to show the details of the selected Approval Workflow.
-
To view information about the selected Approval Workflow, select the "Workflow" tab in the Tool Ribbon. The Workspace is refreshed to show item details (date created, owner, etc.) and revision history. To see a list of other items that reference this Approval Workflow, click "Related Items" in the Function Menu. When finished, select the "Edit" tab in the Tool Ribbon to return to the main view of the Approval Workflow.
-
Make any necessary changes to the Approval Workflow:
-
-
The "Approval Assignment" section lists all the approval requestors, and for which item types.
-
-
To remove a requestor and item type, click the "X" icon next to the name.
-
To add a new requestor, select him or her from the drop-down menu, then select an item type. Click the add button to add this requestor and item type. Optionally, you can repeat this process as needed to add additional requestors and item types.
-
The "Approval Steps" section lists the approver, and what the system should do when an item is approved or not approved.
-
-
To remove an approver, click the "X" icon next to the name.
-
To add an approver, select his or her name from the drop-down menu.
-
From the "On not approved" drop-down menu, select what action the system should take if the item is not approved. The options in this menu are "Do nothing" or "Notify approval requestor."
-
From the "On approved" drop-down menu, select what action the system should take if the item is approved. The options in this menu are "Notify item is approved" or "Go to next step."
Note: An Approval Workflow can consist of multiple Approval Steps, and you can always edit an Approval Step by changing the approver, or by changing the resulting actions on approval / not approval. However, once an Approval Step is added, you can't delete it.
-
Optionally, to rename the Approval Workflow, click Edit > Rename. A "Rename Item" dialog box is displayed. Enter a new name for the Approval Workflow, then click save new name.
-
When finished, click Edit > Save in the Tool Ribbon.
|
|
Click hereClick here
To delete an item:
-
Search for the desired item (see Search for an Item for more details).
-
Click on the item name. The main item screen is displayed and populated with the details of the selected item.
-
In the Tool Ribbon, click Edit > Delete. A confirmation dialog box is displayed.
-
Click delete item to confirm the deletion.
Foldered items are moved to the Recycle Bin. Non-foldered items are permanently deleted.
|
|
Click hereClick here
If you're listed as the "approver" within an Approval Workflow, the system will send you an email notification when a user has requested that you approve an item that he or she has created. This email notification will contain the item type and name, as well as the requestor's name.
Sample email:
Your have been Requested to Approve the Content Block-Hawaii Content Block.
This request was sent from John Smith on 10/7/2015 6:18:52 PM
To review an item:
-
Search for the desired item (see Search for an Item for more details on the available search methods).
-
Click on the item name. The item detail screen is displayed.
-
Review the item.
-
Make an approval decision:
-
Reject: To reject the item, click Edit > Status > Reject in the Tool Ribbon. The system changes the item status back to "Draft," and initiates the "On Not Approved" workflow step identified in the Approval Workflow. If this workflow step includes an email notification, then the requestor will receive a notification informing him or her that you rejected the item.
Sample email:
Your Request for Approval to set the Content Block-Hawaii Content Block to the Ready State was rejected by Bill Johnson.
-
Approve: To approve the item, click Edit > Status > Approve in the Tool Ribbon. The system changes the item status to "Ready to Use," and initiates the "On Approved" workflow step identified in the Approval Workflow. If this workflow step includes an email notification, then the requestor will receive a notification informing him or her that you approved the item.
Sample email:
Your Request for Approval to set the Content Block-Hawaii Content Block to the Ready State was accepted by Bill Johnson.
|