 Member Attributes
Overview
The Member Attributes screen is used to view and manage the demographic fields and other attributes that relate to your Members. The platform includes a wide range of default "System" Attributes applicable to most client loyalty programs. In addition, you can create custom Attributes in order to meet your specific business requirements.
The Marigold Loyalty platform supports a wide range of options and properties related to Member Attributes, such as different data types, the use of pre-defined values, the use of a default value, and organizing Attributes into Categories. You can made Attributes read-only, required, or static. You can also create Calculated Attributes, that are populated based on a formula or function.
Access
To access the Member Attributes screen, select Program from the Main Navigation Menu, then select Member Attributes from the Sub-Category menu.
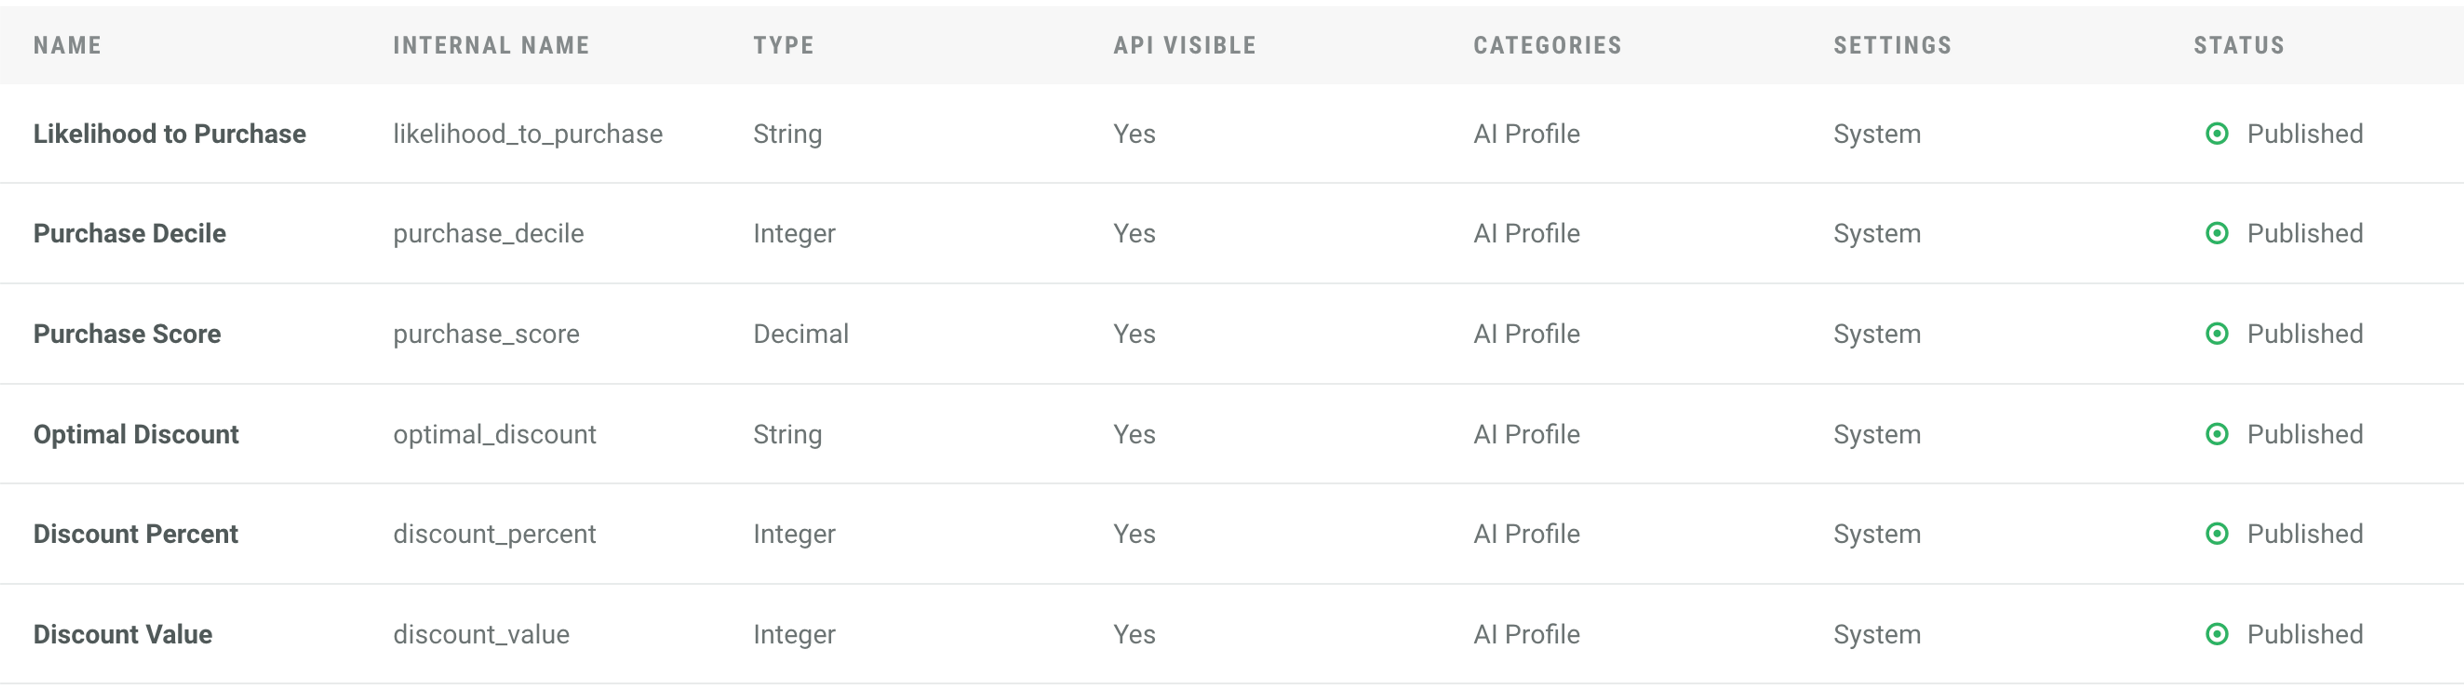
Marigold Artificial Intelligence
The member profile can capture and manage Marigold AI scores related to likelihood to purchase and the optimal offer value needed to incentivize the next purchase. In future releases, Marigold AI capability will help programs optimize offer targeting to improve member engagement, reduce over-discounting, and improve program margins.
Features
The Member Attributes screen provides the following features related to managing your Member Attributes:
|
SearchThe search feature allows you to search for a specified text string anywhere within the following Member Attribute fields: Name, Internal Name, Data Type, Source, or Category name.
SortThe "Sort" drop-down menu allows you to sort the Member Attributes on a variety of different fields. To sort the list of Member Attributes, select the desired sort option from this menu.
NavigationOnce you've found the desired Attribute, you can navigate to the following other screens:
|
|
To create a new Attribute:
To make your new Attribute available, it must have a Status of Published, and you must deploy metadata; see below for details.
|
|
Subscription Fields are a special type of Attribute used to manage a consumer's eligibility to be contacted in a marketing campaign. To create a new Subscription Field:
To make your new Subscription Field available, it must have a Status of Published, and you must deploy metadata; see below for details.
|
|
To view or edit the details of an Attribute:
|
|
This capability is applicable to any client who has a custom attribute for SMS. The outcome is that a member can subscribe to push notifications based on the customer’s custom attribute.
Configure the Custom Member Attribute For email and SMS messages, you must configure the Message Subscriptions category for the custom member attribute in order for the attribute to be available in the Message Subscription list for Push Messages.
Configure Message Subscription Attributes for Push
Deploy Program Metadata Important: Prior to performing the steps below, you should click on Compare Versions to compare differences to ensure you are not deploying some feature that is not ready to go live.
|

|
After you've created or edited a Member Attribute, you must deploy metadata.
|
Calculated Attributes
A Calculated Attribute is a special type of Member Attribute whose value is dynamically derived instead of being directly specified. The Calculated Attribute value holds the result of the expression as it was last computed.
At a minimum, a Calculated Attributed is defined by the following:
-
A name
-
A data type
-
An expression for deriving the attribute value
-
A Time-to-Live (TTL) value that indicates how long the calculated value is considered valid before it can be re-calculated
-
A computation mode defining when the attribute value should be computed
Loyalty supports the use of Groovy for writing Calculated Attribute expressions. Groovy is a scripting language that integrates with Java. You must have a solid understanding of the Groovy language in order to write Calculated Attribute expressions. Within the Groovy expression, Calculated Attributes can use any Profile attribute and / or any Activity attribute that's defined within the Loyalty database. In addition, the platform supports the use of pre-defined functions to make the scripting easier.
To create a Calculated Attribute, check calculated when defining the new Attribute properties. Then navigate to the Member Attribute Details screen to configure the details of the calculation.
The platform supports two different methods of refreshing the values in a Calculated Attributes. These methods (called "computation modes") are On-demand and Scheduled.
On-demand
On-demand computation happens when some event or caller needs to display the value in the Calculated Attribute for an individual. This caller could be, for example, a mobile app, a website, an API call, or a user within the platform's interface.
When this call occurs, the platform checks the Time-to-Live value for the Calculated Attribute for the referenced Member. If the current time is beyond the TTL range, the platform will recalculate the value in the Calculated Attribute. Conversely, if the current time is still within the TTL range, the platform will simply show the existing "cached" value.
Scheduled
Scheduled computation occurs based on a Scheduled Job. When the Job executes, it will recalculate the values in the Calculated Attribute for every customer record in the database.
Scheduled Jobs are created by the Loyalty Services team. If you need a new Scheduled Job for a Calculated Attribute, you must submit a request to the Services team. Within the request, include the following:
-
Scheduled Job type is "Calculated Attribute"
-
The recurring schedule frequency and interval (for example, "every day at midnight, Central Standard Time").
-
The name of the Calculated Attribute you want refreshed.
Once the Scheduled Job is created and published, it will execute at the designated frequency to recalculate the Calculated Attribute.
Last Updated: October 2024