 Scheduled Jobs
Using The Scheduled Jobs Screen
Scheduled jobs are a great way for marketers to execute a Marigold Loyalty action, such as sending a batch message as with an annual birthday message, for their customers.
Manage Scheduled Jobs
Use the Admin | Scheduled Jobs screens to manage scheduled jobs on the Marigold Loyalty Cloud Platform. A scheduled job can run one time, or on a recurring schedule (e.g. every Monday at 11:00pm EDT, or on the 30th minute of every even hour). Each scheduled job executes a Marigold Loyalty action (e.g. send a batch message, such as a daily birthday message). The Scheduled Jobs screen prompts you enter the parameters for the selected action, and also optionally pass custom parameters to the action.
On this screen, you can search and view background jobs, then view the following fields for each background job:
|
In the Edit Scheduled Job pop-up: 3. Type in a Label (name of the job). 4. Type in a Description. 5. Select a Recurrence:
6. Enter the frequency and time in the Schedule Composer. 7. Click and select a Time Zone from the drop-down. 8. Turn On or Off if the Scheduled Job is Active. 9. Click Log every run and select Yes or No for Scheduled Jobs to be logged. 10. Click Priority and select either Default or High. 11. Type in emails to notify in the Notifications Emails field. 12. Choose the Calendar Background color. 13. Click the Action Type drop-down. 14. Select an Action Type. 15. Click Save.
|
|
Search for an existing scheduled job and modify its settings.
|
|
The Grant Anniversary Job supports use cases where date attributes on the member record can be evaluated by the system and optionally:
Note that once Grant Anniversary is selected, additional parameters to then define the Grant Anniversary action are displayed. More information is as follows: Grant Anniversary Action The Data Search Strategy has the following options:
For cases where only the day and month are checked (i.e., cases issuing an offer or reward for a member's birthday), the proper option to select is Future. Cases where the birthday day/month is in the future, the Padding Days value should be a positive value, e.g., 7, which would represent a birthday that occurs 7 days in the future. Cases where the birthday day/month is in the past, the Padding Days value should be negative, e.g., -7, which would represent a birthday that occurred 7 days in the past, relative to when the job runs. For cases where the day, month, and year are checked (i.e., to issue an offer or send a message a certain number of days after program sign up), the proper option to select is Past. The Padding Days value should be positive, e.g., 3, which would represent a signup date 3 days in the past. To define the Grant Anniversary Action customization page that appears below the Edit Scheduled Job:
Note: Information about the other fields contained in the Edit Scheduled Job pop-up can be found in the Create a Scheduled Job section above. The Padding Days and Data Search Strategy approach is used to evaluate absolute dates like Member Since, the date the member enrolled in the loyalty program. The system issues rewards and/or sends messages only once on a specified number of days from the date on the member’s profile.
|
|
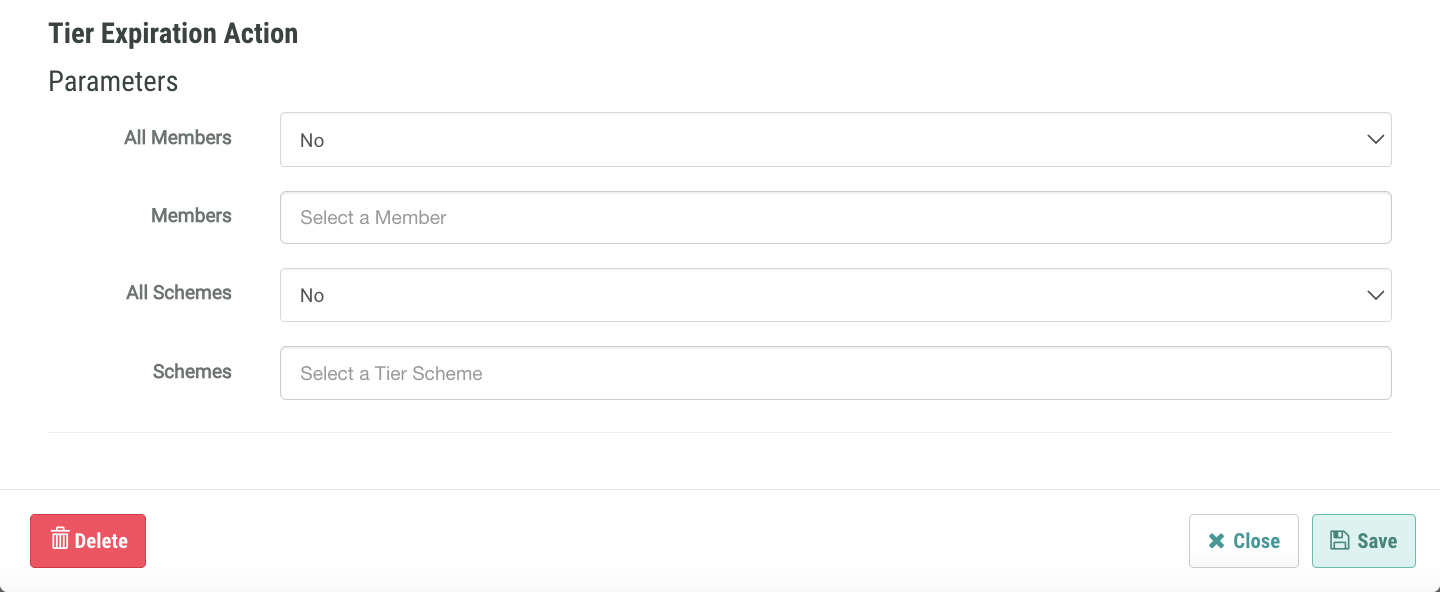
When you are creating a new Scheduled Job, you need to select an Action Type. By selecting the Action Type: Tier Expiration, you can define the specifics in how the tier expires. To define the Tier Expiration: Once you click on the Action Type: Tier Expiration, the Tier Expiration Action Parameters will appear.
|
|
The Batch Merge Accounts Job gives customers the flexibility to initiate a merge from their main system by sending a file on a schedule to be processed. This feature automates and simplifies the process of merging member accounts via a file drop with minimal manual input. |
|
|
|
Note: The “Run Now” button is not available for scheduled jobs that can run only “Once” and have already run.
|
|
The Refresh Wallet Pass action type provides users with a simple, automated means by which to process a Wallet Pass refresh. This feature eliminates the need for manual steps such as exports, imports, and associated triggered actions required to complete the refresh.
|
In addition, the Marigold Loyalty Jobs screen has a Calendar view that shows all scheduled jobs in a calendar format.
Marigold Engage+
You can configure personalization details such as member attribute values, metrics, or other activity details in the message configuration of scheduled jobs without the need for scripting. Specifically, this capability applies to scheduled jobs configured to send email via Marigold Engage+ for a Grant Anniversary Job or a Send Expiry Notifier Job.
New configuration settings dropdown for Type include Attribute, Metric, Content Token, and Advanced options wherein Advanced allows for a textbox for current scripting options.
Note: For existing scheduled jobs, personalization elements should use the Advanced type to ensure scripting continues to work as expected.
Marigold Engage
Grant Anniversary and Send Expiry Notifier job types feature Marigold Engage as a sending channel option. When the marketer selects the Send Messages via Marigold Engage option, the scheduled job configuration panel will display settings that allow the configuration of the Engage connector profile, the Engage journey, the specific language to be used in the message, and personalization parameters.