The JavaScript SDK provides client-side functionality that enables a customer’s website to:
- Use the Loyalty Login
- Call into Loyalty’s Member APIs
The SDK works on both desktop and mobile web browsers.
This getting started guide will show you how to setup the SDK and get it to make some basic API calls.
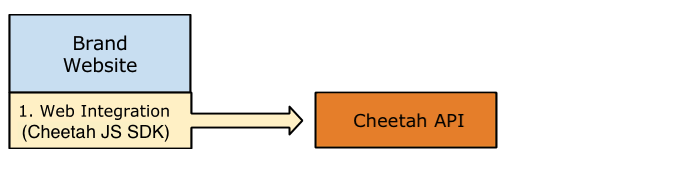
Web Integration
In order to display loyalty content, customers need to integrate their website with the loyalty platform. This is done by identifying pages on the website that need to display loyalty content (possibly creating some new pages), and then embedding small snippets of JavaScript on those pages that will connect to the loyalty platform and pull in content.
This process is very similar to platforms such as Facebook. Loyalty by Zeta provides a JS SDK, which is a JavaScript toolkit that makes it easy to integrate the brand website with the loyalty platform, by adding a snippet of JavaScript to a web page.
Getting Started
Follow these steps to achieve a basic end-to-end website integration, connecting your website to Loyalty.
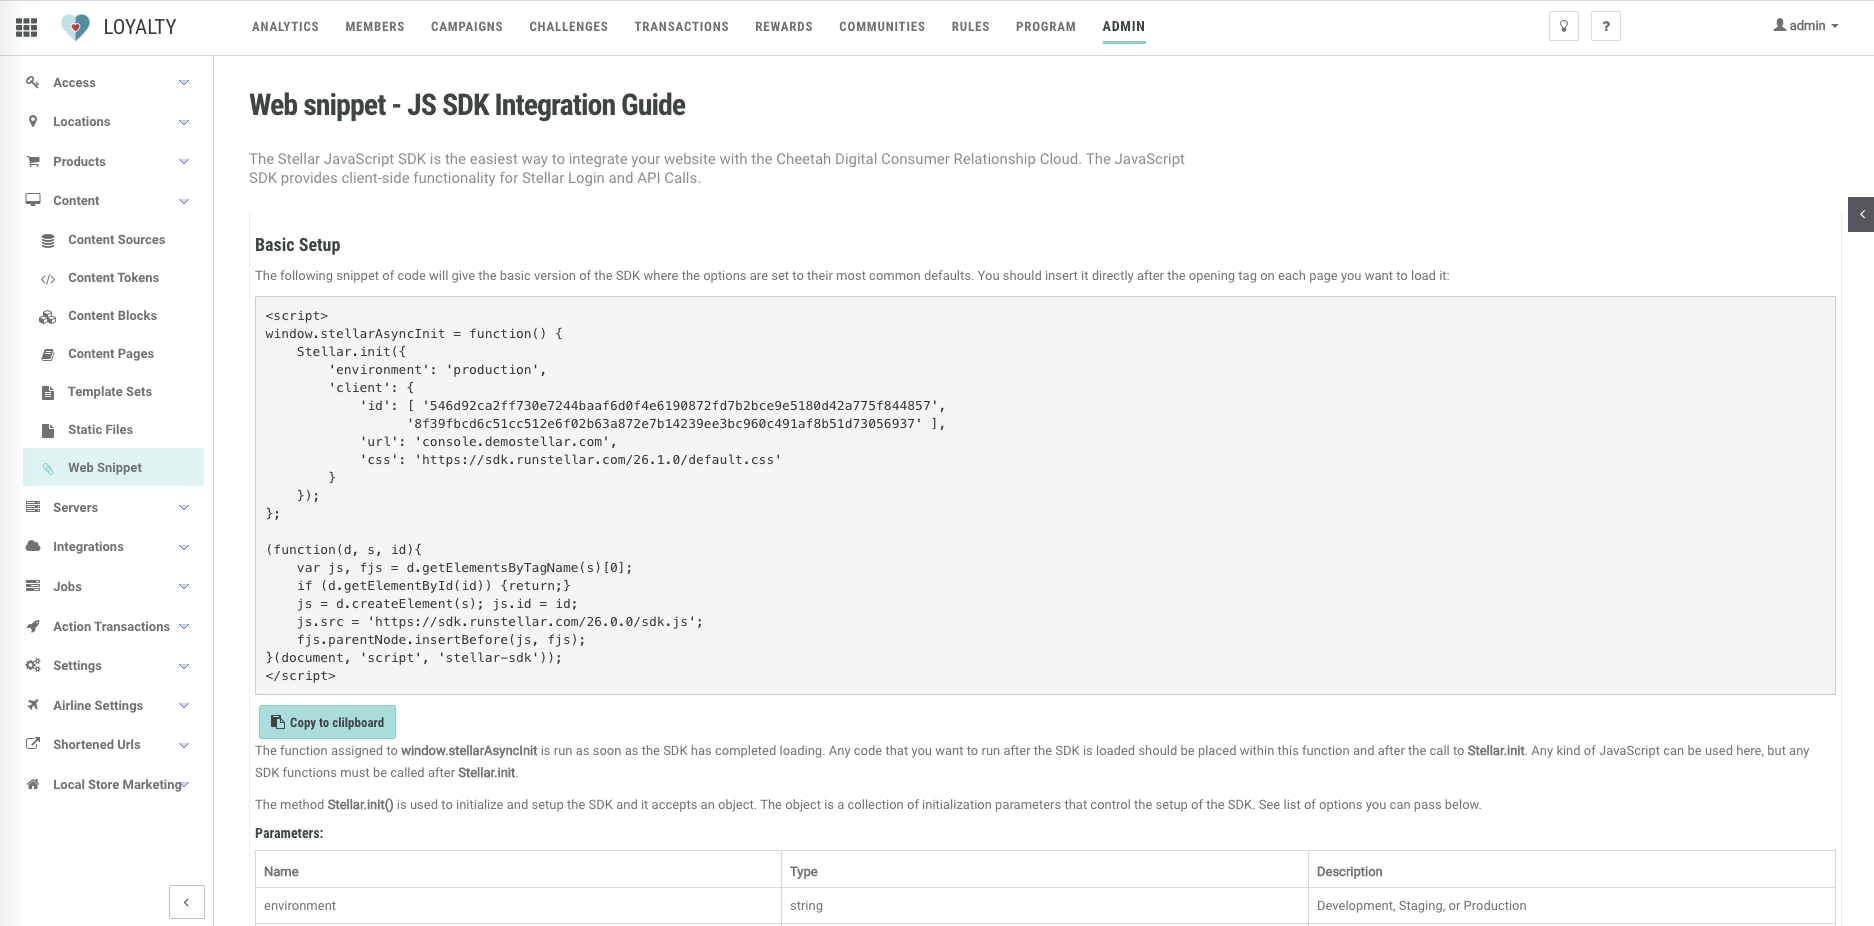
- Customer logs into the Loyalty admin console and navigates to Admin > Web Snippet to find their automatically generated JS SDK snippet.
- Customer creates a test page on their website, such as “challenges.html”, and then copy/pastes the snippet onto that web page.
- Customer create stellar-login element snippet in challenges.html.
- Customer tests the web page by loading it into a browser. A login box should appear.
- Customer tests login by typing the username/password of a Member.
Note: this web snippet is also a central place to find a few customer-specific values such as server hostnames
Basic Setup
The following snippet of code will give the basic version of the SDK where the options are set to their most common defaults. You should insert it directly after the opening tag on each page you want to load it:
<script>
window.stellarAsyncInit = function() {
    Stellar.init({
        'environment': 'production',
        'client': {
            'id': [], // stellar [client_id, secret_id]
            'sdk': '', // stellar js sdk path
            'url': '', // stellar admin console path
            'css': '' // stellar default css path
        },
        // additional options
    });
};

(function(d, s, id){
    var js, fjs = d.getElementsByTagName(s)[0];
    if (d.getElementById(id)) {return;}
    js = d.createElement(s); js.id = id;
    js.src = ''; // stellar js sdk path
    fjs.parentNode.insertBefore(js, fjs);
}(document, 'script', 'stellar-sdk'));
</script>
The function assigned to window.stellarAsyncInit is run as soon as the SDK has completed loading.
Any code that you want to run after the SDK is loaded should be placed within this function and after the call to Stellar.init.
The method Stellar.init() is used to initialize and setup the SDK and it accepts an object. The object is a collection of initialization parameters that control the setup of the SDK. See list of options you can pass below.
| Name | Type | Description |
|---|---|---|
environment |
string | Development, Staging, or Production |
client.url |
string | The hostname of the admin console provided. |
client.id |
string | The id of the javascript app that will be used to communicate with the server. This can be found in the admin apps page (console/apps). |
client.sdk |
string | Url of the js sdk |
client.css |
string | Url of the default css for sdk |
twitter.consumerKey |
string | Twitter app consumer key. This key will be used on challenges with social type twitter. |
twitter.authorizationUrl |
string | The authorization url handles the twitter connect process via the client.url. For now we let the publisher provide the url. e.g. client.url/users/auth/twitter?connect=http://your.appdomain.com |
instagram.clientId |
string | The instagram app id. This key will be used on challenges with social type instagram |
instagram.redirectUri |
string | The web app’s hostname where we can redirect a successful instagram connect challenge. |
facebook.appId |
string | The facebook app id. This id will be used on challenges with social type facebook. |
pixelId |
string | —- |
staticChallenges |
string | This is the link to generated static list of challenges. |
staticGallery |
string | This is the link to generated static list of gallery images. |
staticMemberGroups |
string | This is the link to generated static list of member groups. |
Sample with facebook, twitter, etc social apps defined.
<script>
window.stellarAsyncInit = function() {
    Stellar.init({
        'environment': 'production',
        'client': {
            'id': [ '546d92ca2ff730e7244baaf6d0f4e6190872fd7b2bce9e5180d42a775f844857',
                  '8f39fbcd6c51cc512e6f02b63a872e7b14239ee3bc960c491af8b51d73056937' ],
            'url': 'https://stellar-admin-console.com',
            'sdk': 'https://sdk.runstellar.com/26.1.0/sdk/sdk.js',
            'css': 'https://sdk.runstellar.com/26.1.0/default.css'
        },
        'facebook': {
            'appId': '', // facebook app id
        },
        'instagram': {
            'clientId': '', // instagram client id
            'redirectUri': '' // redirect to you app domain
        },
        'twitter': {
            'consumerKey': '' // twitter consumer key
            'authorizationUrl': '' // admin console twitter auth +  app domain example: 'https://stellar-demo.com/users/auth/twitter?connect=http://stellar-webapp.demostellar.com'
        },
        'google': {
            'clientId': '' // google clientId
        }
    });
};

(function(d, s, id){
    var js, fjs = d.getElementsByTagName(s)[0];
    if (d.getElementById(id)) {return;}
    js = d.createElement(s); js.id = id;
    js.src = 'https://stellar-demo.com/sdk/sdk.js'; // Stellar js sdk path
    fjs.parentNode.insertBefore(js, fjs);
}(document, 'script', 'stellar-sdk'));
</script>
Advanced Setup
Below is an example on how you can externalize them into files.
First you need to separate your configuration by creating a config-[environment].js file.
Copy and paste the sample config file below.
Note: You may create different config files for your development, staging and production.
// config-staging.js
window.stellarLoadApp({
    'program': 'Program Name',
    'environment': 'staging',
    'client': {
        'url': 'https://stellar-staging.com',
        'sdk': 'https://sdk.runstellar.com/26.1.0/sdk/sdk.js',
        'css': 'https://sdk.runstellar.com/26.1.0/default.css',
        'id': [ '57fb4db33b8307146bb6a83e480bf73593cffe84037b512236bfcf6dfff9fc58',
              'fa039a0f281ca827814fcdb4f284074eff7e2ccd55b257b12260f87165f6ec43' ]
    },
    'staticChallenges':   'replace this with the url of the generated static challenges list',
    'staticGallery':      'replace this with the url of the generated static gallery',
    'staticMemberGroups': 'replace this with the url of the generated member groups list',
    'facebook': { 'appId': '668784906557840' },
    'instagram': { 'clientId': '92f4c6f65d494b67b9f7c96ccf9b4cb9' },
});
Create an external file stellar-init.js and copy and paste the code block below.
This script detects your environment and loads the appropriate configuration and the Loyalty JS SDK.
// stellar-init.js
// Define your Stellar environments
window.stellarEnvironments = {
  'staging': {
    'domains': [ "stellar-app.com", "stellar-app2.com" ],
    'config_url': 'https://stellar.staging.com/config-staging.js'
  },
  'production': {
    'config_url': 'https://stellar.production.com/config-production.js'
  },
  'development': {
    'config_url': 'https://stellar.development.com/config-development.js'
  }
};

// Run Stellar
// This function is called when your environment and the Loyalty JS SDK are
// loaded and ready to run.
//
// The JS SDK will be available in the "Stellar" namespace, and you can run
// custom code here as needed.
// If you want to abort the standard loading then *return true* from this function .
//
// If you do not need custom code, just leave the function empty or comment it out.
// The default is:
//     window.runStellar = function () { return false };
//     window.stellarReady = function () { return false };

window.runStellar = function () { return false; };
window.stellarReady = function () { return false; };

//////////////////////////////////////////
// DO NOT EDIT ANY CODE BELOW THIS LINE //
//////////////////////////////////////////
//
// Stellar Init
// Copyright (c) 2016 Loyalty, Inc. All Rights Reserved
//
// This script bootstraps the Stellar JS SDK
// 1. detect environment
// 2. load environment-specific config.js
// 3. config.js calls window.stellarLoadApp to load JS SDK
// 4. window.stellarLoadApp calls window.stellarAsyncInit to load web app
//

;(function () {
  if (typeof window.stellarInitOpts == "undefined") {
    window.stellarInitOpts = { context: "", isDefault: true }
  }

  var host = location.hostname,
      env;
  if (host.indexOf("local.") === 0 || host.indexOf("sdk.") === 0) { env = 'development' }
  else if (window.stellarEnvironments.custom.domains.indexOf(host) !== -1) { env = 'custom' }
  else if (host.indexOf("demostellar.com") !== -1 ||
    window.stellarEnvironments.staging.domains.indexOf(host) !== -1) { env = 'staging' }
  else { env = 'production' }
  window.stellarInitOpts.environment = env;

  window.stellarScriptLoader = function (d, s, id, src, dm, successCallback) {
    var js, fjs = d.getElementsByTagName(s)[0];
    if (d.getElementById(id)) { return; }
    js = d.createElement(s); js.id = id; js.src = src;
    if (dm) { js.setAttribute('data-main', dm) }

    successCallback = successCallback || function() {};
    if (js.readyState) {
      el.onreadystatechange = function() {
        if (el.readyState == 'loaded' || el.readyState == 'complete') {
          el.onreadystatechange = null;
          successCallback();
        }
      }
    } else { js.onload = successCallback; }
    fjs.parentNode.insertBefore(js, fjs);
  };

  // calls window.stellarLoadApp
  window.stellarScriptLoader(document, 'script', 'stellar-config',
    window.stellarEnvironments[window.stellarInitOpts.environment].config_url);

  window.stellarLoadApp = function (config) {
    window.stellarConfig = config;

    config.environment = config.environment || window.stellarInitOpts.environment;
    if (config.environment !== window.stellarInitOpts.environment) {
      console.log('WARNING - detected environment does not match configuration');
    }
    // calls window.stellarAsyncInit
    window.stellarScriptLoader(document, 'script', 'stellar-sdk', config.client.sdk);
  }

  window.stellarAsyncInit = function () {
    if (typeof window.runStellar === "undefined") { window.runStellar = function () {} }
    if (typeof window.stellarReady === "undefined") { window.stellarReady = function () {} }
    Stellar.initOpts(window.stellarConfig);
    if ( ! window.runStellar(window.stellarConfig)) {
      //Stellar.init(window.stellarConfig, Stellar.ui.refresh, window.stellarReady);
      Stellar.init(window.stellarConfig, function() { window.stellarReady(); Stellar.ui.refresh();  } );
      if (window.stellarConfig.themeUrl) { stellarScriptLoader(document, 'script', 'stellar-theme', window.stellarConfig.themeUrl) }
    }
  };

})();
After creating the above files config-[environment].js and stellar-init.js, you will only need to load the stellar-init.js file in your app.
Inside the stellar-init.js code block are codes that loads the config-staging.js, config-production.js, config-development.js file you need for a particular environment.
Include the stellar-init.js file on your page.
Tip: We recommend uploading stellar-init.js and config.js into Static Files. To do this, login to the Loyalty admin console and go to Admin > Content > Static Files. Then get the URL of the file and include that in your web page.
<body>

  <div class="stellar-login"></div>

  <div class="stellar-challenges"></div>
  <div class="stellar-offers"></div>
  <div class="stellar-rewards"></div>

  <script src="stellar-init.js"></script>
</body>
Now you’re ready to use the Loyalty JS SDK Functions including Loyalty Elements.
<div class="stellar-login"></div>
<div class="stellar-challenges" data-layout="medium_rectangle"></div>
Previous Introduction Next: Stellar Elements