 Email Submission Handlers
Overview
In order to comply with certain regional marketing regulations (such as in Japan, for example), Engage+ can optionally be configured to enforce a "double opt-in" method for validating consumer eligibility. If using this method, the consumer must register to receive your marketing email messages, AND confirm the registration. Only consumers who have completed both steps in this process (i.e., the "double opt-in") will be considered eligible to receive email messages.
Enforcement of the double opt-in is managed at the Sender Profile level. A Sender Profile can be configured with an optional "Requires Confirmation" parameter. When this parameter is enabled, all email Campaigns deployed using this Sender Profile will check the consumer's double opt-in status before sending that consumer a message. This parameter is available only for the email Channel.
Note: Configuring a Sender Profile to enforce the double opt-in status requires Administrator-level access to Engage+. Please speak with your Client Services Representative for assistance on configuring your Sender Profile.
When a Sender Profile has been configured with the "Requires Confirmation" parameter, the system automatically creates a new field for each existing field with a Data type of "Email." This new field is named "<email field name> Confirmation," and is used to manage the eligibility status for each consumer. The possible values for this Confirmation field are: "1 = Confirmed," and "0 or Null = Not confirmed."
Please note that a consumer must complete BOTH steps in the double opt-in process in order to have a Confirmation status of "Confirmed." A consumer who has completed only the first step (registration), but not the second step (confirmation), will still have a status of "Not confirmed," and will therefore be ineligible to receive email messages send from this Sender Profile.
Process Flow
Engage+ offers two main methods of setting up the double opt-in process: a Web Form and an Email Submission Handler. Both methods are described below in more detail.
Web Form
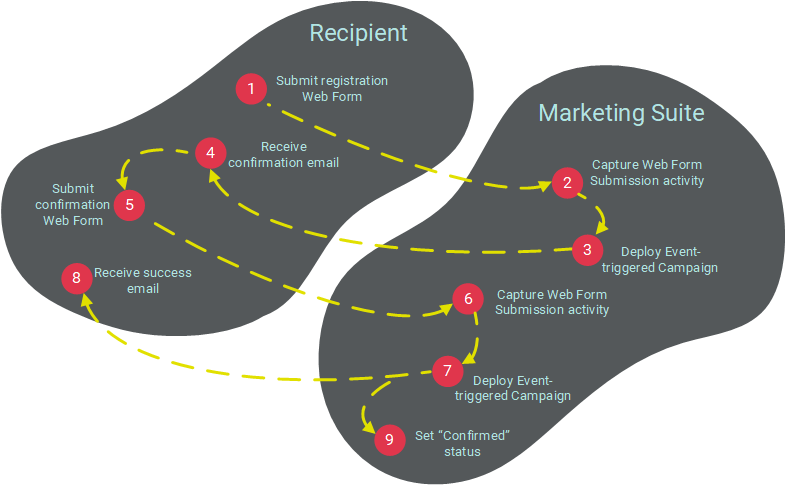
With this method, you create a Web Form for the consumer to enter and submit his or her registration. The submission of this form triggers the deployment of a Event-based Campaign. The content of this Campaign contains a registration confirmation link (which can optionally have an expiration assigned to it). When the consumer clicks the link, a second Web Form is displayed for the consumer to confirm his or her opt-in. When the consumer submits this second Web Form, the system sends a "success" email message, and updates the "Confirmation" status field. For more information on setting up Web Forms, please see the Web Forms topic.
Email Submission Handler
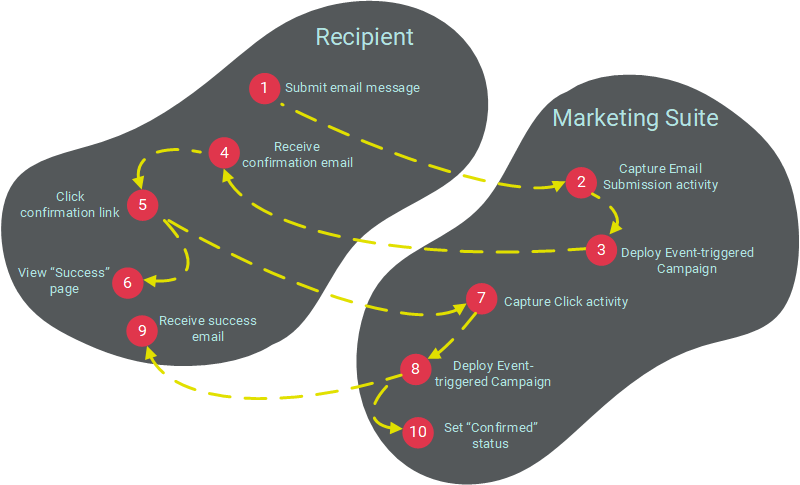
With this method, you create a "Handler" that controls the double opt-in process. The Email Submission Handler consists of a special email address that consumers can contact to submit their registration. Upon receipt of a message sent to this email address, the platform triggers the deployment of a Event-based Campaign. The contents of this Campaign include a registration confirmation link (which can optionally have an expiration assigned to it). When the consumer clicks the link, the Email Submission Handler updates the "Confirmation" status field.
For either method described above, the platform uses an Event-based Campaign to send the email message with the registration confirmation link. However, the consumer's status at this point in the process is still "Not confirmed" because he or she has not yet confirmed the registration. In order to deploy email messages to an "unconfirmed" consumer, the platform offers an override feature within the "Sending" section on the Campaign screen. This feature is intended primarily for this use case, when trying to send confirmation email message to unconfirmed consumers.
Access
The Email Submission Handlers screen is accessible by the following method:
Features
|
Click hereClick here
To create a new Email Submission Handler:
-
Click + New above the list of existing Email Submission Handlers.
-
A "New Item" pop-up window is displayed. In the "Name" field, enter a name for your new Email Submission Handler.
-
From the "Data Source" drop-down menu, select the source table.
Note: You can never modify this source table after the Email Submission Handler is created.
-
Click Create. The Workspace is refreshed to show a blank Email Submission Handler details screen, where you can configure the details of the Email Submission Handler.
-
Optionally, you can assign one or more tags to your Email Submission Handler. To assign a tag, click on the "Add tag" field in the Edit section of the Tool Ribbon. The system displays a pop-up menu of all the existing tags. You can select one of these tags, or type in a new one and press Enter. You can repeat this process to add more tags. To remove a tag, click the "X" icon next to the tag label.
-
In the "Email Address" section, you'll define the email address that consumers will contact to begin the double opt-in process. In the text field, enter the username portion of the email address. Then, from the drop-down menu, select the domain portion of the email address. This menu is populated with all of the sending domains defined for your client account.
-
The "Add / Match to email address in column" drop-down menu is populated with all of the fields on the selected source table that have a Data Type of "Email." The platform will match the consumer's email address against the field you select here in order to determine if this consumer already exists in the source table, or if he or she is new. The platform will add or update the consumer record accordingly. From this menu, select the desired field that you want to match against.
-
The "Field Values" section is used to select the preference field (or fields) that you want to update when the consumer completes the double opt-in process. In most cases, you want to use the "Confirmation" field associated with the email address field you selected in step 7. The field drop-down menu is populated with all of the fields in the source table. Optionally, place a check mark in the "Show preferences only" check box to filter this drop-down menu to show only fields that have a Data Type of "Preference." From this menu, select the desired field.
-
Next you need to define the value of the selected field once the consumer completes the double opt-in process. Depending on the Data Type of the field you selected in step 8, you may see a drop-down menu of pre-defined values, or a blank text field. Select or enter the desired value. If using a "Confirmation" field, you should enter a value of "1."
-
Click the add button (plus-sign icon). The system adds the field and value to the list. Repeat steps 8 and 9 as needed to select additional fields. To remove a field from this list, click the remove button ("X" icon) next to the field.
-
In the Tool Ribbon, click Edit > Save. Or, if you're ready to publish and use this Email Submission Handler, click Edit > Save and Publish.
|
|
Click hereClick here
To copy an existing item to use as the basis for a new item:
-
Search for the desired item (see Search for an Item for more details).
-
Click on the item name. The main item screen is displayed and populated with the details of the selected item.
-
In the Tool Ribbon, click Edit > Save As. A "Save as" dialog box is displayed.
-
Enter a name for the new item.
-
By default, the new item will be saved in the same folder location as the base item. Optionally, click the magnifying glass icon to browse to and select a different folder location.
-
Click save a copy. The system creates a copy of the selected item.
|
|
Click hereClick here
To view or edit an Email Submission Handler:
-
Search for the desired Email Submission Handler (see Search for an Item for more details on the available search methods).
-
Click on the Email Submission Handler name. The Email Submission Handler screen is displayed and populated with the details of the selected Email Submission Handler.
-
Optionally, to view detailed information about the Email Submission Handler, click the Email Submission Handler tab in the Tool Ribbon. The Item Details screen is displayed, showing who created the item, who modified it last, and what the last actions taken on the item were. On this screen, click "Related Items" in the Function Menu to see other items in the system that reference or utilize this Email Submission Handler. When finished, click the Edit tab in the Tool Ribbon to return to the main edit screen.
-
Optionally, you can assign one or more tags to your Email Submission Handler. To assign a tag, click on the "Add tag" field in the Edit section of the Tool Ribbon. The system displays a pop-up menu of all the existing tags. You can select one of these tags, or type in a new one and press Enter. You can repeat this process to add more tags. To remove a tag, click the "X" icon next to the tag label.
-
Optionally, to rename the Email Submission Handler, click Edit > Rename. A "Rename Item" dialog box is displayed. Enter a new name for the Email Submission Handler, then click save new name.
-
Make any necessary changes to the Email Submission Handler, such as adding or removing fields, or changing the field values.
-
To save your changes, click Edit > Save in the Tool Ribbon. Or, if you're ready to publish the Email Submission Handler, click Edit > Save & Publish.
|
|
Click hereClick here
To delete an item:
-
Search for the desired item (see Search for an Item for more details).
-
Click on the item name. The main item screen is displayed and populated with the details of the selected item.
-
In the Tool Ribbon, click Edit > Delete. A confirmation dialog box is displayed.
-
Click delete item to confirm the deletion.
Foldered items are moved to the Recycle Bin. Non-foldered items are permanently deleted.
|