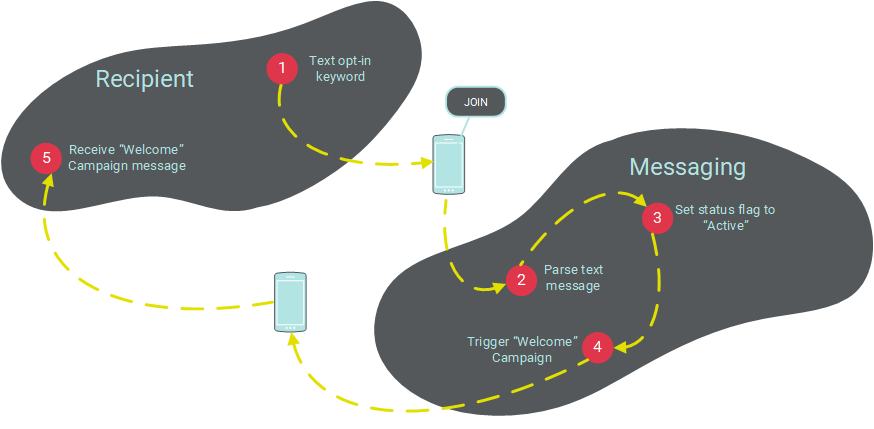
-
From the System Tray, select Campaigns > Management > Campaigns. The Campaigns screen is displayed.
-
In the Tool Ribbon, click Home > New. A "New Item" pop-up window is displayed.
-
To select the folder where you want to save this new Campaign, click the folder name in the Navigation Tree on the left side of this pop-up. The "Where?" field is updated with the selected folder name.
-
In the "Name" field, enter a name for your new Campaign. This name must be unique within the selected folder.
-
From the "Data Source" drop-down menu, select the source table from which this Campaign will pull its audience of recipients.
-
From the "Type" drop-down menu, select "Event-triggered."
-
From the "Channel" drop-down menu, select "SMS."
-
Click save new item. The Workspace is refreshed to show a blank Campaign details screen, where you can configure the details of the Campaign.
-
The trigger mechanism for this Campaign is the receipt of a text message containing any of the Keywords in the Opt-in Keyword Group you created above. To define this trigger, click Edit > Add Trigger in the Tool Ribbon. From the "Add Trigger" drop-down menu, select ""Mobile SMS Response." The "Build Mobile (SMS) Response Criteria" pop-up window is displayed.
-
Place a check mark next to "... to a specific SMS ShortCode." The system creates a new tab named "SMS Short Code."
-
From the "Select a Short Code" drop-down menu, select the Short Code that customers will use to send you text responses.
-
Return to the "Add Criteria" tab. Place a check mark next to " ... with a specific SMS keyword." The system creates a new tab named "SMS Keyword."
-
From the "Select a Keyword" drop-down menu, select the Opt-in Keyword Group you defined above.
-
Click save criteria. The system displays the trigger criteria details within the "Trigger" section.
-
From the "Sender Profile" drop-down menu, select the Short Code that you'll use to send out the "welcome" message.
-
The default audience for a triggered-Campaign is "All Triggered Records." You can optionally apply a Filter to this audience, but for the purposes of an Opt-in response, you likely want to leave the default audience.
-
In the "Content" section, select a message encoding option -- either "Latin 9 (ISO)" or "Unicode."
-
The "Expiration Date" field is used to set an end-date on the Keyword Group bound to this Campaign. You likely want your Opt-in Keyword Group bound to this Campaign indefinitely, so leave this field blank.
-
In the "Content" field, enter the message content. This message should welcome consumers to your SMS Text marketing community. The message must also contain the following required legal information:
-
The number and frequency of expected messages. For example: "You will receive 4 msgs/mo."
-
Instructions for how to receive assistance. For example: "Reply HELP 4 help."
-
Instructions for how to opt-out. For example: "Reply STOP to cancel."
-
Legal disclaimer about data rates. For example: "Msg&DataRatesMayApply."
-
The default Campaign schedule will queue and send messages immediately after receipt of the trigger message. The "Schedule" section allows you to optionally define a customized queueing / sending schedule for your Campaign.
-
The "Responses" section allows you to set up link tracking for any links that the platform detected within your message content.
-
Next you need to "bind" the Opt-in Keyword Group to this Campaign. Binding the Keyword Group means that all responses will be tracked and associated to this Campaign only (Keyword Groups can be bound to only one Campaign at a time). In the Tool Ribbon, click Responses > Add Keyword Response. The "SMS Keyword Responses" dialog box is displayed.
-
From the "Short Code" drop-down menu, select the Short Code to which customers will text their responses.
-
From the "Keyword" drop-down menu, select the Opt-in Keyword Group you created above.
-
From the "Match Phone Field" drop-down menu, select the desired "Phone" field on the Campaign's source table. The system will look for a match between the mobile phone number on the customer's response and the field you select here, in order to identify the customer.
-
Leave the "Confirmation Message" text field blank.
-
Click save response. The system adds a new section named "SMS Keywords" within the "Responses" section of the Campaign detail screen. From this new section, you can see a list of all the automated response Keyword Groups assigned to this Campaign.
-
In the Tool Ribbon, click Edit > Save.
-
In the Function Menu, click "Launching." The Launch screen is displayed.
-
In the Tool Ribbon, click Launch > Launch Campaign.
 SMS Text Channel Setup: Opt-In Welcome Campaign