 Segments
Overview
Segments are groups of consumers that share common characteristics, such as demographics or patterns in interaction history. In the Loyalty platform, Segments are used for targeting promotions, offers, and communications, as well as to manage eligibility to be contacted. Segments may be used in rule conditions as well.
The Segmentation Engine can query consumer data based on any information in the consumer interaction profile, then create a Segment that selects the desired group of individuals. The Segmentation Engine is completely dynamic: consumers may enter or exit Segments in real-time based on their profile changes or most recent interactions.
Segment Computation
Loyalty uses two broad categories of Segment computation:
-
For One Member: All Segments are computed for a Member on demand whenever the Member’s eligibility needs to be determined. For example, when the Member accesses Offers or Challenges from a client interface, their Segment memberships are calculated. This process ensures that a Member’s Segment definition is dynamic and up-to-date. As soon as a Member performs an activity, they may enter or exit Segments.
-
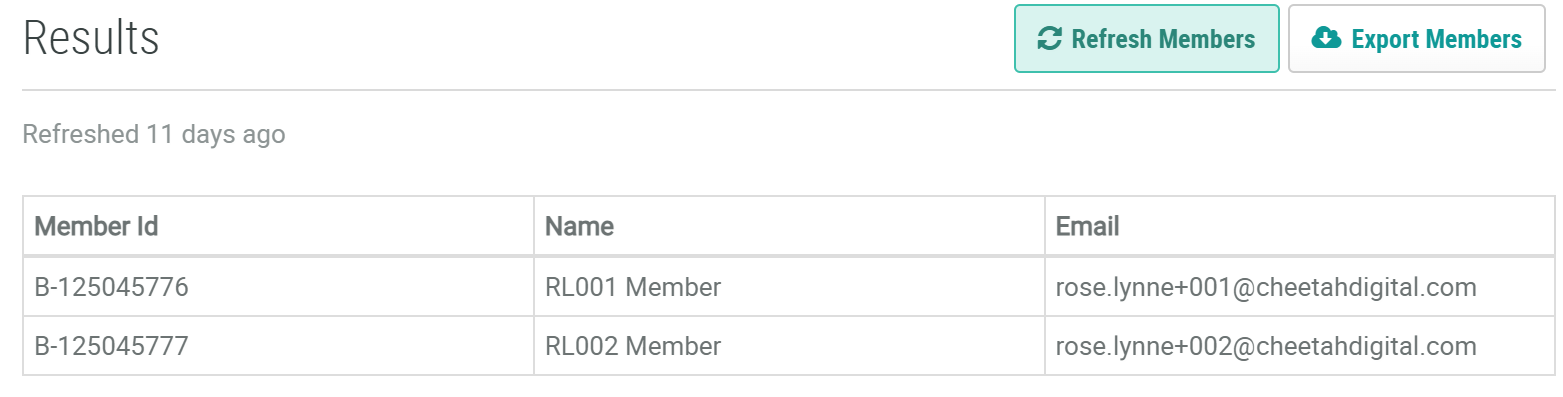
For All Members: While the previous computation keeps a single active Member’s Segments up-to-date, certain batch scenarios (such as sending emails) require the refresh of Segment membership for all Members. A Segment may be manually computed by using the "Refresh Members" action within the Results tab of the Segment Details screen.
In addition to the two computation modes, the platform also supports the concepts of Dynamic and Static Segments.
A Dynamic Segment will immediately add or remove individuals in real-time, whenever their attributes or activity history changes. Every API call will cause the platform to re-evaluate the individual referenced in the API, and determine their inclusion in Dynamic Segments.
A Static Segment is evaluated only when the marketer manually refreshes the Segment, or when the system performs batch processing, such as a message deployment or a Batch Job.
Execution Types
When you're creating a new Segment, you'll be prompted to select an Execution Type. The options available are as follows.
-
EDP (Engagement Data Platform): This Execution Type uses aggregated data, and does not support dynamically-calculated Segments. The EDP Execution Type is primarily intended for use cases where you need to calculate all the individuals that belong in a particular Segment. A common use case for EDP Segments would be email sends, where you're using a Segment to identify the audience of email recipients. EDP is the default Execution Type when you create a new Segment.
-
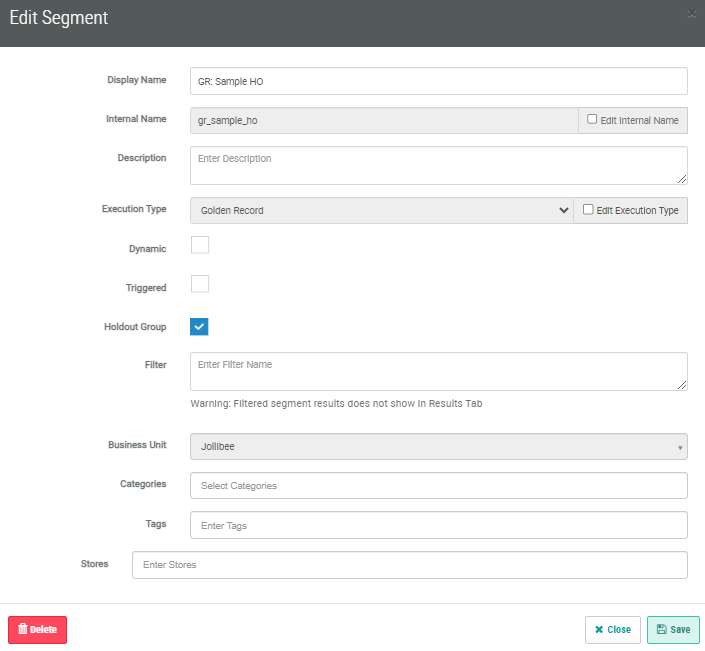
Golden Record: This Execution Type uses a "wide row" design, meaning that everything about an individual is available within a single row. This method is primarily intended for use cases where you need to calculate the Segments to which a single individual belongs. The Golden Record Execution Type supports dynamic Segments that are computed as needed, such as for website personalization. The Golden Record Execution Type also supports the use of custom Groovy code if you need to define more sophisticated logic.
Access
To access the Segments screen, select Members from the Main Navigation Menu, then select Segments from the Sub-Category menu.
Features
Managing Segments
The Segments screen provides the following features related to managing your Segments:
|
SearchThe search feature allows you to search for a specified text string anywhere within the following Segment fields: Display Name, Internal Name, Status, Tag, Category label, or Category name.
SortThe "Sort" drop-down menu allows you to sort the Segments on a variety of different fields. To sort the list of Segments, select the desired sort option from this menu.
NavigationOnce you've found the desired Segment, you can navigate to the following other screens:
|
|
To create a new Segment with an Execution Type of "EDP:"
Note: By default, a new Segment will have an Execution Type of EDP. If you want to make a Golden Record type Segment, you'll need to create a new Segment, then edit the Segment properties to switch it to Golden Record. See Segment Details for more information. |
|
To view or edit the details of a Segment:
|
|
After you've created a Segment and defined its rules for selecting Members, you must deploy the Segment metadata. If you have changed Segments in your account that haven't yet bee deployed, a warning message is displayed at the top of the Segments screen. When you deploy the segment metadata to the server, the process automatically deploys the metadata for ALL modified Segments, so you should always verify what Segments will be deployed before you run the deployment process.
Note: You can deploy metadata immediately, but the best practice is to validate the Segment logic before deploying metadata to ensure no incorrect expression code gets deployed to the server that could cause issues.
Note: You can also deploy segment metadata by selecting "Deploy Segments Metadata" from the "Actions" drop-down menu. |
|
To see the details of what Segment metadata has been deployed:
|
|
Holdout Groups offer a way to measure the performance of campaigns and understand their effectiveness. Creating a holdout group involves a process of reviewing your email marketing program to quantify if the campaigns being sent are generating increased engagement metrics/conversions. This can help clients decide if campaigns are actually giving an incremental increase in engagement metrics, conversions, and an increase in revenue that would otherwise not be realized. Holdout groups may be created for either the EDP or Static Golden Record types of segments and will be supported in refreshing and non-refreshing segments. Holdout groups can be created with an absolute count or as a percentage of the segment which was created via the current segmentation UI. Once the holdout group is generated, you can choose to export the segment to an Engage+ campaign with holdout group information within the segment, download a segment with holdout group information, or download the holdout group members only. Any member in the holdout group will be excluded from actions on the segment.
|
Exporting Segment Data
The Segments screen provides the following features related to exporting Segments.
Export Segments to Engage+
|
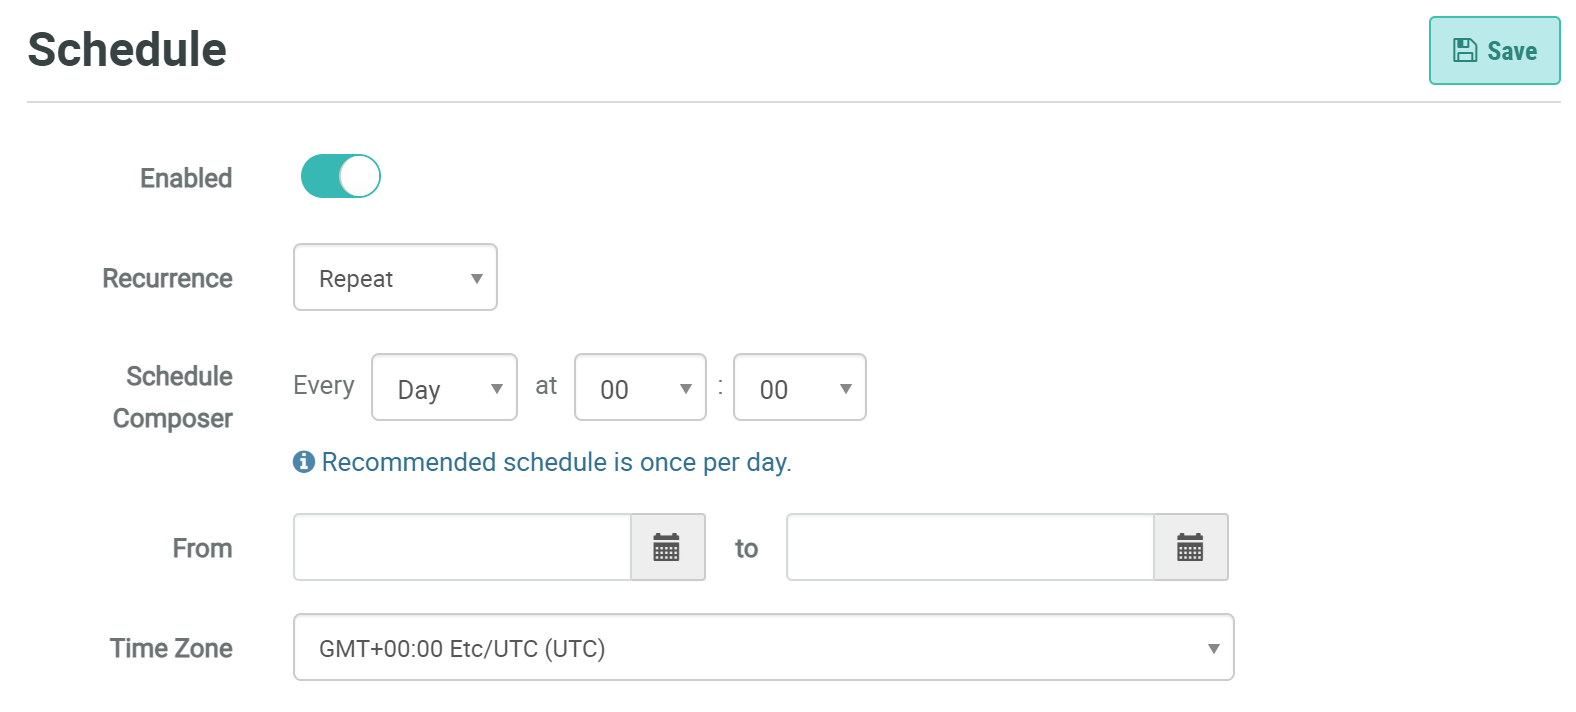
This option allows you to set the segment at a particular cadence via the Scheduled Segments UI. The segment will then refresh and automatically send a segment file to the configured destination. This can be found by navigating to Members > Segments > Schedule. Note: You must create a connection profile and set up the integration with Engage+ first before you can schedule segments for export. Please see this user guide for information on how to complete those steps.
Enabled: The toggle allows you to enable or disable a schedule for segment refresh and export. Recurrence: Repeat- repeat the scheduler at a set cadence as configured in the Schedule Composer. Once- The segment will only run once in its lifetime at the scheduled time. Once selected, the Execute Once option will come up with a calendar object that allows you to pick the date, time, and time zone if desired. Schedule Composer: Enables you to specify how often a segment should refresh and be exported to Engage+. From and To: Specifies the dates between which the scheduler should run. Time Zone: Allows you to specify the time zone for segment refresh.
Make sure to click Save after you have set up your scheduled segment. |
|
This options allows you to manually export segments to Engage+ by refreshing and exporting members. This can be found by navigating to Members > Segments > Results. Note: You must create a connection profile and set up the integration with Engage+ first before you can schedule segments for export. Please see this user guide for information on how to complete those steps.
The Results screen displays the results of a segment, including the Member ID, the name, and the email. Click on the Export Members button. This will enable a manual export to Engage+ or enable you to download the segment file. |
Export Definitions
|
Export definitions can optionally be saved and reused, when you need to download Segments from Loyalty. From the "Actions" drop-down menu in the top-right corner of the screen, select "Export Segments." The "Create New Export - Segments" pop-up window is displayed.
Timing
Define Export ScheduleDefine Export Schedule To define the export schedule:
Define a Repeating Schedule
Notification and TransportIf you checked "Asynchronous" above, this section is displayed.
FieldsThis section allows you to optionally include (or exclude) specific columns in the export file.
RulesThis section allows you to create custom business rules to define which Segments are included in the export file.
You can also group rules by selecting Add Rule Group from the Add icon. Rule Groups have their own internal logical operator.
ChildrenTo export child records joined to the main record:
FinishWhen finished creating the Export Definition, click save. |
|
To view or edit a Segment Export Definition:
|
|
To manually execute a Segment Export Definition:
|
|
To download the last execution of an Export Definition:
|
|
To delete a Segment Export Definition:
|
Last Updated: October 2024