 Import Definition Details
Overview
The Import Definition Details screen provides all of the information about the selected Import Definition.
Control Files
When importing data into Loyalty, the platform supports the optional use of a Control File as a way to validate that the import file has been received correctly. If enabled, the Control File must be provided along with the import file. The Control File should contain one row and one column (without a header row). The value in the Control File must be an integer that represents the record count of the import file (including a column header row, if used).
Loyalty will count all of the records in the import file, and compare that count to the integer in the Control File. If the platform identifies a discrepancy in the record count, then the import file will not be imported and an error message is displayed.
Loyalty allows you to optionally treat multiple import files as a single import job. If you have this feature enabled, ALL files must pass the Control File evaluation criteria, or else the import will fail for all files. If you do not have this feature enabled, the platform evaluates each import file separately against its Control File.
The Control File must conform to the proper naming convention so that the platform can identify the import file to which it corresponds. The Control File must have the exact same name as the import file, but with file extension "control" or "ctrl." For example:
-
Import File Name: member_import_20200821.txt
-
Control File Name: member_import_20200821.control
If you zip the import file, you must also zip its corresponding Control File. For example:
-
Zipped Import File: member_import_20200821.zip
-
Zipped Control File: member_import_20200821.control.zip
If importing multiple files, you can optionally zip all import files together in one file, and zip all their corresponding Control Files in another zip file. For example:
If you encrypt the import file, you must also encrypt its corresponding Control File. For example:
-
Encrypted Import File: member_import_20200821.pgp
-
Encrypted Control File: member_import_20200821.control.pgp
Access
To access the Import Definition Details screen, click on the desired Import Definition from the Imports screen.
Navigation links are provided near the top of the Import Definition Details screen:
Features
|
Click hereClick here
To edit the Import Definition properties:
-
Click the Edit icon next to the Import Definition name. The "Edit Import Definition Name" pop-up window is displayed.
-
Optionally change the Display Name of the Import Definition.
-
If your account is configured to use Business Units, optionally enter one or more Business Units to which this Import Definition applies. A confirmation dialog box is displayed; click confirm.
Note: If you assign a Business Unit to an Import Definition, you can't later change or remove that assignment.
-
From the "Integration Queue Name" field, select a priority ranking for this Import Definition: High, Normal (the default setting), or Low. The platform will automatically process files in the highest possible priority queue unless that queue is empty; then the platform will move to the next-highest possible priority queue, and so on.
-
Click save.
|
|
Click hereClick here
To delete an Import Definition:
-
Click the Edit icon next to the Import Definition name. The "Edit Import Definition Name" pop-up window is displayed.
-
Click delete. A confirmation dialog box is displayed.
-
Click confirm.
|
|
Click hereClick here
Import Definitions can be scheduled to run automatically on a one-time or recurring basis. You can also manually execute an Import Definition as follows:
-
Click run. A confirmation dialog box is displayed.
-
Click confirm.
|
Import Definitions Tables
The Import Definitions screen has several tables from which you can use to import data.
|
Click hereClick here
The Id (Integer) field, which is contained in the mappable fields in the Offer Responses, enables records to accurately update from external systems. You may set Offer Response record updates to be set to a daily schedule.
-
From the Select Table dropdown menu, select Offer Response, enter a Display Name, and click Create.
-
Under the Origin Settings tab, upload your CSV file with appropriate columns: id and processing_status.
-
Under the Action Settings tab, click on the Match Records by field, and select id as the key member identifier.
-
Under the Map & Transform tab, do the following:
-
Add a row. Check the Required box for the id under the Field Name column and select Id (Integer) under the Destination column dropdown.
-
Add a second row under the Field Name column for processing_status. Select Processing_Status (String) under the Destination column dropdown.
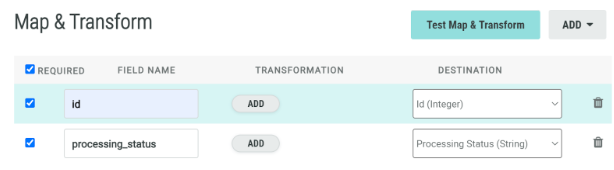
5. Click Save, then Run.
|
|
Click hereClick here
The
Offer Response with Certificate Assignment field enables you to automatically assign certificates during offer response imports from available certificate codes.
-
From the Select Table dropdown menu, select Offer Response with Certificate Assignment, enter a Display Name, and click Create.
-
Under the Origin Settings tab, select the Offer from the Select Offer dropdown, or include a single offer ID in the import file. The Select Offer dropdown will only display published certificate offers and coupon offers where the Certificates on Responses feature is enabled. Note that when an Offer is selected from the dropdown, Offer ID(s) in the import file are disregarded.
-
Under the Action Settings tab, select the Member Identifier in the Match Records by field. Note that the member_id should be included at a minimum. If you do not select the Offer from the Origins screen, you will need to include the Offer ID also. Note that if you include the Offer ID in the import file, each file must then contain a single offer and be for the same Offer ID.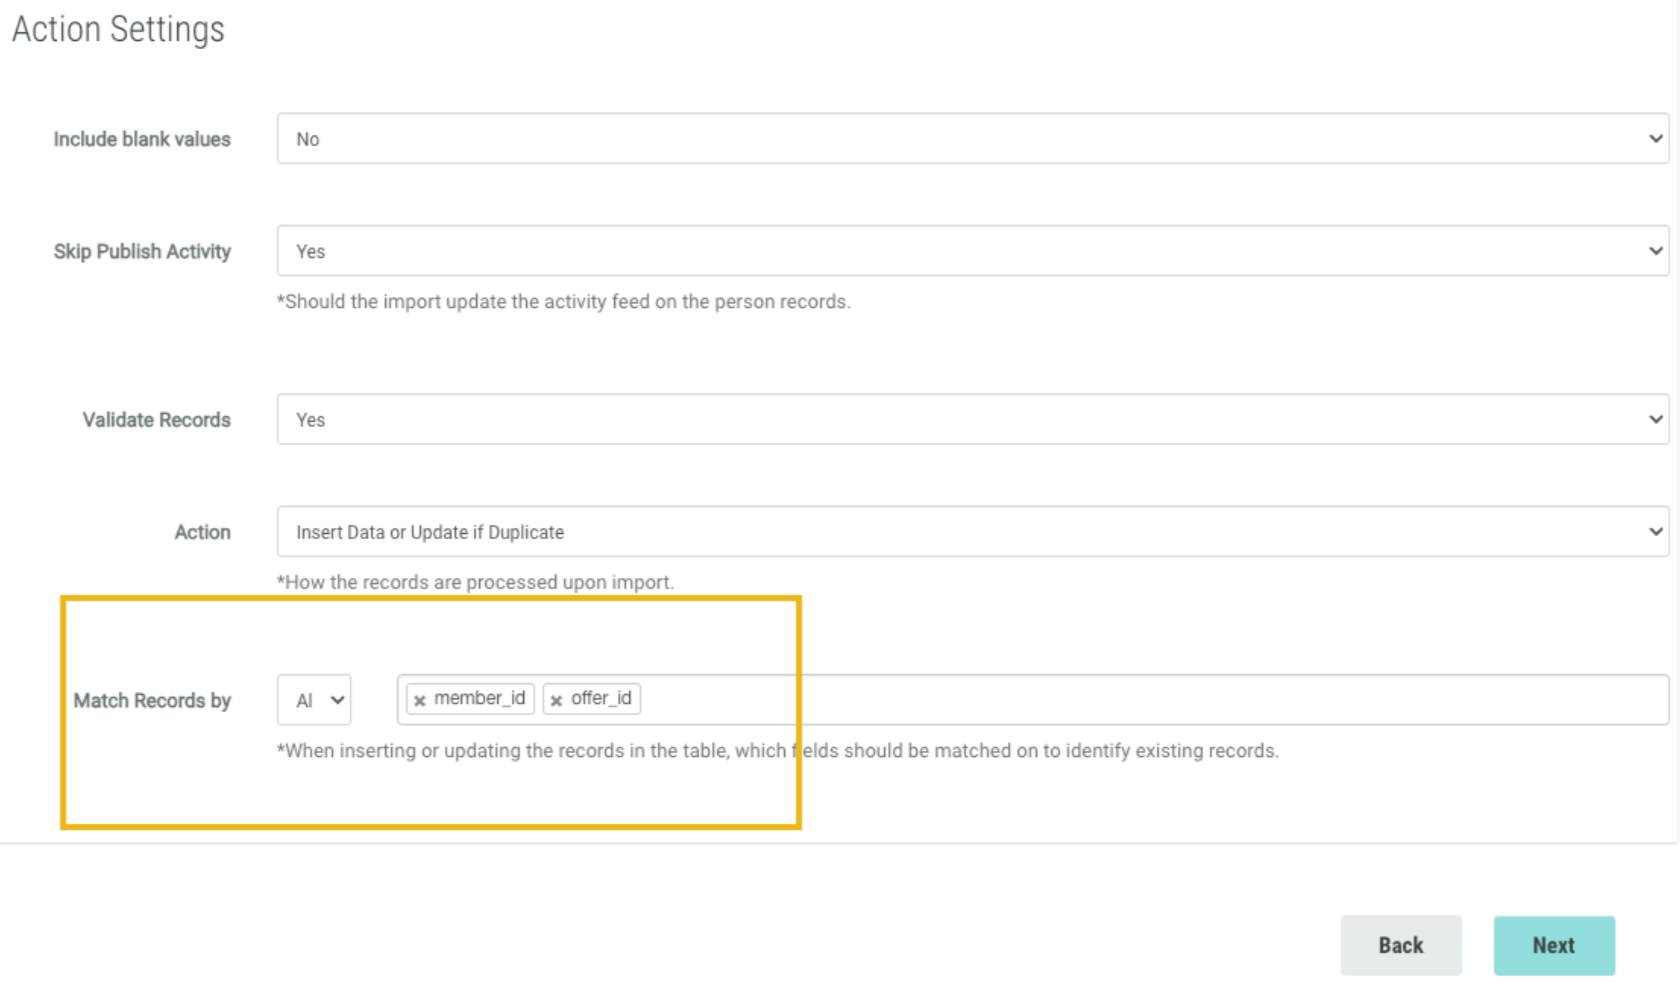
-
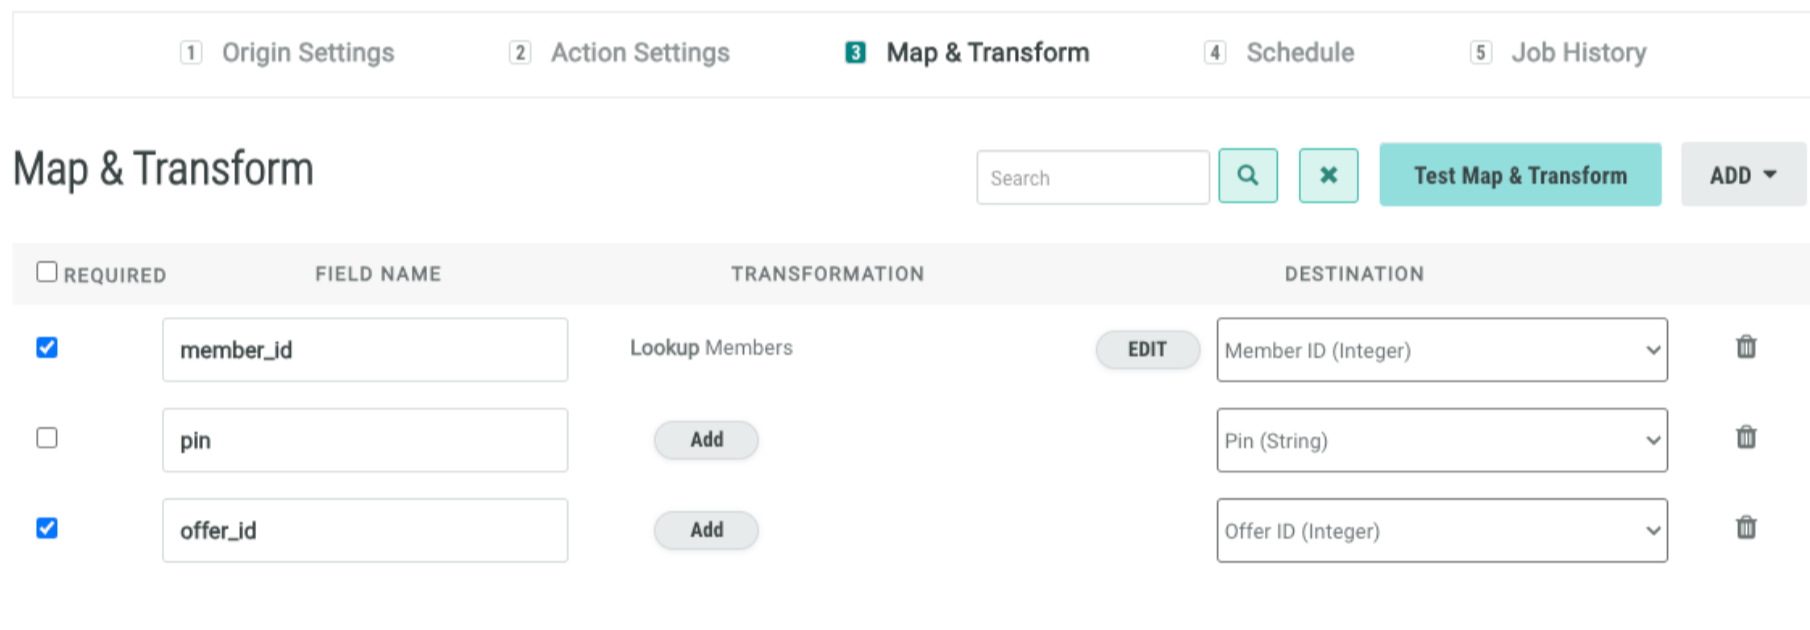
The Map & Transform tab will be dependent on what you have included in your file and what you selected in the Match Records by field. In Map & Transform, whatever identifiers were selected in the Match Records by should be checked in Map & Transform also.
Example:
In this scenario, the user has only included the Member Identifier:
Under the Map & Transform tab, do the following:
Add a row. The Field Name should match the headers in the file. For Member ID, check the required box for the id under the Field Name column.
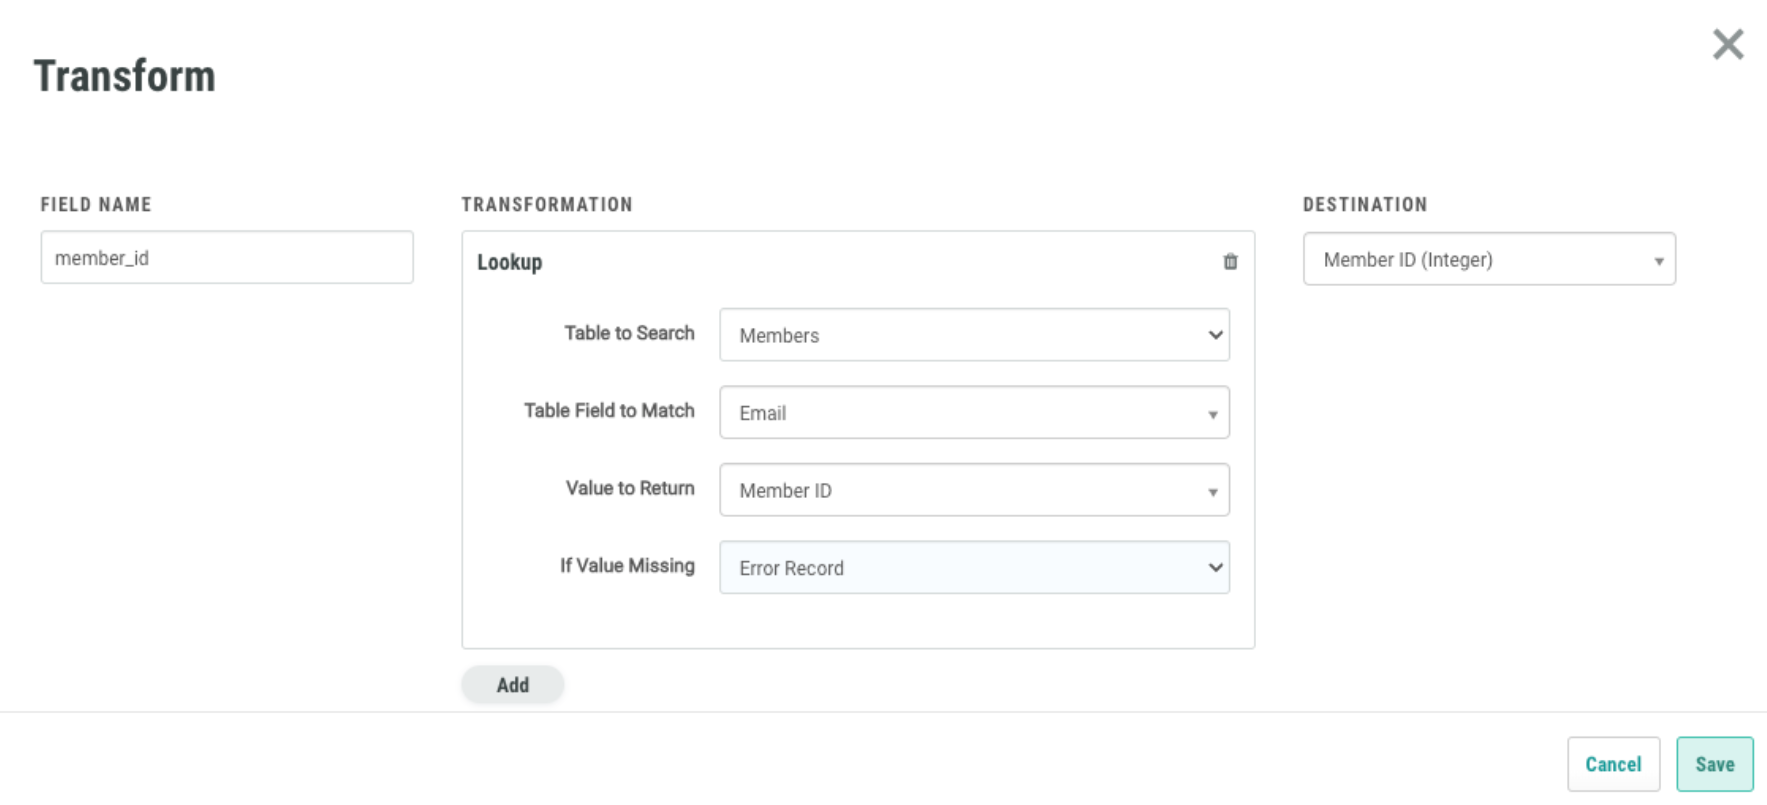
Under the Transformation column, click Add. Then select the following:
- Table Field to Match: Select the member identifier that matches the identifier type included in the file
- Value to Return: Select Member ID
- If Value Missing: Select how you want errors to be handled
- In the Destination field, select Member ID (Integer)
- Click Save.
|
Import Definitions Details
The Import Definition Details screen is split into multiple steps, identified by a series of numbered items across the top of the screen. You can complete these steps (described below) in any order you like.
|
Click hereClick here
-
Click 1: origin settings.
-
The import file can reside either on your local PC, or on an SFTP server or Amazon S3 bucket. These options are described below in more detail.
-
Click save. Or click next to navigate to 2: Action Settings.
Import a File from your Local PC
-
From the "Connector" drop-down menu, select Desktop.
-
Click choose file, then browse to and select the desired import file.
-
From the "File Delimiter" drop-down menu, select a delimiter character, or select Custom Delimiter and enter the custom character.
-
If your import file uses text qualifiers, select the appropriate character from the "Text Qualifier" drop-down menu, or select Custom Qualifier and enter the custom character.
-
From the "File Encoding" drop-down menu, select an encoding method (the default method is UTF-8).
-
If the import file is encrypted, select PGP from the "Encryption Type" drop-down menu.
-
From the "Contains Unescaped Double Quotes" drop-down menu, select Yes if you want to ignore enclosing double quotes. Or, select No if you want the platform to treat enclosing double quotes as the CSV cell container.
-
If the import file has a column header row, select Yes from the "File has Column Header" drop-down menu.
-
Some clients split very large import files into multiple files. In this situation, the platform can be directed to process these multiple files as a single import job, in a specified sequence. To enable this feature, select Yes from the "Process multiple files as one" drop-down menu. Then select the desired sort sequence from the "Sort Files" drop-down menu -- either Ascending - Alphanumeric or Descending - Alphanumeric.
Import a File via SFTP or Amazon S3
-
From the "Connector" drop-down menu, select either Secure FTP or Amazon S3.
-
From the "Connection Profile" drop-down menu, select a Connection Profile (see Connectors for more information on creating Connection Profiles).
-
In the Folder Path field, enter the path to the folder on the server or S3 bucket where the import file is located.
-
In the File Name field, enter the name of the import file. This field supports the use of a date pattern mask, and the use of wild card characters.
-
From the "File Timestamp Time Zone" drop-down menu, select the time zone to use for the file's timestamp.
-
From the "After Import" drop-down menu, identify what to do with the original file after it's been imported:
-
Move File: In the "Folder Path" field, enter the location where you want to move the file.
-
Add Suffix: In the "Suffix" field, enter the text string you want to append to the file name.
-
From the "File Delimiter" drop-down menu, select a delimiter character, or select Custom Delimiter and enter the custom character.
-
If your import file uses text qualifiers, select the appropriate character from the "Text Qualifier" drop-down menu, or select Custom Qualifier and enter the custom character.
-
From the "File Encoding" drop-down menu, select an encoding method (the default method is UTF-8).
-
From the "Contains Unescaped Double Quotes" drop-down menu, select Yes if you want to ignore enclosing double quotes. Or, select No if you want the platform to treat enclosing double quotes as the CSV cell container.
-
If the import file is encrypted, select PGP from the "Encryption Type" drop-down menu.
-
If the import file has a column header row, select Yes from the "File has Column Header" drop-down menu.
-
Some clients split very large import files into multiple files. In this situation, the platform can be directed to process these multiple files as a single import job, in a specified sequence. To enable this feature, select Yes from the "Process multiple files as one" drop-down menu. Then select the desired sort sequence from the "Sort Files" drop-down menu -- either Ascending - Alphanumeric or Descending - Alphanumeric.
-
Optionally, to use a Control File, select Yes from the "Control File Name" drop-down menu, then enter the name of the Control File. This file must be the same name as the import file, with the file extension ".control" or "ctrl."
|
|
Click hereClick here
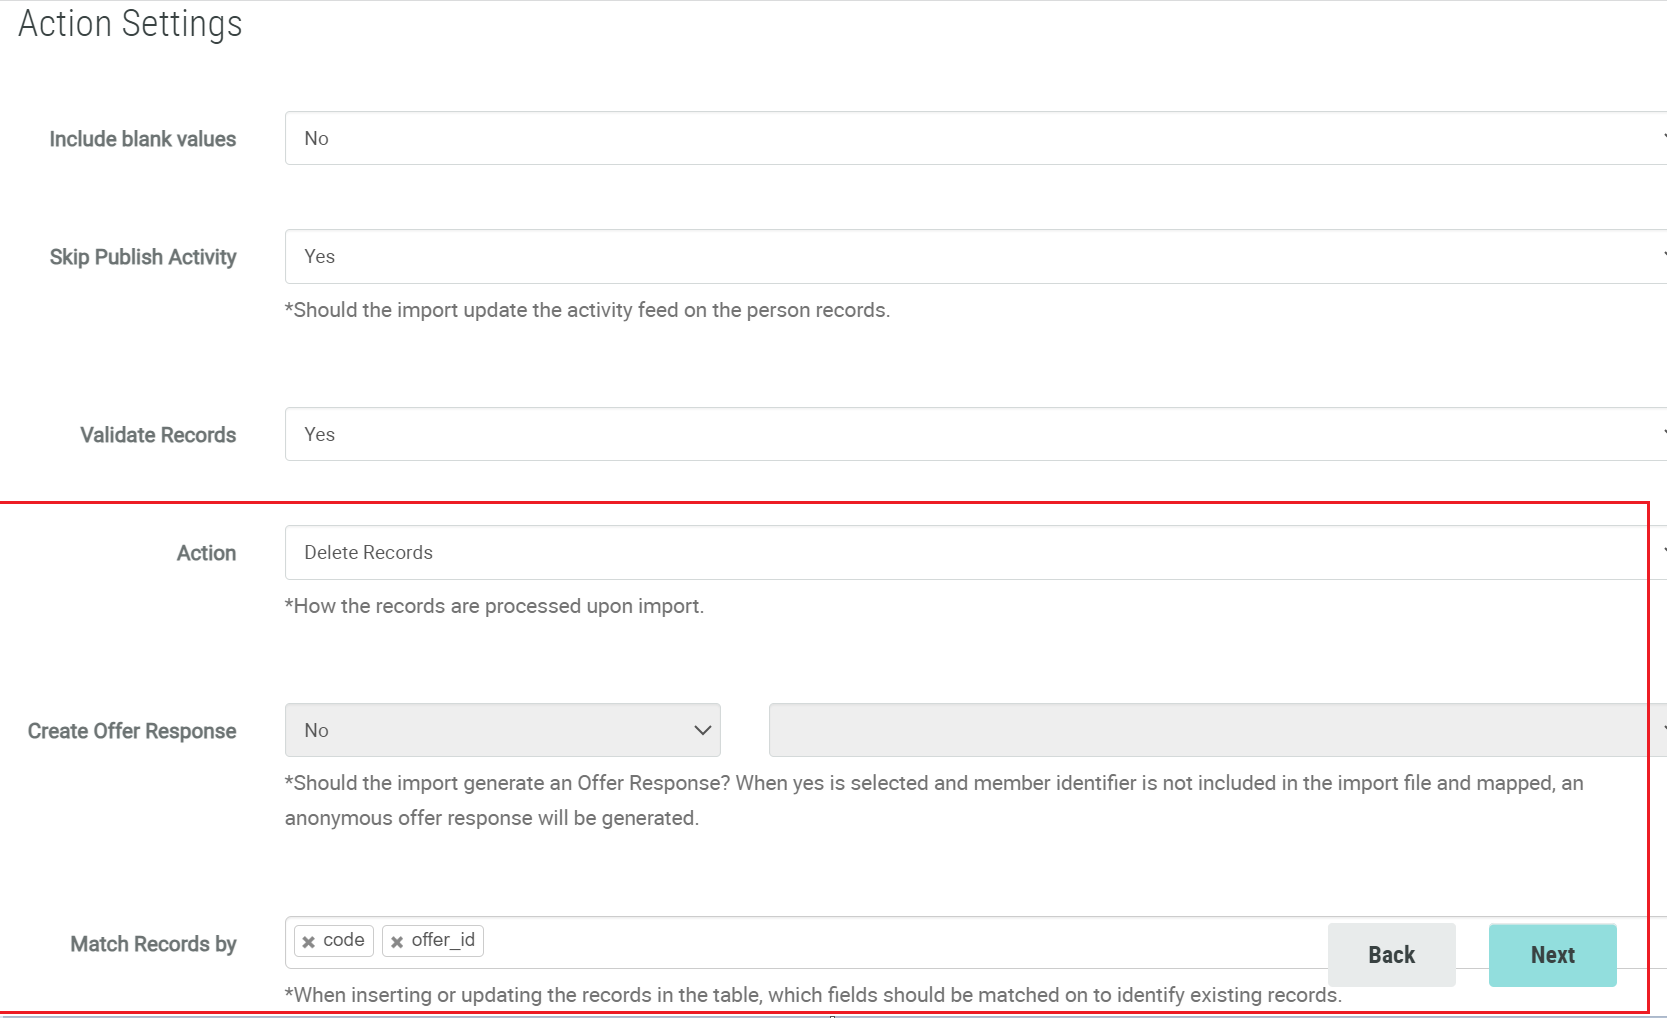
The Action Settings screen is used to define how the platform handles the import data.
-
Click 2: action settings.
-
From the "Include Blank Values" drop-down menu, select either:
-
From the "Skip Publish Activity" drop-down menu, select either:
Note: The default option for Skip Publish Activity is No. This option is enabled typically only for performance reasons.
-
From the "Validate Records" drop-down menu, select either:
-
From the "Action" drop-down menu, identify how you want the platform to handle the import data:
-
Insert Data or Update if Duplicate: Create new records and update existing records.
-
Insert Data or Skip if Duplicate: Create new records only; existing records are ignored.
-
Update Data or Skip Insert: Update existing records only; new records are ignored.
-
Delete Records: Delete existing records.
-
Overwrite All Existing Data: For Lookup tables only, replace the entire Lookup table with the data in the import file.
-
In the "Match Records By" field, enter the primary key (or keys) by which you want to match records in the import file to existing records in the destination table.
-
If you selected more than one Match By field, select a logical operator:
Note: The All / Any selector is optional, and must be enabled in your account. If this feature is not enabled in your account, the platform defaults to using All.
-
Click save. Or click next to navigate to 3: Map & Transform.
Offer Certificates Deletion
Marketers can remove incorrect offer certificates without needing assistance from Marigold.
1. Navigate to Campaigns > Offers, and search for Offer Certificate ID or Certificate Code. Note that in order to be deleted, certificate status is not in an unused or unreserved status nor is the certificate tied to an Offer Response.
2. Navigate to Admin > Integrations > Imports
3. Under Action Settings, select Delete Records under the Action dropdown. Then select No under Create Offer Response.
4. Under the Match Records by field, enter the certificate code and Member ID or Offer ID.
5. Click Save.
|
|
Click hereClick here
The Map & Transform section is used to define the data map for the import file. The data map allows you to identify which column in the import file should be loaded into which field in the destination table. You can either define the data map manually, or upload a file of column header names to define the data map.
-
Click 3: map & transform.
-
You can either define the data map manually, or upload a file of column header names to define the data map. These options are described below in more detail.
-
Click save. Or click next to navigate to 4: Schedule.
Manually Define the Data Map
-
Click add row (or select Add Row from the "Add" drop-down menu).
-
Check "Required" if this column is required.
-
In the Field Name field, enter the name of the column from the import file.
-
To perform a data transformation on this field, click add. From the pop-up menu of available options, click the desired Data Transformation. Repeat this step as needed to define additional data transformations.
-
From the "Destination" drop-down, select the field in the table where this column is to be loaded.
-
Repeat the above steps to define additional columns to import.
-
To remove a column, click the Delete button (trash can icon).
Upload Headers
-
Click upload headers (or select Upload Headers from the "Add" drop-down menu).
-
In the "Upload Headers" pop-up window, click choose file.
-
Browse to and select the desired file.
Note: The file of column header names must be in .csv or .txt format.
-
From the "Delimiter" drop-down menu, select a delimiter character, or select Custom and enter the custom character.
-
Click upload. The Map & Transform screen is populated with the column header names from the import file.
The column header names are displayed within the Field Name field, in the same sequence as they appear in the import file. The platform attempts to map each column name to a field in the destination table. If the platform finds a match, the Destination drop-down menu is pre-populated with that field name.
-
If the platform couldn't identify a field name (or if the field name is incorrect), select the desired field from the "Destination" drop-down menu.
-
To perform a data transformation on a column, click add. From the pop-up menu of available options, click the desired Data Transformation. Repeat this step as needed to define additional data transformations.
-
To remove a column, click the Delete button (trash can icon).
|
|
Click hereClick here
To test your data map and data transformations:
-
Click test map & transform. The "Map & Transform Preview" pop-up window is displayed.
-
Click choose file, and browse to and select the desired test file (this file must include a header row, and contain fewer than 100 rows).
Note: For the test file, the platform will apply the import settings defined in the "Origin Settings" section (such as delimiter character, text qualifier, etc.), so your test file must conform to those same settings. In addition, the platform will validate that the incoming test file field values are compatible with the data types of the destination table fields.
-
Click upload. The test results are displayed. If a row encountered any errors, the row is highlighted in red. Click the "i" icon to the left of the row to view additional details about the error condition(s).
-
Optionally, to download the results of the validation process, click either success rows or failed rows.
-
Optionally, to test another file, click upload another file. When finished, click close.
|
|
Click hereClick here
In addition to running an import on demand, EDP supports the following automated execution options -- run once at a specified date / time, or run repeatedly at a specified frequency.
-
Click 4: schedule.
-
Select one of the following methods:
Schedule Import: on demandSchedule Import: on demand
You can schedule an import to run only when manually executed.
-
-
Toggle Enabled to Yes.
-
From the Recurrence drop-down menu, select On demand.
Schedule Import: run onceSchedule Import: run once
You can schedule an import to process once at a specified date / time.
-
-
Toggle Enabled to Yes.
-
From the Recurrence drop-down menu, select Once.
-
Click into the "Execute Once On field." A calendar pop-up window is displayed.
-
Select the desired date when you want the import to execute.
-
Within the calendar pop-up window, click the clock icon.
-
Define the time when you want the import to execute.
-
From the "Time Zone" menu, select the time zone to use when determining the time to execute.
Schedule Import: recurringSchedule Import: recurring
You can schedule an import to run on a recurring frequency:
-
-
Toggle Enabled to Yes.
-
From the Recurrence drop-down menu, select Repeat.
-
Next to Schedule Composer, select an interval:
-
Hour: Select the minute past the hour.
-
Day: Select the time of day.
-
Week: Select the day of the week, and the time of day.
-
Month: Select the day of the month, and the time of day.
-
Year: Select the day, the month, and the time of day.
-
Optionally, to manually enter a CRON expression, check "Advanced Mode," then enter the expression.
-
Define the import schedule begin and end date. If you leave these date ranges blank, the schedule will run indefinitely.
-
From the Time Zone menu, select the time zone to use when determining the time to execute.
-
Optionally, if you want to send error notifications, toggle Error to Yes, then enter the email addresses for the notification recipients.
-
Optionally, if you want to send success notifications, toggle Success to Yes, then enter the email addresses for the notification recipients.
-
Click save.
|
|
Click hereClick here
To view the execution history of an Import Definition:
-
Click 5: job history. Each execution of an Import is displayed as a row on the Job History screen. Each row indicates the start and end date / time, the current status, and the number of records imported.
-
Optionally, to filter the Job History log by processing status, select a status value from the drop-down menu, then click the Search button.
-
Optionally, to download a log file associate with an execution, select one of the following from the Download menu within the Action column:
-
EDP Log
-
Transofrmation Errors
-
Skipped Records Log
-
Records with Errors
-
Optionally, to view additional details of the import job, click the Show Import Jobs icon within the Action column.
-
Optionally, to delete a job, click the Delete icon within the Action column.
|
Back to Imports