This kit enables you to display a list of product categories, a list of all products, a list of products belonging to a specific product category, and the details of a certain product. This kit also includes an ordering functionality, i.e. cart of products and corresponding checkout.
On this page:
Overview
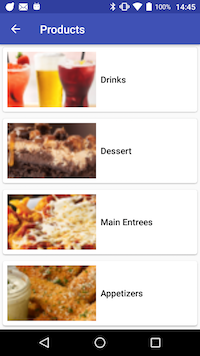
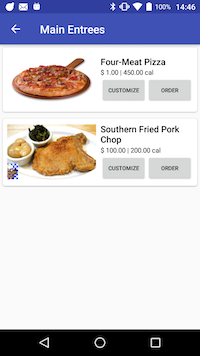
The Products kit can display the list of product categories in the server. Clicking on a category will then bring up the list of products belonging to that category.
To include the Products kit, open the Gradle Scripts | build.gradle (Module: app) and add the following to the
dependencies section:
implementation 'com.cheetahdigital.android:products:<version>'
This kit can also display all the products in the server regardless of category.
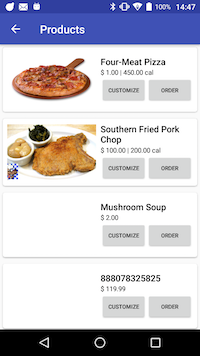
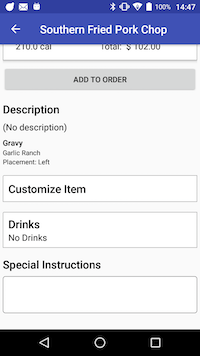
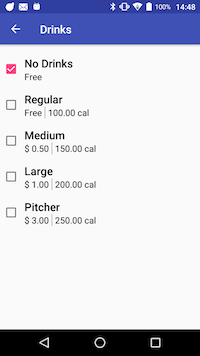
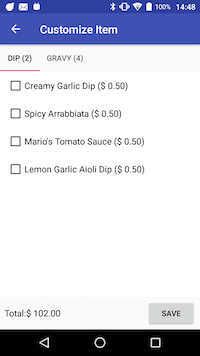
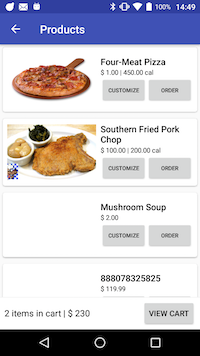
If a product in the list is clicked, it will open up its details page. From the details page, you can customize a product’s attribute (first and second screenshot), component (second and third screenshot), and product group components (second and fourth screenshot). When the user is satisfied, this product configuration along with the specified quantity can then be added to the cart.

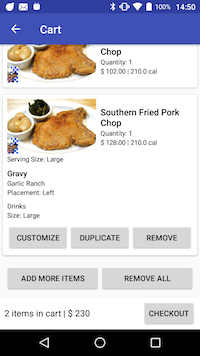
When at least one item was added to cart, a cart strip will be displayed at the bottom of the pages in the Products Kit (first screenshot). The Cart page can be opened by clicking on the View Cart button in the cart strip. The Cart page (second screenshot) displays all the items added to the cart, and has buttons at the bottom of the list for adding another product, and for removal of all items in the cart (second screenshot). If an item in the cart is clicked, that item expands to display the selected attribute and product components of that item. The expanded item will also allow the user to customize that item, duplicate that item, or remove that item (third screenshot).

From the Cart page, you can proceed to the Checkout page by clicking on the Checkout button at the bottom of the page. In the Checkout page, the order summary - subtotal, tax, discount, total, is displayed. The user may also choose which payment method to do the checkout with. If rewards are applicable to the cart items, these rewards will also be displayed here in the Checkout page.
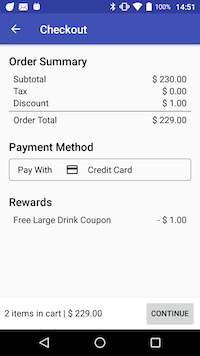
From the Checkout page, you can proceed with the specified payment by clicking on the Continue button. After payment is successful, the transaction will then be forwarded to the server.
Launching the Products Activities
Assuming that the Products kit will be launched from a MainActivity, you can follow these steps to launch the Activities from a Button’s OnClickListener:
- Add the Activities to your
AndroidManifest.xml:
 		<activity
            android:name="com.cheetahdigital.products.ui.productlist.ProductsListActivity"
            android:screenOrientation="portrait">
            <intent-filter>
                <action android:name="${applicationId}.PRODUCTS_LIST" />

                <category android:name="android.intent.category.DEFAULT" />
            </intent-filter>
        </activity>
        <activity
            android:name="com.cheetahdigital.products.ui.details.ProductDetailsActivity"
            android:screenOrientation="portrait">
            <intent-filter>
                <action android:name="${applicationId}.PRODUCT_DETAILS" />

                <category android:name="android.intent.category.DEFAULT" />
            </intent-filter>
        </activity>
        <activity
            android:name="com.cheetahdigital.products.ui.productcategory.ProductCategoriesActivity"
            android:screenOrientation="portrait">
            <intent-filter>
                <action android:name="${applicationId}.PRODUCT_CATEGORIES" />

                <category android:name="android.intent.category.DEFAULT" />
            </intent-filter>
        </activity>
        <activity
            android:name="com.cheetahdigital.products.ui.orderlist.OrdersActivity"
            android:screenOrientation="portrait">
            <intent-filter>
                <action android:name="${applicationId}.PRODUCTS_ORDERS" />

                <category android:name="android.intent.category.DEFAULT" />
            </intent-filter>
        </activity>
        <activity
            android:name="com.cheetahdigital.products.ui.checkout.CheckOutActivity"
            android:screenOrientation="portrait">
            <intent-filter>
                <action android:name="${applicationId}.PRODUCTS_CHECKOUT" />

                <category android:name="android.intent.category.DEFAULT" />
            </intent-filter>
        </activity>
        <activity
            android:name="com.cheetahdigital.products.ui.productattribute.ProductAttributesActivity"
            android:screenOrientation="portrait">
            <intent-filter>
                <action android:name="${applicationId}.PRODUCT_ATTRIBUTES" />

                <category android:name="android.intent.category.DEFAULT" />
            </intent-filter>
        </activity>
        <activity
            android:name="com.cheetahdigital.products.ui.component.ProductGroupComponentsActivity"
            android:screenOrientation="portrait">
            <intent-filter>
                <action android:name="${applicationId}.PRODUCT_GROUP_COMPONENT" />

                <category android:name="android.intent.category.DEFAULT" />
            </intent-filter>
        </activity> <!-- End of Products -->
-
Start the Activities using
Intent -
You can also use the
ProductCategoriesFragmentorProductListFragmentin your own activity layout. You can declare a layout element such as aFrameLayoutin your activity’s xml file. Then add your fragment to the layout using aFragmentTransaction.
<FrameLayout
	android:id="@+id/products_fragment"
	android:layout_width="match_parent"
	android:layout_height="match_parent"/>
ProductCategoriesFragment fragment = new ProductCategoriesFragment();
FragmentTransaction ft = getSupportFragmentManager().beginTransaction();
ft.add(R.id.products_fragment, fragment).commit();

ProductListFragment fragment = new ProductListFragment();
ft.add(R.id.products_fragment, fragment).commit();
List of Activities and Fragments
ProductCategoriesActivityandProductCategoriesFragmentfor displaying the list of product categories.ProductsListActivityandProductListFragmentfor displaying the list of all products in the server.ProductDetailsActivityfor displaying the details of a product.ProductGroupComponentsActivityfor displaying the Customize Item page of a product. This Customize Item page displays the product group components in a ViewPager. This ViewPager uses theProductComponentFragmentfor each tab.ProductAttributesActivityfor displaying the product attributes of a product’s component.OrdersActivityandOrderListFragmentfor displaying the Cart page.CheckoutActivityfor displaying the Checkout page.
Theme Customization
The Kits leverage on Android’s built-in support for Styles and Themes. Overriding the Styles and Themes of the app will also change the corresponding Views used in this kit.
Layout Customization
Customizing Layouts via XML
You can customize the layouts of the different screens in the Groups kit by copying the layout XML’s and overriding as desired. To read more about this, please visit the Layout Customization via XML document. The XML’s used are:
activity_checkout- used to display the Checkout pageactivity_orders- used to display the Cart pageactivity_product_attributes- used to display the selection of product attributes of a product componentactivity_product_categories- container layout for list of product categoriesfragment_product_categories- used to display the list of product categoriesactivity_product_details- used to display the details of a productactivity_product_group_component- used to Customize Item page/customization of product group components of a productfragment_product_group_component- used to display a specific product group component in the ViewPager displayed in Customize Item pageactivity_product_list- container layout for a list of productsfragment_product_list- layout used to display a list of productslayout_product_component_item- used to display a selected product component in the product details pagelist_item_coupon- item layout for a reward in the Checkout pagelist_item_order- layout for an item in the Cart pagelist_item_order_component- layout for each component configuration displayed in the expanded view of an item in the Cart pagelist_item_order_component_attribute- layout for each attribute of a component displayed in the expanded view of an item in the Cart pagelist_item_order_footer- layout used for the list footer in the Cart page. This contains the Add New Item and Remove All buttonslist_item_order_header- layout used for the list header in the Cart page. This contains the Place Selection layoutwidget_order_location- layout used for the list header in the Cart pagelist_item_payment- item layout for a payment method in the Checkout pagelist_item_product- item layout for a product in a list of productslist_item_product_category- item layout for a product category in the list of product categorieslist_item_product_component_attribute- item layout for a product component attribute when tapping on a product component in the details pagelist_item_product_component_grp- item layout for a product group component in the Customize Item pagelist_item_product_component- item layout for a product component of a group component in the Customize Item page
Customizing Layouts via Code
There are certain cases that you may want to use a highly-customized layout for an Activity/Fragment. To read more about this, please visit the Layout Customization via Code document. The classes used by the Products kit are indicated in List of Activities and Fragments.
Customizing Handlers
There are certain cases that you may want to change the default behavior of an Activity/Fragment. You can achieve this by extending the class that you want to customize and overriding as necessary.
Handlers may occur in different places:
- Adapters - for Lists
- Member Variables inside Activities or Fragments
- Member Variables inside Custom Widgets - for stand-alone Custom Widgets
Just follow the steps mentioned in Customizing Layouts via Code, and override the methods related to the handling that you want to customize. The Activites and Fragments used by the Products kit are indicated in List of Activities and Fragments. The Adapters used are the following:
OrdersAdapter- used to display the list of items in the Cart pagePaymentsAdapter- used to display the list of payment methods available in the Checkout pageProductAdapter- used to display the list of productsProductCategoriesAdapter- used to display the list of product categoriesProductComponentsAdapter- used to display the list of product components of a certain product
The following are the widgets used in the Products Kit:
CartStrip- used to display the cart strip in all the pages in the Products KitOrderLocationWidget- used to display the list header in the Cart page
Fully Custom UI
Products
The ProductsAPI class contains different GET methods for querying all the products, a specific product, all the product categories, and all the products belonging to a specific product category. Pass a true to the clearCache parameter to remove cached response prior to sending the actual request.
Retrieving List of Product Categories
getProductCategories(ProductsParams productsParams, boolean clearCache, ListenerModel<BaseModel<Categories>, Categories> listener)
Retrieving List of Products
getProducts(ProductsParams productsParams, boolean clearCache, ListenerModel<BaseModel<Products>, Products> listener)
Retrieving a Product by ID
getProduct(ProductsParams productsParams, boolean clearCache,
                           ListenerModel<BaseModel<Product>, Product> listener)
Transactions
The TransactionsAPI class contains a PUT method for getting the rewards of a user given a certain set of items, and a POST method for passing the transaction details after payment is done.
Get Rewards
getDiscounts(TransactionsParams transactionsParams, Transaction transaction,
                             ListenerModel<BaseModel<TransactionResult>, TransactionResult> listener)
Submit Transaction
~~~ java
submitTransaction(TransactionsParams transactionsParams, Transaction transaction,
ListenerModel<BaseModel
To help with using TransactionAPI’s API calls, we’ve created the following class and method:
OrderStore- contains the Cart items. To add a Product item, use theaddOrderItemmethod that takes anOrderItem. AnOrderItemobject contains a Product item, and a quantity value.TransactionUtils.fromOrders(Order orders, String storeId, String terminalId)- static method that transforms aOrderinstance into aTransaction. You have to supply your own unique store ID and terminal ID.