The Preferences kit provides the following features: retrieving the preferences, adding user preferences and removing user preferences.
On this page:
Overview
The Preferences kit follows the Master / Detail View behavior.
To include the Preferences kit, open the Gradle Scripts | build.gradle (Module: app) and add the following to the
dependencies section:
implementation 'com.cheetahdigital.android:preferences:<version>'
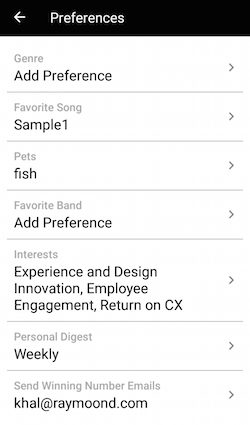
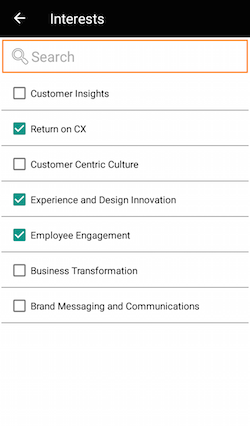
In the Preference Details page, users may pick their choice of preference. They can choose only one or many depending on the set is_multi_select attribute on the server.
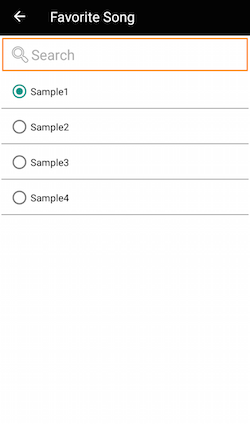
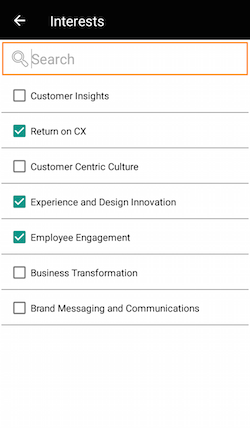
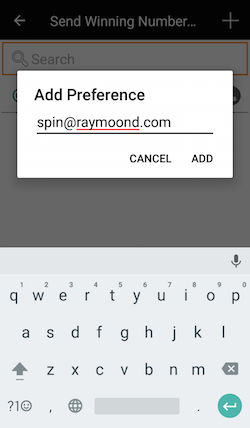
Users may also add their own choice of preference by clicking on the + button on the upper right side of the toolbar which will be saved on the server.
Note: Some preference do not have a + button because the is_unbounded attribute set on the server is false.

Launching the Preferences Activity
Assuming that the Preferences kit will be launched from a MainActivity, you can follow the succeeding steps to launch the StellarPreferencesActivity from a Button’s OnClickListener:
- Add the following Preferences Activities to the Manifest
PreferencesActivityPreferencesDetailActivity
<activity android:name="com.cheetahdigital.preferences.ui.list.PreferencesActivity"> <intent-filter> <action android:name="${applicationId}.PREFERENCE" /> <category android:name="android.intent.category.DEFAULT" /> </intent-filter> </activity> <activity android:name="com.cheetahdigital.preferences.ui.detail.PreferencesDetailActivity"> <intent-filter> <action android:name="${applicationId}.PREFERENCE_DETAILS" /> <category android:name="android.intent.category.DEFAULT" /> </intent-filter> </activity> -
Launch
PreferencesActivity:startActivity(new Intent(Action.Preferences.getPreferenceActivityAction (MainActivity.this))
Theme Customization
The Kits leverage on Android’s built-in support for Styles and Themes. Overriding the Styles and Themes of the app will also change the corresponding Views used in this kit.
Layout Customization
Customizing the Preferences List
You can customize the layouts of the different screens in the Preferences kit by copying the layout XML’s and overriding as desired. To read more about style-able Layout XMLs, please visit the Layout Customization via XML document. The layout XMLs for the Preferences kit are:
fragment_preferences.xml- layout for the list of preferencesfragment_preferences_detail.xml- layout for the details page of a preferencefragment_preferences_add_dialog.xml- layout for the dialog that pops up when a user adds a preferencelayout_preference_single_item.xml- layout for the preference option if it’s a single choice itemlayout_preference_multi_select.xml- layout for the preference option if it’s a multiple choice itemlist_item_preferences.xml- layout for the preference list item
Customizing Layouts via Code
There are certain cases that you may want to use a highly-customized Layout for an Activity. To read more about this, please visit the Layout Customization via Code document. The classes used for the Preferences kit are:
PreferencesActivityandPreferencesFragmentfor displaying the list of preferencesPreferencesDetailActivityfor displaying the details page of a single preference
Customizing Handlers
There are certain cases that you may want to change the default behavior of an Activity or Fragment. You can achieve that by extending the class that you want to customize and override as necessary.
Handlers may occur in different places:
- Adapters - for lists
- Member variables inside Activities or Fragments
- Member variables inside custom Widgets - for stand-alone custom Widgets
To start with, you may look at the classes mentioned in Customizing Layouts via Code, along with PreferencesAdapter which is used to display the list of preferences.
Fully Custom UI
If changing the layout does not suffice for your case, you can always do a full customization. The following are the methods you can use from the PreferencesAPI class:
Get preferences
getPreferences(PreferencesParams preferencesParams, boolean clearCache, ListenerModel<BaseModel<List<Preference>>, List<Preference>> listener)
Update preferences
updatePreferences(PreferencesParams preferencesParams, PreferencesFields preferencesFields,
                                  Listener<SuccessResponse> listener)
Add preferences
addPreference(PreferencesParams preferencesParams, PreferencesFields preferencesFields,
                              Listener<SuccessResponse> listener)
Remove preferences
removePreference(PreferencesParams preferencesParams, PreferencesFields preferencesFields, Listener<SuccessResponse> listener)