The Places kit lets you present locations, that are meaningful to your brand, to your members. Use the marketing console to mark places of interest like stores, kiosks, etc. The kit displays these locations on a list and on a Google Maps view.
This kit can also be used for listening to location events such as a member entering / exiting / staying in an area. The marketer may want to react to that event immediately by showing an Offer, Survey, or Challenge related to the location.
To include the Location kit, open the Gradle Scripts | build.gradle (Module: app) and add the following to the
dependencies section:
implementation 'com.cheetahdigital.android:location:<version>'
On this page:
Overview
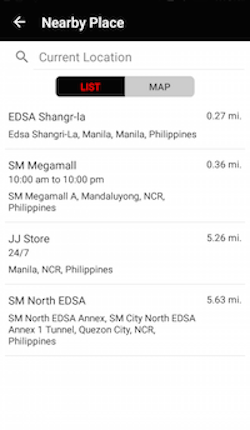
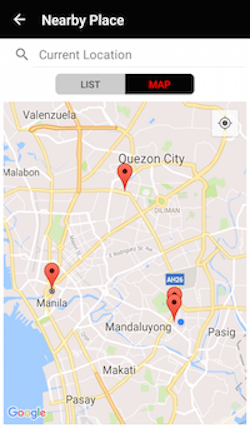
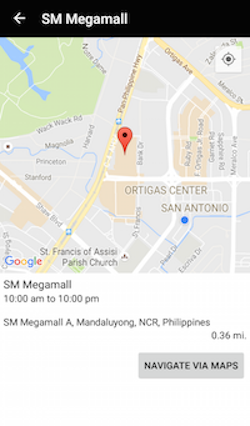
The Places module follows the Master / Detail navigation flow. The master uses a Recyler view and a Map view to display the list of places. Clicking a list item or a map marker will open the details view that shows detailed information about the place.
Prerequisites
Before you can start using the Places Map View or Geofencing, you’ll need to:
- Get a Google Maps API key
- Add the API key to your application
-
Declare access fine location in your
AndroidManifest.xml<uses-permission android:name="android.permission.ACCESS_FINE_LOCATION"/>
For details on these requirements, see Maps Android API Project Setup
Launching the Places Activity
- Create a new Activity that contains a placeholder view for a Fragment.
- Add either the
PlacesListFragment,NearbyPlacesFragmentorPlacesMapFragmentas the content of your Fragment placeholder. - Another option is to put the said fragments in a ViewPager.
Enabling Geofence Monitoring
-
Add the following to the
AndroidManifest.xml.<!-- Geofence Receivers and Services --> <service android:name="com.cheetahdigital.locations.ui.geofences.GeofenceJobService" android:exported="true" android:permission="android.permission.BIND_JOB_SERVICE" /> <service android:name="com.cheetahdigital.locations.ui.geofences.GeofenceNotificationJobService" android:exported="true" android:permission="android.permission.BIND_JOB_SERVICE" /> <receiver android:name="com.cheetahdigital.locations.ui.geofences.ThresholdTransitionReceiver" android:exported="true" /> <receiver android:name="com.cheetahdigital.locations.ui.geofences.GeofenceTransitionReceiver" android:exported="true" /> <!-- End of Geofence --> -
Then enable the Geofencing feature by declaring this on your resources file.
<!-- Geofence Configuration -->
<bool name="geofencing_enabled">true</string>
Theme Customization
The Kits leverage on Android’s built-in support for Styles and Themes. Overriding the Styles and Themes of the app will also change the corresponding Views used in this kit.
Layout Customization
Customizing Layouts via XML
You can customize the layouts of the different screens in the Places kit by copying the layout XML’s and overriding as desired. To read more about style-able layout XMLs, please visit the Layout Customization via XML document. The XML’s used are:
activity_nearby_places.xml- layout used for displaying places on a list and mapactivity_place_detail.xml- layout for the place detailslist_item_nearby_place.xml- list item layout for the place
Customizing Layouts via Code
There are certain cases that you may want to use a highly-customized layout for an Activity/Fragment. To read more about this, please visit the Layout Customization via Code document. The classes used for the Leaderboards kit are:
PlacesActivityandPlacesListAndMapFragmentfor displaying both the list and map in aViewPager.PlaceDetailActivityfor displaying the place detailsPlacesListFragmentfor displaying the places on a listPlacesMapFragmentfor displaying the places on a map
Customizing Handlers
There are certain cases that you may want to change the default behavior of an Activity. You can achieve that by extending the Activity that you want to customize and override as necessary.
Handlers may occur in different places:
- Adapters - for Lists
- Member Variables inside Activities or Fragments
- Member Variables inside Custom Widgets - for stand-alone Custom Widgets
To start with, you may look at the classes mentioned in Customizing Layouts via Code, along with PlacesAdapter which is used to display the places in a list.
Fully Custom UI
If changing the layout does not suffice for your case, you can always do a full customization. You can use the following methods from the PlacesAPI class:
Get All Places
getPlaces(PlacesParams queryParams, boolean clearCache, ListenerModel<BaseModel<Places>, Places> listener)
Get Place Details
getPlace(PlacesParams queryParams, boolean clearCache, ListenerModel<BaseModel<Place>, Place> listener)
Get Events for a Place
getPlaceEvents(PlacesParams queryParams, boolean clearCache, ListenerModel<BaseModel<ClientEvents>, ClientEvents> listener)